
Are you ready to hang shelves, mount a mirror, or install hooks on your tile wall but don’t know where to start? Drilling into tile can feel tricky and risky—you worry about cracking or damaging your beautiful surface.
But what if you had a simple, step-by-step guide that made the whole process easy and safe? You’ll discover exactly how to drill tile walls without stress or mistakes. By the end, you’ll have the confidence and know-how to get the job done perfectly.
Keep reading, because your next home project is about to get a whole lot easier.
Choosing The Right Tools
Choosing the right tools is key to drilling a tile wall without damage. The right tools make the job easier and safer. Using the wrong tools can crack tiles or cause injury. Focus on drill bits, the drill itself, and safety gear. These three parts affect your success the most.
Types Of Drill Bits For Tile
Use drill bits made for tile or glass. Carbide-tipped bits work well for ceramic tiles. Diamond-tipped bits are best for harder materials like porcelain. Avoid regular wood or metal bits. They can cause tiles to crack or chip. Start drilling slowly to keep control and reduce heat.
Selecting The Best Drill
Pick a drill with variable speed control. A cordless drill with a low-speed setting works great. Hammer drills can damage tiles, so avoid them. A drill with a side handle gives better control. Keep the drill steady and apply light pressure.
Safety Gear Essentials
Always wear safety glasses to protect your eyes from dust and chips. Use a dust mask to avoid breathing in tile particles. Gloves protect your hands from sharp edges. Hearing protection helps if the drill is loud. Prepare your workspace to keep it clean and safe.

Credit: www.uglyducklinghouse.com
Preparing The Tile Surface
Preparing the tile surface is a key step before drilling. It helps protect the tile and ensures a clean hole. Careful preparation reduces the risk of cracks and damage.
Cleaning And Marking The Spot
First, clean the tile surface with a soft cloth and mild cleaner. Remove all dust, dirt, and grease. A clean surface helps the drill bit grip better.
Next, mark the spot where you want to drill. Use a pencil or a non-permanent marker. Make a small dot to guide the drill bit precisely.
Using Tape To Prevent Cracks
Place a piece of masking tape over the marked spot. The tape holds the surface and stops cracks from spreading. It also helps the drill bit stay steady.
Press the tape firmly on the tile. Drill through the tape to reduce slipping and chipping. This simple step protects your tile effectively.
Drilling Techniques
Drilling into a tile wall requires specific techniques to avoid cracks and damage. Tiles are hard and brittle, so careful handling is key. Using the right drilling methods helps create clean holes and keeps tiles intact. Here are important drilling techniques to follow.
Setting The Drill Speed
Use a slow drill speed for tiles. High speed can cause the tile to crack. Start drilling at a low speed to control the process better. Slow speed reduces heat and stress on the tile. Adjust the speed as you drill deeper, keeping it steady.
Applying Proper Pressure
Press gently on the drill. Too much pressure can break the tile. Let the drill bit do the work. Applying steady, light pressure avoids slipping and damage. If you feel resistance, pause and check the drill position.
Cooling The Drill Bit
Keep the drill bit cool to prevent overheating. Overheated bits can dull quickly and harm the tile. Use water or a damp cloth to cool the bit while drilling. Stop drilling now and then to cool the bit naturally. Cooling helps the drill bit last longer and makes cleaner holes.
Handling Different Tile Materials
Drilling tile walls requires care and the right tools. Different tile materials need different handling. Understanding the type of tile helps avoid cracks and damage. Each tile type responds to drilling in its own way.
Drilling Ceramic Tiles
Ceramic tiles are common and easier to drill. Use a carbide-tipped drill bit for best results. Start with a slow speed to avoid slipping. Place masking tape on the tile for grip. Drill gently with light pressure. Keep the drill straight to prevent cracks.
Drilling Porcelain Tiles
Porcelain tiles are denser and harder than ceramic. Use a diamond-tipped drill bit for porcelain. Begin with a slow drill speed to reduce heat. Apply water to cool the drill bit. Avoid pushing hard; let the drill do the work. Patience is key to avoid breaking the tile.
Drilling Glass Tiles
Glass tiles need extra caution because they are fragile. Use a diamond or carbide-tipped drill bit. Start drilling at an angle to create a guide hole. Use water to cool the area constantly. Drill slowly and gently, without applying too much force. Support the tile from behind to prevent shattering.
Fixing Common Issues
Drilling into tile walls can cause some problems. These issues may stop your work and damage the tile. Fixing these common problems quickly helps keep your project on track. Here are simple ways to solve frequent tile drilling troubles.
Dealing With Cracks
Cracks happen if the drill slips or pressure is too high. Stop drilling immediately if you see a crack. Use a small piece of tape over the spot before drilling next time. Tape helps hold the tile and stops cracks.
Try using a lower drill speed and less pressure. A steady hand is key. If cracks appear, fill them with clear epoxy to stop spreading. Let it dry fully before continuing.
Removing Stuck Drill Bits
Sometimes drill bits get stuck in the tile. Don’t force it out. Gently turn the drill in reverse to loosen the bit. Use pliers if the bit won’t come out easily.
To avoid stuck bits, use a bit made for tile drilling. Keep the drill steady and use slow speed. Cool the bit with water to reduce heat and stickiness.
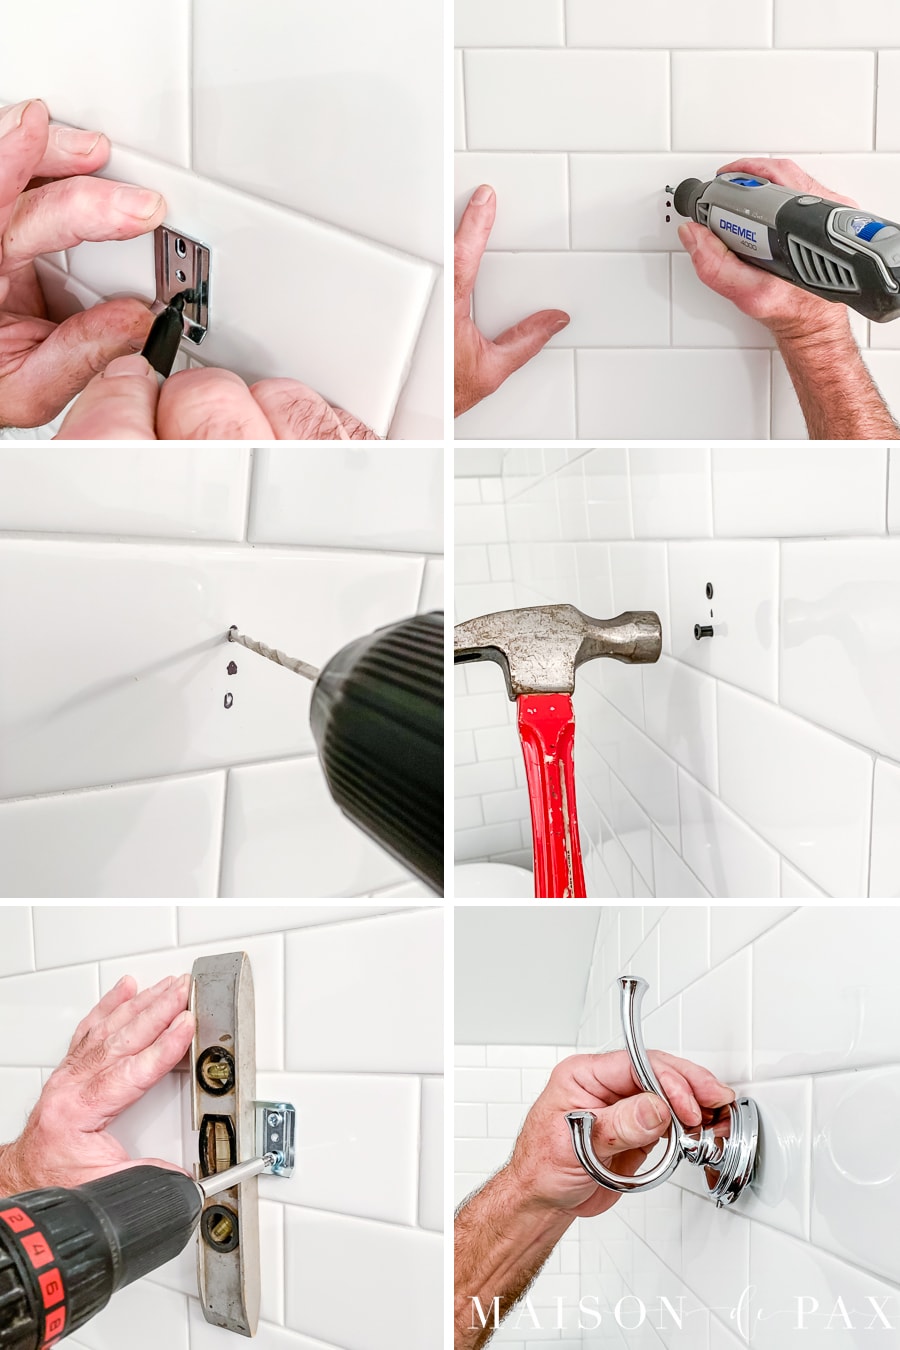
Credit: www.maisondepax.com
Finishing Touches
After drilling into a tile wall, the work is not done yet. The finishing touches ensure a clean look and secure installation. These steps protect your tile and make your fixture hold firmly. Proper care now prevents damage and makes the job last longer.
Cleaning The Hole
Clear out dust and small tile bits from the hole. Use a small brush or a vacuum cleaner nozzle. Make sure the hole is dry and free of debris. This helps anchors or screws fit tightly. A clean hole also stops moisture buildup that can cause damage.
Installing Anchors Or Fixtures
Choose the right anchors for your tile type and weight. Gently tap the anchor into the hole without cracking the tile. Screw in fixtures carefully to avoid over-tightening. Tighten just enough to hold the item firmly in place. Check for stability to ensure your fixture will not fall.

Credit: www.youtube.com
Frequently Asked Questions
How Do I Safely Drill Into A Tile Wall?
Use a carbide-tipped drill bit designed for tiles. Start with a small pilot hole and apply light, steady pressure. Keep the drill speed slow to avoid cracking. Use masking tape on the tile to prevent slipping and always wear safety goggles.
What Drill Bit Works Best For Ceramic Tiles?
A carbide-tipped or diamond-tipped drill bit works best for ceramic tiles. These bits can cut through hard surfaces without damaging the tile. Avoid using regular wood or metal bits as they may crack the tile or become dull quickly.
How Can I Prevent Tile From Cracking While Drilling?
Apply masking tape over the drilling spot to reduce slipping. Use a slow drill speed and light pressure. Start with a small pilot hole before widening it. Cooling the bit with water during drilling also helps prevent overheating and cracking.
Should I Use A Hammer Drill On Tile Walls?
Avoid using a hammer drill on tile walls as it can cause cracks. Use a regular drill with a tile-specific bit instead. Hammer action is too forceful and may damage the tile’s surface and structure.
Conclusion
Drilling into tile walls takes care and the right tools. Use a drill bit made for tiles to avoid cracks. Mark your spot clearly and drill slowly with steady pressure. Keep the drill straight to make clean holes. Protect your eyes and keep the area safe from dust.
Taking your time helps prevent damage and ensures a good result. Now, you can hang shelves or hooks with confidence. Practice patience and follow these steps for a smooth job every time.