
If you’ve ever wanted to create your own unique jewelry or add a personal touch to your gemstones, knowing how to drill a gemstone is a skill you need. But drilling a gemstone can feel tricky and even a little scary if you don’t know the right steps.
What if you crack or damage your precious stone? Don’t worry. In this guide, you’ll discover simple, clear techniques that help you drill your gemstone safely and confidently. Keep reading, and by the end, you’ll have the know-how to turn your gemstones into beautiful, wearable art.
Choosing The Right Gemstone
Choosing the right gemstone is important before you start drilling. The stone must be strong enough to handle the process. Some stones break easily and can ruin your project. The size and shape also matter for drilling. Picking the best stone makes your work easier and safer.
Hardness And Durability
Hardness shows how tough a gemstone is. Use the Mohs scale to check hardness. Stones with a hardness of 6 or higher are best for drilling. Softer stones can crack or chip. Durability means how well the stone handles pressure. A durable stone will not break during drilling.
Size And Shape Considerations
Small stones are harder to drill. Bigger stones give more space for holes. Shape affects how you hold the stone. Round or oval shapes are easier to drill. Flat surfaces help keep the drill steady. Choose a shape that fits your project needs.
Common Gemstones For Drilling
Quartz is popular for drilling because it is hard and common. Amethyst and citrine are types of quartz that work well. Garnet and topaz also handle drilling nicely. Avoid very soft stones like opal or turquoise. They break easily and can ruin your work.
Essential Tools And Materials
Drilling a gemstone requires the right tools and materials. These help protect the stone and make the drilling process easier. Choosing the correct equipment is important for safety and success. Below are the key items needed for drilling gemstones.
Drill Types And Bits
Use a drill that can run at low speeds. A rotary tool or a small drill press works well. Diamond drill bits are best for gemstones. They cut smoothly without cracking the stone. Choose bits sized to the hole you want to make. Avoid regular metal bits; they can damage the gem.
Safety Gear
Wear safety glasses to protect your eyes from dust and chips. Use a dust mask to avoid breathing fine particles. Gloves help protect your hands but must fit well. Keep your work area clean and well-lit. Safety gear prevents injuries and keeps the process safe.
Lubricants And Coolants
Use water as a coolant to keep the stone and bit cool. It prevents overheating and reduces the risk of cracks. A small container of water or a spray bottle works fine. Some use light oil, but water is safer for most gems. Keep the drilling area wet during the process.
Preparing The Gemstone
Preparing the gemstone is the first step before drilling. This step ensures safety and precision. Proper preparation protects the stone from damage. It also helps to make a clean hole. Follow these simple steps to prepare your gemstone well.
Cleaning And Marking
Start by cleaning the gemstone with warm water and a soft brush. Dirt and oils can cause slipping or uneven drilling. After cleaning, dry the stone completely. Use a fine-tip marker to mark the drill spot. Marking guides the drill and keeps the hole straight. Choose a visible but thin mark to avoid damage.
Securing The Stone
Hold the gemstone tightly to prevent movement. Use a clamp, vise, or a soft cloth wrap. Make sure the stone is secure but not too tight. Too much pressure can crack or chip the gem. The goal is to keep the stone stable during drilling.
Setting Up The Workspace
Prepare a clean, flat surface to work on. Good lighting helps see the drill mark clearly. Keep water or a lubricant nearby to cool the drill bit. Use safety glasses to protect your eyes. Organize tools within easy reach to stay focused and safe.
Credit: www.navneetgems.com
Step-by-step Drilling Process
Drilling a gemstone needs care and the right steps. Follow a clear process to avoid cracking or breaking the stone. This guide helps you drill safely and neatly. Each step is important for a smooth result.
Starting The Drill
Choose the right drill bit for your gemstone type. Secure the stone firmly on a soft surface. Begin drilling at a low speed to avoid slipping. Hold the drill steady and start with a small hole. This helps keep control and prevents damage.
Maintaining Steady Pressure
Apply gentle and even pressure while drilling. Press too hard and the stone may crack. Too little pressure will slow the drilling. Keep your hand steady to guide the drill bit. Take short breaks if needed to keep control.
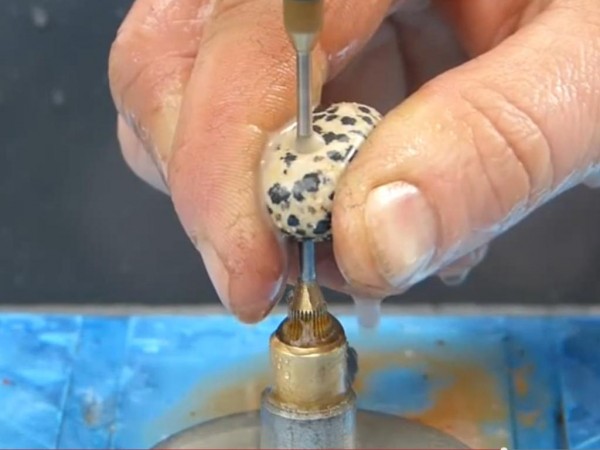
Managing Heat And Friction
Drilling creates heat that can damage the gemstone. Use water or oil to cool the drill bit and stone. Stop often to let the stone cool down. Keep the drill speed moderate to reduce heat. Cooling prevents cracks and keeps the stone strong.
Common Mistakes To Avoid
Drilling a gemstone requires care and attention. Avoiding common mistakes helps protect the gem and get the best results. Many beginners make simple errors that can ruin the stone or the drill bit. Learning what to avoid saves time and money.
Overheating The Gemstone
Heat damages gemstones quickly. Drilling creates friction, which causes heat. Too much heat can crack or change the color of the gem. Always use water or oil to cool the stone. Take breaks to let the gem cool down. Never press too hard on the drill, as this raises heat fast.
Using Incorrect Drill Speed
Each gemstone needs a certain drill speed. Too fast, and the stone may crack or chip. Too slow, and the drill bit can get stuck or worn out. Use a low to medium speed for hard gems like quartz. Softer stones need even slower speeds. Check the drill’s manual or gemstone guide for best speed.
Inadequate Support
Gemstones must be stable while drilling. Holding the stone by hand causes movement and mistakes. Use a clamp or soft holder to keep the gem steady. Support reduces the risk of slipping and breaking. A steady gem lets you drill straight holes safely. Avoid forcing the drill, and keep steady pressure.
Finishing Touches
After drilling a gemstone, the final steps help ensure it looks perfect and stays strong. These finishing touches protect the gem and prepare it for use in jewelry or crafts. Taking time on these details improves the gem’s beauty and durability.
Smoothing Rough Edges
Drilling can leave sharp or rough edges around the hole. Use fine sandpaper or a small diamond file to smooth these edges gently. Move slowly and check often to avoid removing too much material. Smooth edges prevent cracking and protect the thread or wire from damage.
Cleaning Post-drilling
Dust and debris gather inside and around the hole after drilling. Clean the gemstone with warm water and a soft brush. Avoid harsh chemicals that may harm the gem’s surface. Dry the gemstone carefully with a soft cloth to keep it sparkling.
Inspecting For Damage
Look closely at the drilled area for cracks or chips. Use a magnifying glass to see small flaws clearly. Minor cracks can worsen over time, so catch them early. If damage appears, consider reinforcing or discarding the stone to avoid breakage later.
Advanced Tips For Precision
Drilling gemstones requires careful focus and skill. Advanced tips help you achieve precise results. These methods reduce errors and protect the stone. Small details make a big difference.
Use tools and techniques that improve accuracy. This section covers three key tips to drill gemstones with precision.
Using Templates And Guides
Templates and guides help keep drill holes straight. They provide a fixed path for the drill bit. This reduces slipping and uneven holes. Use plastic or metal guides for best results. Mark the drilling spot clearly on the template. Secure the stone firmly before drilling. This method works well for repeat designs.
Microscopic Inspection
Check the gemstone under a microscope before drilling. Look for cracks, inclusions, and weak spots. These flaws can cause the stone to break. Microscopic inspection helps choose the safest drilling area. Inspect the hole after drilling too. It ensures the hole is clean and smooth. This step improves overall quality and safety.
Custom Drill Bits
Use drill bits made specifically for gemstones. Custom bits have sharper edges and better durability. They reduce heat build-up and prevent chipping. Choose the right size for your gemstone. Replace bits often to keep cutting sharp. Custom bits save time and protect your stones.

Credit: www.youtube.com

Credit: www.youtube.com
Frequently Asked Questions
How Do I Safely Drill A Gemstone At Home?
Use a diamond-tipped drill bit and keep the stone wet. Secure the gem firmly and drill slowly to avoid cracks or breaks.
What Tools Are Best For Drilling Gemstones?
A rotary tool with a diamond drill bit is ideal. Use a water source to cool the bit and reduce dust.
Can Any Gemstone Be Drilled Without Damage?
Not all gemstones are suitable. Softer stones may crack. Always test on a similar stone or consult a professional.
How To Prevent Gemstone Cracking While Drilling?
Keep the gemstone wet and drill at low speed. Use steady pressure and avoid forcing the drill bit through.
Conclusion
Drilling a gemstone takes patience and care. Choose the right tools and keep the stone steady. Work slowly to avoid cracks or damage. Practice on cheap stones before trying valuable ones. Safety matters—wear goggles and protect your hands. With each step, you learn and improve your skill.
Enjoy the process as you create unique jewelry pieces. Keep these tips in mind to drill gems safely and well. Your effort will show in the final result.