

Are you looking to build a drill press table that fits your workshop perfectly? Creating your own drill press table can save you money and give you a custom setup that works exactly how you want.
But where do you start? A clear, easy-to-follow Drill Press Table PDF guide can make all the difference. You’ll discover simple steps and practical tips that help you design and build your drill press table with confidence. Keep reading to unlock a straightforward plan that turns your idea into a sturdy, useful tool.
Materials Needed
Gathering the right materials is the first step to build a sturdy drill press table. Using proper tools and materials ensures safety and accuracy. A well-made table improves your drilling work and lasts longer.
Essential Tools
Start with basic tools needed for cutting and assembling. A saw helps cut wood or metal to size. A drill or screwdriver is required to fasten parts together. Measuring tape or ruler ensures precise cuts and placements. Clamps hold pieces steady during assembly. Sandpaper smooths rough edges for a clean finish. Safety gear like gloves and goggles protect your hands and eyes.
Recommended Materials
Choose materials that provide strength and stability. Plywood or MDF boards work well for the tabletop. Hardwood offers durability for the frame and supports. Metal brackets or angle irons add extra support. Wood screws and bolts hold the parts firmly. Non-slip pads or rubber feet keep the table stable during use. A finish, like paint or varnish, protects the surface from damage.

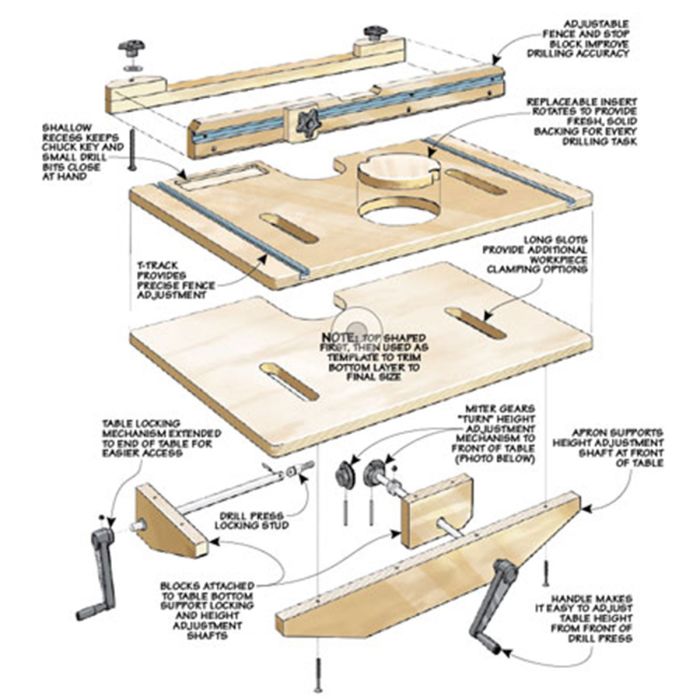
Credit: www.woodsmithplans.com
Designing The Table
Designing the drill press table is a crucial step. It sets the foundation for a safe and efficient workspace. The design should fit your drill press and the work you plan to do. Clear planning helps avoid mistakes and wasted materials.
Two key aspects to focus on are the table’s size and how it is arranged. These details affect stability and ease of use. Thoughtful design makes your drill press more functional and comfortable to use.
Choosing Dimensions
Start by measuring your drill press base. The table should be larger than the base for better support. A common size is around 18 by 18 inches. Adjust based on your workspace and project needs.
Thickness matters too. A thicker table offers more strength and less vibration. Use wood or metal that is at least 3/4 inch thick. Ensure the table can hold the weight of your materials safely.
Selecting The Layout
Plan the shape and holes in the table. Round or square shapes work well. Include a slot or hole for the drill bit to pass through. Position it in the center for balance.
Think about clamps or stops. These help hold workpieces steady. Mark their spots before cutting or drilling the table. A clear, practical layout makes drilling easier and safer.
Cutting The Components
Cutting the components is a key step in making your drill press table. You need to cut the wood or metal parts to the right size. Precise cuts help the table fit together well. This section guides you through measuring and cutting safely.
Measuring And Marking
Start by measuring each piece carefully. Use a tape measure or ruler for accuracy. Mark the lines clearly with a pencil. Double-check measurements before cutting. Mark all parts to avoid confusion. Clear marks make cutting easier and more precise.
Safe Cutting Techniques
Always wear safety glasses to protect your eyes. Use clamps to hold pieces steady. Cut slowly and follow your marked lines. Keep your hands away from the blade at all times. Use the right saw for the material you cut. Take breaks if you feel tired to avoid mistakes.
Assembling The Table
Assembling the drill press table is a key step in building a functional workspace. This process requires focus to ensure all parts fit together well. A well-assembled table improves your drilling accuracy and safety.
Follow each step carefully. Take time to check every connection and alignment. Proper assembly leads to a strong and stable table that lasts long.
Joining Parts Securely
Start by aligning the table parts correctly. Use screws and bolts to join the pieces tightly. Avoid loose connections that can cause movement.
Use a screwdriver or wrench to tighten fasteners firmly. Check each joint twice. Secure parts reduce wobbling during use.
Ensuring Stability
Stability is vital for safe and precise drilling. Make sure the table sits flat and does not rock. Use a level tool to check the surface.
Add support braces if needed. Tighten all bolts again after assembly. A stable table keeps your work steady and prevents accidents.
Finishing Touches
Finishing touches improve the look and function of your drill press table. They help make the table smooth and protect it from damage. This step is important for a durable and safe workspace. Follow these tips to complete your project perfectly.
Sanding And Smoothing
Start by sanding all surfaces of the table. Use medium-grit sandpaper to remove rough spots and sharp edges. Next, switch to fine-grit sandpaper for a smooth finish. Sand evenly to avoid dips or bumps. This process makes the table safe and easy to work on.
Adding Surface Protection
Apply a protective layer to shield the wood from moisture and wear. Use varnish, polyurethane, or paint designed for wood surfaces. Apply thin, even coats and let each dry completely. This protection extends the life of your drill press table. It also makes cleaning easier after use.
Creating The Pdf Guide
Creating a PDF guide for a drill press table helps share your project clearly. A well-made PDF shows every step and detail. This guide helps others build the table with ease.
Focus on clear instructions and simple layout. Good design makes the guide useful and easy to follow. Organize the content so readers can find information fast.
Documenting Steps Clearly
Write each step in short sentences. Use simple words to explain actions. Add pictures or diagrams to show details. Number the steps to keep order. Highlight important tips or warnings. Make instructions easy to read and understand. Avoid complex terms or long paragraphs.
Using User-friendly Formats
Choose fonts that are easy to read on screens. Use headings and bullet points to break text. Include clickable table of contents for quick navigation. Save the file in a common PDF format. Check that images load correctly and are sharp. Test the PDF on different devices for compatibility. Keep the file size small for easy download.
Tips For Effective Use
Using a drill press table PDF effectively can make your work safer and easier. Understanding key tips helps you get the best results. Simple steps improve both accuracy and safety. Follow these tips to keep your workspace organized and efficient.
Safety Precautions
Always wear safety glasses to protect your eyes. Keep your hands clear of the drill bit. Use clamps to hold your workpiece firmly in place. Never wear loose clothing or jewelry near the drill press. Make sure the drill press is turned off before adjusting the table. Check that the drill bit is sharp and properly tightened. Keep your workspace clean to avoid accidents. Stay focused and avoid distractions during drilling.
Maintenance Advice
Clean the drill press table after each use. Remove dust and debris from the surface and moving parts. Apply a light coat of oil to metal parts to prevent rust. Check bolts and screws regularly to keep the table stable. Inspect the drill bit for wear and replace it if needed. Lubricate the spindle and other moving parts as recommended. Store the drill press in a dry place to avoid damage. Regular maintenance extends the life of your drill press table PDF.

Credit: www.woodsmithplans.com
Credit: www.woodpeck.com
Frequently Asked Questions
What Materials Do I Need For A Drill Press Table Pdf?
You need wood or MDF, screws, bolts, washers, and T-tracks. A drill press and measuring tools are essential for accuracy. These materials ensure a sturdy, functional drill press table.
How Can I Customize My Drill Press Table Pdf?
Customize size, T-track placement, and fence design in your PDF. Adjust dimensions to fit your drill press model and workspace. Personalization improves usability and efficiency.
Is The Drill Press Table Pdf Easy To Follow?
Yes, the PDF offers step-by-step instructions with clear diagrams. It’s designed for beginners and experienced users alike. Following it ensures a successful build.
Can I Print The Drill Press Table Pdf For Offline Use?
Absolutely, the PDF format is ideal for printing. You can take it to your workshop for easy reference. Printing helps during hands-on assembly.
Conclusion
Making a drill press table PDF is simple and useful. You can follow clear steps to create your own guide. This helps keep your work organized and easy to share. Use basic tools and measure carefully for the best results.
Having a PDF saves time and effort during projects. Try making one today and see how it improves your workshop tasks. It’s a small step that makes a big difference.