

Is your cordless drill battery not holding a charge like it used to? You rely on your drill for countless tasks, and a weak battery can bring your projects to a frustrating halt.
But before you rush out to buy a new one, what if you could fix it yourself? Imagine saving money and getting your drill back to full power in no time. You’ll discover simple, step-by-step ways to repair your cordless drill battery.
Keep reading, and you’ll learn how to breathe new life into your tool—without any technical hassle.

Credit: www.ifixit.com
Signs Of A Failing Battery
Knowing the signs of a failing cordless drill battery can save you time and money. A battery that does not work well affects your drill’s performance. Spotting problems early helps you fix or replace the battery before it stops working completely.
Reduced Run Time
The drill runs for less time than before. You might charge it fully, but it dies quickly. This is a clear sign the battery is losing power. The cells inside the battery wear out over time. Reduced run time means the battery holds less charge.
Slow Charging
The battery takes much longer to reach full charge. Charging that used to take an hour may now take several hours. This means the battery’s ability to absorb power has dropped. Slow charging often signals internal damage or aging in the battery cells.
Overheating Issues
The battery gets hot during use or charging. Heat can damage the battery further and reduce its life. Overheating is dangerous and should not be ignored. It can mean the battery is failing or has a short circuit inside.
Safety Measures Before Repair
Repairing a cordless drill battery requires careful attention to safety. Batteries store electrical energy that can be dangerous. Taking safety steps protects you from injury and damage. Prepare well before starting any repair work.
Proper Workspace Setup
Choose a clean, dry, and well-lit area to work. Avoid clutter to prevent accidents. Keep flammable materials far away. Use a sturdy table that won’t shake or wobble. Make sure you have enough space to lay out tools and parts.
Necessary Protective Gear
Wear safety glasses to protect your eyes. Use gloves to avoid cuts and electric shock. Long sleeves can protect your arms from sparks. Closed-toe shoes keep your feet safe. Have a fire extinguisher nearby, just in case.
Handling Electrical Components
Always disconnect the battery from the drill before starting. Use insulated tools to avoid electric shock. Avoid touching battery terminals directly with your hands. Be gentle with wires and connectors to prevent damage. Check for any signs of swelling or leaks before handling.
Tools And Materials Needed
Repairing a cordless drill battery needs specific tools and materials. Having the right items makes the process easier and safer. Below is a list of what you need to gather before starting your repair.
Basic Repair Tools
Start with basic tools like screwdrivers and pliers. A small Phillips or flathead screwdriver helps open the battery case. Needle-nose pliers assist in handling small parts and wires. A multimeter checks the battery voltage and cell condition. Wire cutters and strippers prepare wires for reconnection. A soldering iron helps fix loose connections or attach new parts.
Replacement Battery Cells
Identify the type and size of your drill’s battery cells. Most cordless drills use lithium-ion or nickel-cadmium cells. Buy cells that match your original battery’s voltage and capacity. New cells restore power and extend battery life. Avoid mixing old and new cells to prevent damage.
Cleaning Supplies
Keep the battery clean for better performance. Use isopropyl alcohol to remove dirt and corrosion. Cotton swabs help clean tight spots. A soft brush clears dust from the battery contacts. Clean contacts ensure good electrical connection. Proper cleaning prevents future battery issues.
Credit: www.youtube.com
Testing The Battery Health
Testing the battery health is a crucial step in repairing a cordless drill battery. It helps you understand if the battery can still hold a charge or if it needs replacement. This process involves checking the voltage and identifying any damaged cells. Proper testing saves time and money by avoiding unnecessary parts replacement.
Using A Multimeter
A multimeter is a tool used to measure electrical values. It checks voltage, current, and resistance. To test your battery, set the multimeter to measure DC voltage. Connect the red probe to the positive terminal and the black to the negative terminal. The reading shows the battery’s current voltage level.
Checking Voltage Levels
Compare the multimeter reading to the battery’s rated voltage. A healthy battery should show a voltage close to its rated value. If the reading is significantly lower, the battery may be weak or damaged. Repeat the test after charging the battery fully to see if the voltage improves.
Identifying Faulty Cells
Batteries have multiple cells connected in series or parallel. Each cell produces a portion of the total voltage. Use the multimeter to test each cell individually by accessing their terminals. Cells with lower voltage than others are faulty and may cause the battery to underperform. Replace or remove these cells to restore battery health.
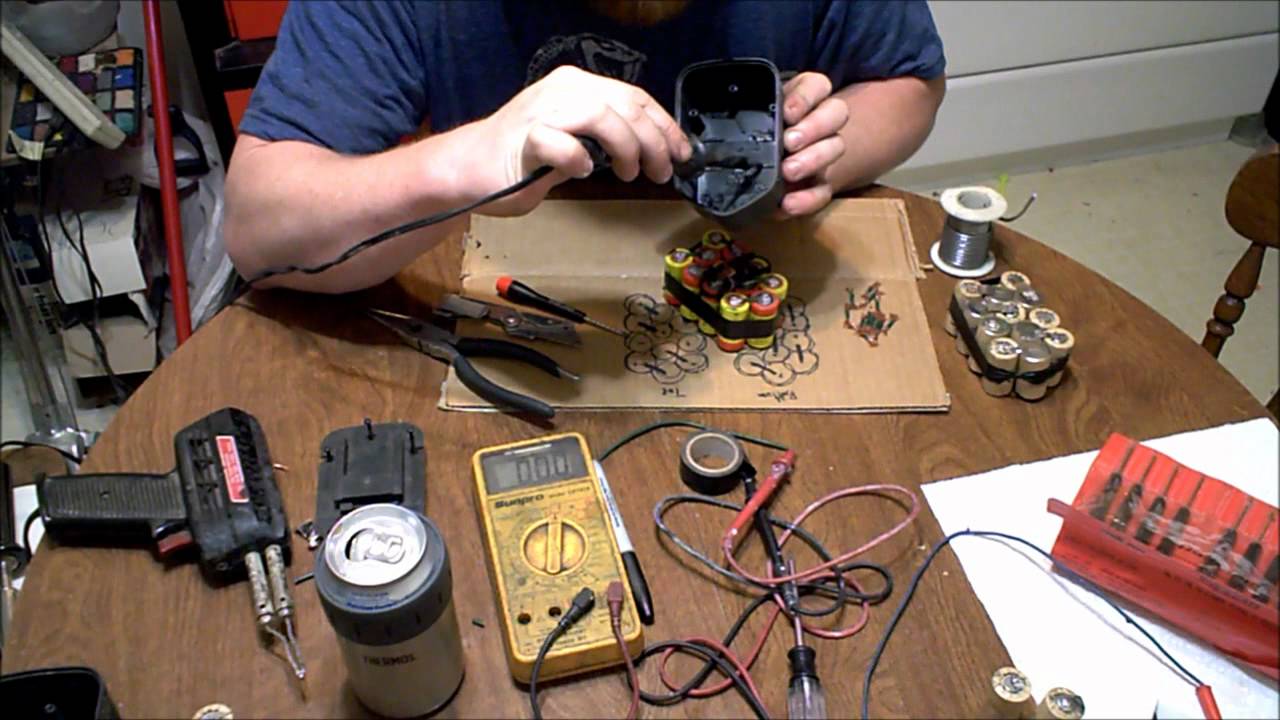
Disassembling The Battery Pack
Disassembling the battery pack is the first step in repairing a cordless drill battery. This process helps you access the internal parts and find the problem. It requires care and the right tools to avoid damage or injury.
Removing Outer Casing
Start by removing the screws holding the battery casing. Use a small screwdriver for this task. Gently pry open the case with a plastic tool. Avoid using metal tools to prevent sparks or damage. Keep all screws safe for reassembly.
Extracting Battery Cells
Inside the casing, you will find battery cells connected by metal strips. Carefully disconnect these strips using a soldering iron or by gently pulling connectors. Remove the cells one by one. Note their position to place new cells correctly later.
Inspecting Internal Components
Check the battery cells for swelling or leaks. Look for broken wires or loose connections. Examine the circuit board for burnt parts or corrosion. Replace or repair damaged parts before reassembling the pack.
Replacing Bad Cells
Replacing bad cells in a cordless drill battery can bring it back to life. Over time, some cells lose power and affect the battery’s performance. Swapping out these weak cells with new ones restores the battery’s strength. This process requires care to avoid damaging the battery pack.
Selecting Compatible Cells
Choose cells that match the original battery’s size and voltage. Use the same type, like NiMH or Li-ion, to keep the battery safe. Check the capacity to ensure the new cells last long. Buying from a trusted source helps avoid fake or low-quality cells.
Soldering Techniques
Use a soldering iron with a fine tip for precision. Heat the solder just enough to connect the wires without damaging the cells. Avoid holding the iron on the cell for too long. Work quickly and carefully to prevent overheating.
Ensuring Proper Connections
Make sure all cells connect firmly in series or parallel, as required. Check each connection for solid contact and no loose wires. Use electrical tape or shrink tubing to cover exposed wires. Proper connections help the battery work efficiently and safely.
Cleaning And Maintenance Tips
Keeping your cordless drill battery clean and well-maintained helps it last longer. Dirt, dust, and corrosion can reduce battery performance. Regular care keeps the contacts working well. It also prevents damage that stops the battery from charging properly.
Removing Corrosion
Corrosion looks like white or green powder on battery contacts. Use a soft brush or cloth to clean it off gently. A small amount of baking soda mixed with water can help remove stubborn corrosion. Make sure to dry the contacts completely before using the battery again. Clean contacts improve the power flow and charging speed.
Lubricating Contacts
Dry contacts may cause poor connection and reduce battery life. Apply a tiny drop of electrical contact lubricant to the metal parts. This helps protect against moisture and dirt. Avoid using too much lubricant as it can attract dust. Proper lubrication keeps the battery working smoothly and extends its lifespan.
Storing Batteries Safely
Store batteries in a cool, dry place away from direct sunlight. Avoid extreme temperatures because heat and cold can damage the battery cells. Keep batteries away from metals or other objects that might cause a short circuit. Store them partially charged to maintain battery health. Proper storage ensures your battery is ready when you need it.
Reassembling The Battery Pack
Reassembling the battery pack is a critical step in repairing your cordless drill battery. This process ensures all parts fit together correctly and work safely. Careful handling during reassembly extends battery life and performance.
Follow these steps to put your battery pack back together properly. Take your time to avoid damage and ensure everything is secure.
Aligning Components
Start by placing the cells and circuit board in their original positions. Check that wires do not get pinched or twisted. Align the contacts so they connect firmly. Proper alignment prevents poor connections and battery failure.
Securing The Casing
Once components are aligned, close the battery casing carefully. Use screws or clips to fasten the cover tightly. Do not force the casing; it should fit snugly without gaps. A secure case protects internal parts from dust and damage.
Final Inspection
Look over the battery pack for loose parts or gaps. Test the buttons and connectors to ensure they work smoothly. Clean any dust or debris before use. A thorough check helps avoid problems after reassembly.
Charging And Testing Restored Battery
After restoring a cordless drill battery, charging and testing are crucial steps. These steps confirm the battery works well and holds power correctly. Proper charging and testing help avoid damage and extend battery life. Follow clear procedures for best results.
Initial Charging Process
Start by placing the battery in its charger. Use the charger designed for your drill model. Let the battery charge fully without interruptions. This process may take several hours. Avoid removing the battery before it reaches full charge. Check the charger indicator for completion signals.
Monitoring Performance
After charging, test the battery in the drill. Observe how long it runs under normal use. Note any sudden drops in power or quick discharge. A healthy battery should perform steadily. Repeat charging and use cycles to confirm reliability.
Troubleshooting Issues
If the battery does not charge or hold power, check connections first. Clean terminals and ensure good contact. Try charging with another charger if possible. Replace damaged cells if necessary. Persistent problems may require buying a new battery pack.

Credit: www.youtube.com
Extending Battery Life
Extending the life of your cordless drill battery saves money and keeps your tools ready. Batteries wear out faster without good care. Simple habits help keep them healthy and strong longer. Follow these easy steps to protect your battery and get the best use from it.
Proper Charging Habits
Always use the charger made for your battery. Avoid chargers that deliver too much or too little power. Charge the battery in a cool place, not in direct sunlight. Stop charging once the battery is full. Overcharging causes damage and reduces battery life.
Avoiding Deep Discharges
Do not let the battery run completely out of power. Deep discharges stress the battery cells and shorten their lifespan. Charge the battery before it gets too low. Keeping some charge in the battery helps it stay healthy longer.
Regular Maintenance
Clean the battery contacts often with a dry cloth. Dirt or corrosion blocks power flow and makes the battery work harder. Store the battery in a dry, cool place when not in use. Avoid extreme temperatures that harm the battery’s performance.
Frequently Asked Questions
How Can I Tell If My Cordless Drill Battery Is Dead?
Check if the drill won’t hold a charge or run briefly. Also, test with a multimeter for low voltage. These signs indicate a dead or failing battery needing repair or replacement.
What Are Simple Steps To Fix A Cordless Drill Battery?
Remove the battery pack, clean contacts, and test each cell. Replace bad cells and reassemble. Use proper tools and safety gear for best results and battery longevity.
Can I Repair A Lithium-ion Cordless Drill Battery Myself?
Yes, with caution. Identify faulty cells, replace them carefully, and balance the pack. Follow safety guidelines to avoid damage or injury during the repair process.
How Do I Maintain My Cordless Drill Battery For Longer Life?
Store in a cool, dry place and avoid full discharges. Charge regularly and clean contacts. Proper maintenance reduces wear and extends your battery’s effective lifespan.
Conclusion
Repairing your cordless drill battery can save money and reduce waste. Start with simple checks like cleaning contacts and testing voltage. Replace damaged cells carefully to restore power. Always follow safety steps to avoid injury. Regular maintenance helps your battery last longer.
Small efforts bring big results. Keep your drill ready for any job. Try these tips and see the difference yourself.