

If you’ve ever struggled to remove a bit from your Dewalt impact driver, you’re not alone. It can be tricky, especially if the bit is stuck or you’re unsure how to unlock it properly.
But don’t worry—once you know the simple steps, it becomes quick and hassle-free. In this guide, you’ll learn exactly how to take a bit out of your Dewalt impact driver safely and easily. Keep reading, and you’ll save time and avoid frustration on your next project.

Credit: www.youtube.com
Choosing The Right Bit
Choosing the right bit for your Dewalt impact driver is key for good results. The bit must fit well and handle the power of the tool. Using the wrong bit can cause damage to both the driver and the material. It also makes the work harder and less safe. Knowing the right type, size, and material helps you get the job done smoothly.
Types Of Bits Compatible With Dewalt Impact Drivers
Dewalt impact drivers use specific bits made for high torque. Impact-rated bits are designed to handle strong twisting force. They last longer and resist breaking. Common types include Phillips, flathead, Torx, and hex bits. Each type fits different screw heads. Choose a bit type that matches your screws. Avoid standard drill bits as they can break easily under impact.
Material And Size Considerations
Bits come in various materials like steel, titanium, and carbide. Steel bits are common and affordable. Titanium bits offer more strength and last longer. Carbide bits are very hard and good for tough jobs. Size matters too. The bit must match the screw size exactly. A loose fit can strip the screw head. Too small or large bits can damage screws and bits. Measure carefully before picking a bit.
Preparing The Impact Driver
Preparing your Dewalt impact driver before taking out the bit is important. Proper preparation helps you work safely and efficiently. It also protects your tool and extends its life.
Follow simple steps to get your impact driver ready. These steps focus on safety and power control. This way, you avoid accidents and damage.
Safety Precautions
Wear safety glasses to protect your eyes from flying debris. Use gloves to keep your hands safe. Clear the work area of any loose items. Make sure your workspace is well-lit. Keep children and pets away while using the tool. Always check the bit for damage before inserting it.
Powering Off The Tool
Turn off the impact driver before changing or removing the bit. Remove the battery pack or unplug the tool from the power source. This prevents accidental starts. Hold the tool firmly to avoid slips. Wait a few seconds to ensure the tool is fully off. Now you are ready to safely remove the bit.
Removing The Bit
Removing the bit from a Dewalt impact driver is a simple task. It keeps your tool ready for the next job. Follow clear steps to avoid damage or injury. This guide helps you remove the bit quickly and safely.
Locating The Bit Holder
The bit holder is at the front of the impact driver. It holds the bit tightly during use. Look for a metal or plastic collar around the bit. This part grips the bit firmly in place.
Releasing The Bit Mechanism
To release the bit, pull the collar away from the tool. This unlocks the bit from the holder. Some models may require you to twist the collar. The collar must move smoothly to free the bit.
Extracting The Bit Safely
Once unlocked, pull the bit straight out. Do not force or twist it harshly. Hold the tool firmly to keep control. Store the bit in a safe place for later use.
Credit: vixencomposites.com
Installing A New Bit
Installing a new bit in your Dewalt impact driver is simple and quick. A proper installation ensures strong performance and safety. Follow these steps to fit your bit correctly and keep your work smooth.
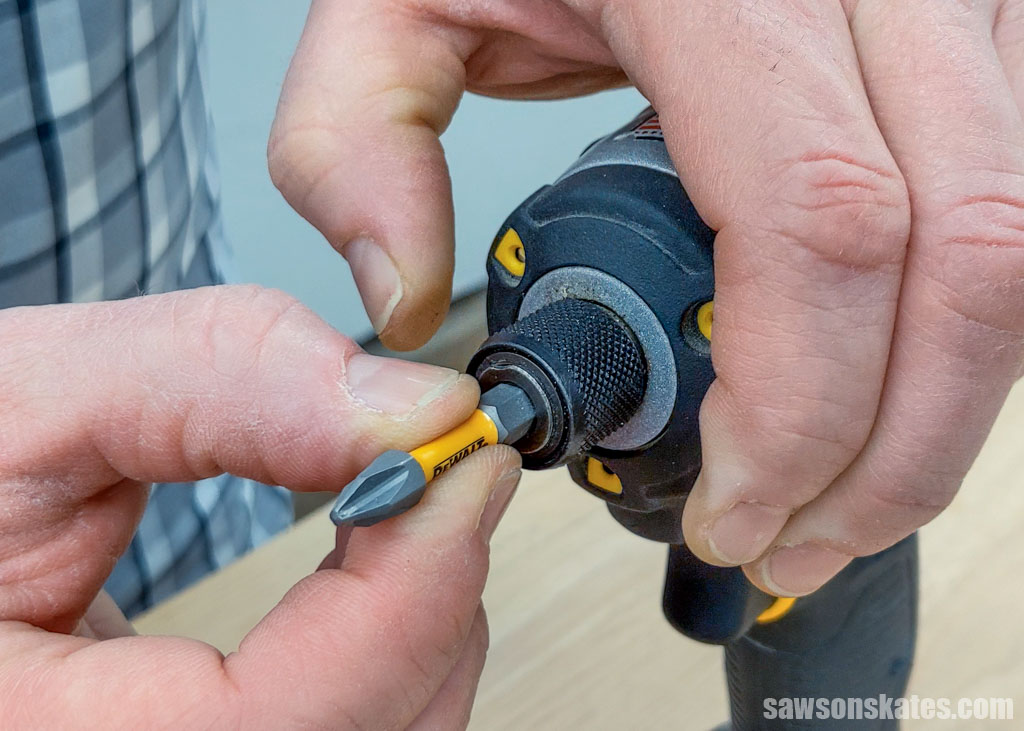
Aligning The Bit Properly
Hold the bit near the chuck of the impact driver. Match the flat side of the bit with the flat side inside the chuck. This alignment helps the bit fit tightly without slipping.
Push the bit straight into the chuck. Avoid forcing it at an angle. A correct fit reduces wear and tear on the tool.
Securing The Bit In Place
Grip the chuck firmly and pull back the collar. Insert the bit all the way in. Release the collar slowly to lock the bit.
Check that the bit does not wiggle. A secure bit means safer and more accurate work. If the bit feels loose, repeat the process.
Testing The Fit
Power on the impact driver briefly. Watch the bit spin smoothly without wobbling. If it shakes, remove and reinsert the bit.
Try driving a screw into scrap wood. This test confirms the bit holds well under pressure. Adjust if needed before starting your project.
Maintaining Your Impact Driver
Maintaining your DeWalt impact driver keeps it working well for a long time. Regular care helps the tool stay strong and reliable. Simple steps like cleaning and proper storage make a big difference. This section shows easy ways to take care of your impact driver bits and the tool itself.
Cleaning And Lubrication Tips
Remove dust and dirt from the bit holder after each use. Use a dry cloth or a soft brush to clean tight spots. Avoid using water, as it can cause rust or damage. Apply a small drop of machine oil to the metal parts. This keeps the bits smooth and prevents wear. Wipe off extra oil to avoid attracting dust. Clean your impact driver regularly for best results.
Storing Bits Correctly
Store bits in a dry and clean place to avoid rust. Use a bit organizer or small container to keep bits sorted. Keep bits away from moisture and direct sunlight. Avoid mixing different types of bits to prevent damage. Always check bits for wear before using them again. Proper storage helps bits last longer and work better.
Credit: vixencomposites.com
Troubleshooting Common Issues
Troubleshooting common issues with your Dewalt impact driver can save time and frustration. This tool is strong and reliable, but sometimes problems with the bit can occur. Understanding simple fixes helps keep your work smooth and safe.
Bit Not Securing Properly
Check the bit holder for dirt or debris. Clean it thoroughly to allow the bit to fit snugly. Make sure you push the bit all the way into the chuck. If the bit still slips, inspect it for damage. Worn or rounded bits will not hold well. Replace the bit if it looks damaged. Also, check the collar or locking mechanism for wear. If it does not lock firmly, the bit will not stay secure.
Difficulty Removing Stuck Bits
Turn off and unplug the impact driver before trying to remove a stuck bit. Use pliers to grip and gently twist the bit back and forth. Avoid forcing it hard to prevent damage. Apply a small amount of lubricant to the bit base to loosen rust or dirt. Let it sit a few minutes, then try removing again. If the bit still won’t budge, tap the base lightly with a rubber mallet. This can help free it without harming the tool.
Frequently Asked Questions
How Do I Remove The Bit From A Dewalt Impact Driver?
To remove the bit, pull back the collar on the chuck. Then, simply pull the bit out carefully. This mechanism ensures a secure fit and easy bit changes.
Can I Use Any Bit With A Dewalt Impact Driver?
Yes, you can use standard 1/4-inch hex shank bits. Ensure they fit snugly to avoid slipping during use. Always choose impact-rated bits for durability.
What Is The Correct Way To Insert A Bit?
Pull back the collar on the chuck, insert the bit fully, and release the collar. The bit should lock firmly in place without wobbling.
How To Maintain The Bit Holder On Dewalt Impact Drivers?
Keep the bit holder clean and free of debris. Regularly inspect for wear or damage. Lubricate if recommended in the user manual for smooth operation.
Conclusion
Taking the bit out of a DeWalt impact driver is simple and quick. Just press the collar and pull the bit out gently. Doing this keeps your tools safe and ready for the next job. Remember to handle parts carefully to avoid damage.
Practice a few times to feel confident using your driver. This small step helps you work smoothly every time. Keep your tools in good shape for better results. Easy, fast, and effective—just the way it should be.