
Have you ever struggled to remove the chuck from your cordless drill? It can be frustrating when your tool doesn’t work the way you want, especially if you need to change bits quickly.
But don’t worry—removing a cordless drill chuck is easier than you think. You’ll discover simple, step-by-step instructions that anyone can follow. Whether you want to replace a worn-out chuck or just clean your drill, learning this skill will save you time and hassle.
Keep reading to take control of your tools and get the job done right!
Tools Needed
Removing a cordless drill chuck requires some basic tools. These tools help you work safely and make the process easier. Having the right tools ready saves time and effort.
Adjustable Wrench
An adjustable wrench fits different sizes of nuts and bolts. It helps loosen the chuck from the drill shaft. Choose one with a comfortable grip for better control.
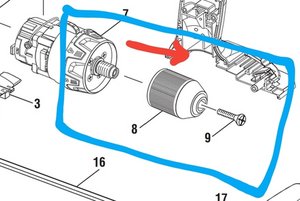
Allen Key (hex Key)
Many cordless drills use an Allen key to remove the chuck screw. This small tool fits inside the screw head. Make sure you have the correct size for your drill model.
Rubber Strap Wrench
This wrench grips the chuck without damaging it. Use it to twist and loosen the chuck smoothly. The rubber strap prevents scratches on the drill parts.
Clean Cloth
A clean cloth wipes away dirt and grease from the chuck area. Keeping the area clean helps tools grip better. It also makes the job safer and neater.
Safety Glasses
Protect your eyes during the removal process. Small parts or debris can fly off suddenly. Safety glasses keep your eyes safe from harm.
Safety Precautions
Always unplug the drill before removing the chuck. Wear safety glasses to protect your eyes from debris. Keep your hands steady and work in a clear area.
Wear Protective Gear
Always wear safety glasses to protect your eyes from flying debris. Use gloves to guard your hands from sharp edges. Wear closed-toe shoes to prevent injuries if tools drop.
Disconnect The Battery
Remove the drill’s battery before starting any work. This stops the drill from accidentally turning on. It keeps you safe from unexpected movements.
Work In A Clean Area
Keep your workspace tidy and free of clutter. A clean area helps avoid tripping or losing small parts. It also improves focus and safety.
Use The Right Tools
Choose tools made for cordless drill chucks. Using wrong tools can cause damage or injury. Proper tools make the process smoother and safer.
Handle The Chuck Carefully
The chuck may be tight or stuck. Use slow, steady force to avoid slips. Never use excessive power that can cause accidents.
Identify Your Drill Chuck Type
Knowing your drill chuck type is the first step to remove it safely. Different drills use different chuck designs. Each type needs a special approach for removal.
Take a close look at your cordless drill. Understanding the chuck type helps avoid damage and saves time. It makes the whole process easier and safer.
Keyed Chucks
Keyed chucks have a small gear on the side. Use a chuck key to open and close the jaws. The key fits into holes on the chuck. This type is common on older drills.
Keyless Chucks
Keyless chucks turn by hand to tighten or loosen. No extra tools are needed for operation. They are popular in modern cordless drills. Easy to spot by their smooth, knurled grip.
Single Sleeve Vs Double Sleeve Chucks
Single sleeve chucks use one ring to tighten or loosen. Double sleeve chucks have two rings that move independently. Check which sleeve style your drill has. This affects how you remove the chuck.
Pin Or Screw Retained Chucks
Some chucks are held by a small screw or pins. This screw is often inside the chuck. Removing it allows the chuck to slide off the spindle. Look inside the chuck for this screw before removal.
Loosen The Chuck
To remove a cordless drill chuck, start by loosening the chuck. This step is key to releasing the drill bit or the chuck itself. The chuck holds the drill bit tight, so you need to open it first.
Loosening the chuck depends on its type. Some chucks use a key tool, while others can be loosened by hand. Knowing your chuck type helps you proceed correctly.
Using The Chuck Key
Many cordless drills come with a chuck key. This small tool fits into the holes on the chuck. Insert the key into the hole and turn it counterclockwise.
Turn the key slowly but firmly. The chuck jaws will open, releasing the drill bit. Keep turning until the chuck is loose enough to remove the bit or the whole chuck.
Hand-tightened Chucks
Some chucks do not need a key. These are called hand-tightened or keyless chucks. To loosen, grip the chuck firmly with your hand.
Turn the chuck counterclockwise to open the jaws. It might need some force, especially if it is very tight. Once loose, you can pull out the drill bit or remove the chuck.
Remove The Chuck Screw
Removing the chuck screw is the first step in taking off a cordless drill chuck. This screw holds the chuck tightly in place. Without removing it, you cannot loosen the chuck from the drill. The screw is usually small but important. It keeps the chuck secure during drilling.
Before removing the chuck screw, you need to locate it carefully. It might be hidden inside the chuck. Some drills have a left-hand thread screw, which means it loosens clockwise. Knowing this helps avoid damage to the drill.
Locating The Screw
The chuck screw is found inside the drill chuck. Open the chuck jaws as wide as possible. Look inside the center hole of the chuck. The screw sits at the bottom of this hole. It may have a slot or a hex shape on its head. Use a flashlight to see clearly. The screw can be tiny, so check carefully.
Unscrewing Tips
Use the right screwdriver or hex key for the screw. A wrong tool can strip the screw head. Turn the screw in the correct direction. Most screws loosen by turning counterclockwise. Some screws loosen clockwise, so test gently. Hold the chuck firmly while turning. If the screw is tight, apply a little penetrating oil. Let it sit for a few minutes before trying again. Avoid using too much force to prevent damage.

Credit: www.wikihow.com
Detaching The Chuck
Detaching the chuck from a cordless drill is a straightforward task. It helps when you want to replace the chuck or fix a jam. The process is simple and requires minimal tools.
The chuck holds drill bits tightly. Removing it carefully protects the drill and bits. Follow these steps for safe and easy chuck removal.
Manual Removal
Start by opening the chuck jaws fully. This gives access to the retaining screw inside.
Look inside the chuck for a small screw. It usually has a left-hand thread.
Use a screwdriver to turn the screw clockwise. This loosens it.
Hold the drill firmly. Grip the chuck and turn it counterclockwise to unscrew.
If it’s tight, tap the chuck lightly with a rubber mallet. This can loosen it.
Once loose, pull the chuck straight off the drill shaft.
Using A Puller Tool
A puller tool makes chuck removal easier. It pulls the chuck off without damage.
Attach the puller to the chuck jaws. Tighten the screws to grip the chuck firmly.
Turn the puller’s central screw slowly. It pushes against the drill shaft.
Keep turning until the chuck slides off the shaft.
This method avoids force and prevents tool damage.
Cleaning And Maintenance
Cleaning and maintenance keep your cordless drill chuck working well. Dirt and dust can stop the chuck from gripping bits tightly. Regular care helps the chuck last longer and work smoothly.
After removing the chuck, take time to clean it thoroughly. Use a brush or cloth to remove dust and debris. Clean inside the jaws where dirt often hides. This small step prevents rust and wear.
Cleaning The Chuck Jaws
Use a small brush to clear dirt from the jaws. Wipe them with a dry cloth to remove loose dust. For stubborn grime, use a little rubbing alcohol on a cloth. Avoid soaking the chuck in water or liquid.
Lubricating Moving Parts
Apply light machine oil to the moving parts of the chuck. This keeps the jaws moving smoothly and prevents rust. Use a drop or two, then open and close the chuck to spread oil. Wipe off any extra oil to avoid dust buildup.
Inspecting For Wear And Damage
Check the chuck for cracks or worn parts. Look closely at the jaws and the body of the chuck. Replace the chuck if you find serious damage. A damaged chuck can cause unsafe drilling or poor bit grip.

Credit: www.youtube.com
Reinstalling Or Replacing The Chuck
Reinstalling or replacing the chuck on a cordless drill is a simple task. It helps restore the drill’s function or upgrade its performance. The process involves a few clear steps to ensure the chuck fits and works properly.
Taking care during installation prevents damage and ensures safety. Use the right tools and follow the steps carefully.
Removing The Old Chuck
Before installing a new chuck, remove the old one completely. Hold the drill firmly and open the chuck jaws. Use an Allen wrench to loosen the chuck screw inside. Turn the screw counterclockwise to remove it.
Once the screw is out, grip the chuck and twist it counterclockwise. This will detach the chuck from the drill’s spindle. Clean the spindle threads before adding a new chuck.
Installing The New Chuck
Align the new chuck with the spindle threads. Turn the chuck clockwise by hand to start threading it on. Make sure it fits snugly and turns smoothly. Use a wrench to tighten the chuck firmly but not too tight.
Insert the chuck screw and tighten it clockwise with the Allen wrench. This secures the chuck and keeps it from loosening during use.
Testing The Installed Chuck
After installation, test the chuck’s grip and rotation. Attach a drill bit and tighten the chuck jaws. Run the drill at low speed to check for wobbling or noise. If the chuck feels loose or wobbly, retighten the screw and chuck.
Proper installation ensures better drilling accuracy and tool safety.
Credit: www.ifixit.com
Frequently Asked Questions
How Do I Remove A Cordless Drill Chuck?
To remove a cordless drill chuck, first remove the drill bit. Then, open the chuck jaws fully. Locate the chuck screw inside and unscrew it counterclockwise. Finally, turn the chuck counterclockwise to unscrew it from the drill spindle.
What Tools Are Needed To Remove A Drill Chuck?
You typically need an Allen wrench or a hex key to remove the chuck screw. A wrench or pliers might help to unscrew the chuck from the drill. Some drills may require no tools if they have a keyless chuck.
Can I Remove A Cordless Drill Chuck Without A Key?
Yes, if your drill has a keyless chuck, you can remove it by hand. Open the jaws fully and twist the chuck counterclockwise firmly to unscrew it from the spindle. Use an Allen wrench to remove the chuck screw if present.
Why Is The Chuck Stuck On My Cordless Drill?
The chuck may be stuck due to dirt, rust, or overtightening. Applying penetrating oil and gently tapping can help loosen it. Make sure to remove the chuck screw before trying to unscrew the chuck itself.
Conclusion
Removing a cordless drill chuck is simple with the right steps. Start by loosening the chuck carefully. Use tools like a wrench or Allen key as needed. Keep safety in mind to avoid injuries. Practice makes the process easier over time.
This skill helps maintain and repair your drill. You can replace worn parts quickly and save money. Follow instructions closely, and you will succeed. Remember, patience and care lead to good results. Now, your cordless drill is ready for any task.