
Are you ready to upgrade your door with a new lock but unsure how to drill the perfect hole? Drilling a hole for a door lock might seem tricky, but with the right steps, you can do it yourself quickly and safely.
Imagine having the confidence to install your lock without costly mistakes or extra help. This guide will show you exactly how to drill that hole with ease, saving you time and money. Keep reading, and by the end, you’ll have all the tips and tricks you need to get the job done right.
Tools And Materials Needed
Preparing to drill a hole for a door lock requires the right tools and materials. Having everything ready makes the job easier and safer. This section covers the essential items you need before starting.
Drill Types And Bits
A power drill is key for this task. Cordless drills offer good mobility. A corded drill provides constant power. Choose a drill with adjustable speed for better control.
Use hole saw bits sized for the lock’s diameter. Spade bits work well for door edge holes. Make sure the bits are sharp and in good shape.
Measuring Tools
Accurate measurements are critical. Use a tape measure to mark the hole location. A pencil or marker helps mark drill points clearly. A combination square ensures straight, level markings.
Double-check all measurements before drilling. Proper alignment prevents mistakes and lock fitting issues.
Safety Gear
Safety is important. Wear safety glasses to protect eyes from wood chips. Use ear protection to guard against loud drill noise. Gloves can protect your hands but avoid loose ones near the drill.
Work in a well-lit area. Clear the workspace of obstacles and hazards.

Credit: doorcorner.wordpress.com
Choosing The Right Door
Choosing the right door is the first step before drilling a hole for a door lock. The door must support the lock securely. Not all doors work well with every lock type. Picking the right door saves time and effort during installation.
Consider the door’s material and thickness. These factors affect the lock’s fit and strength. A suitable door ensures safety and smooth lock operation.
Material Considerations
Doors come in wood, metal, fiberglass, and composite materials. Wood is common and easy to drill. Metal doors need special drill bits and care. Fiberglass doors require attention to avoid cracks. Composite doors vary, so check the material before starting.
Choose a door material that matches the lock type. Some locks work better with wood than metal. Understanding material helps prevent damage and ensures a proper fit.
Thickness Requirements
Most locks need a door thickness between 1 3/8 inches and 1 3/4 inches. Thinner doors may not hold the lock firmly. Thicker doors might need special locks or extra drilling depth. Measure the door thickness before buying a lock.
Check the lock’s instructions for exact thickness needs. Correct thickness ensures the lock fits tight. It also helps the lock work smoothly without sticking.
Marking The Drill Points
Marking the drill points is a key step for installing a door lock properly. It ensures the lock fits perfectly and works well. Careful marking helps avoid mistakes that can damage the door or make the lock unusable.
Take your time to measure and mark accurately. Use a pencil and ruler to create clear, visible marks. These marks guide the drilling and keep everything aligned.
Measuring Lock Placement
Start by deciding the height for the lock on the door. Most locks are placed about 36 inches from the floor. Measure this height on the edge and face of the door. Use a tape measure and mark the spot lightly with a pencil. Check that the placement matches the door frame and strike plate location.
Marking Hole Centers
After measuring, mark the center points for the holes. These include the hole for the lock cylinder and the latch. Use the lock template or the lock body to find exact points. Draw small, clear dots at the center of each hole. Double-check measurements before drilling to avoid errors.
Credit: prettyhandygirl.com
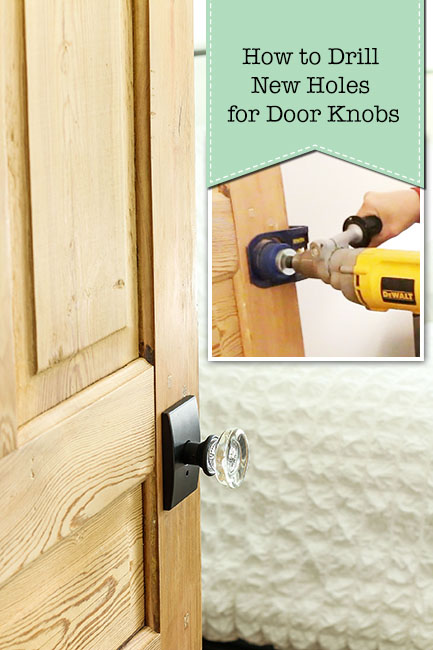
Drilling The Face Hole
Drilling the face hole is a key step when installing a door lock. This hole allows the lock’s latch or bolt to fit properly into the door. It must be drilled accurately to ensure the lock works smoothly. The right tools and careful technique make this task easier and safer.
Setting Drill Speed
Choose a low to medium drill speed. High speed can burn the wood or damage the drill bit. Slow speed helps keep control and precision. It also reduces the chance of cracking the door. Start drilling slowly, then increase speed if needed.
Maintaining Drill Stability
Hold the drill firmly with both hands. Keep the drill bit straight and steady. Avoid wobbling or tilting the drill. Use a guide or template to mark the hole spot. Steady drilling prevents uneven holes and door damage. Take your time for the best results.
Drilling The Edge Hole
Drilling the edge hole is an important step when installing a door lock. This hole holds the latch or bolt in place. It must be drilled precisely to fit the lock mechanism properly. A clean, accurate hole ensures the lock works smoothly and securely. Take your time to measure and mark the spot before drilling. Use the right tools and techniques to avoid mistakes and damage to the door.
Aligning The Drill
Place the drill bit exactly on the marked edge spot. Hold the drill straight and steady. The hole must go straight into the door edge. Tilting the drill can cause uneven holes or cracks. Use clamps to keep the door from moving. Check your angle twice before starting the drill. A steady hand helps make a clean, accurate hole.
Depth Control
Set the drill to the right depth to avoid drilling too far. Too deep or too shallow holes cause fitting problems. Use a tape or a depth stop on the drill bit to guide you. Drill slowly and stop when you reach the marked depth. This control keeps the hole neat and perfect for the lock parts.
Installing The Lock Components
Installing the lock components is a key step in securing your door. This process ensures the lock fits properly and works smoothly. Follow clear steps for a clean and safe installation.
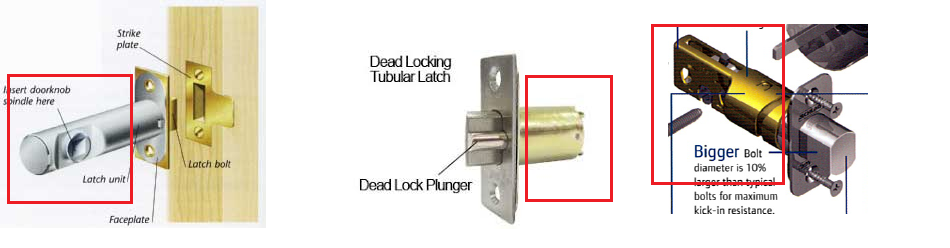
Fitting The Latch
Start by inserting the latch into the edge of the door. Make sure the latch faceplate sits flush with the door surface. Use a screwdriver to fasten the screws tightly. Check the latch moves freely without sticking.
Securing The Lockset
Align the lockset on both sides of the door. Feed the spindle through the latch mechanism carefully. Attach the exterior and interior lock parts together. Tighten all screws to hold the lockset firmly. Test the lock to ensure it turns and locks smoothly.
Testing The Lock Function
Testing the lock function is a crucial step after drilling holes for a door lock. It ensures the lock works smoothly and fits perfectly. This step helps avoid future problems like jamming or misalignment.
Check the lock’s movement by turning the key or thumb turn several times. Make sure the bolt slides in and out without resistance. Listen for any unusual sounds that might indicate trouble.
Checking Alignment
Start by examining if the lock lines up with the strike plate on the door frame. The bolt should enter the strike plate hole easily. Misalignment causes difficulty in locking or unlocking the door.
Look at the door edge and frame from different angles. See if the lock and strike plate are level. Even small misalignments can cause problems over time.
Adjusting If Needed
If the lock does not align well, adjust the strike plate position. Loosen screws and move the plate slightly up, down, or sideways. Tighten screws once the bolt fits perfectly into the strike plate.
Test the lock function again after adjusting. Repeat the process until the lock works smoothly without force. Proper adjustment keeps your door secure and easy to use.
Credit: diy.stackexchange.com
Troubleshooting Common Issues
Drilling holes for door locks can bring some problems. These issues may slow down your work or cause the lock not to fit well. Knowing how to fix common problems saves time and keeps your door secure. Here are some frequent issues and easy ways to solve them.
Misaligned Holes
Misaligned holes happen when the lock hole and latch hole do not line up. This causes the lock to sit unevenly or not fit at all. To fix this, mark the drill points carefully before drilling. Use a template or measure twice for accuracy. If the holes are already drilled, fill the wrong hole with wood filler. Sand it smooth and drill again in the right place.
Splintering Wood
Splintering happens when the wood cracks or chips around the hole. It looks bad and can weaken the door. To avoid this, drill slowly and use a sharp drill bit. Put masking tape over the drill spot to hold the wood fibers. Drill from both sides of the door to prevent splinters. If splintering occurs, sand the edges gently to smooth the surface.
Lock Jamming
Lock jamming means the lock does not move smoothly. This problem may come from rough holes or wrong hole size. Check the hole size to match the lock parts exactly. Clean any wood dust or debris inside the hole. Lubricate the lock mechanism with a light oil. Test the lock several times to ensure it works well.
Frequently Asked Questions
How Do I Measure For A Door Lock Hole?
Measure the door thickness and backset accurately. Mark the hole position using the lock template. Ensure measurements match lock specifications for a perfect fit.
What Drill Bit Size Is Needed For Door Locks?
Use a hole saw drill bit sized 2 1/8 inches for the main hole. For the latch hole, use a 1-inch spade bit. Always check your lock’s instructions.
How Deep Should I Drill For A Door Lock?
Drill the face hole through the entire door thickness. For the latch hole, drill about 1 inch deep. Confirm depth matches your lock’s latch length.
Can I Drill A Door Lock Hole Without Damage?
Yes, use a sharp drill bit and steady pressure. Mark clearly to avoid mistakes. Drill slowly to prevent splintering and ensure a clean hole.
Conclusion
Drilling a hole for a door lock is simple with the right steps. Measure carefully and mark the spot clearly. Use the correct drill bit size to avoid mistakes. Take your time and drill straight for a clean hole. Safety matters—wear goggles and handle tools with care.
Practice on scrap wood if you feel unsure. Following these tips helps you install door locks with confidence. Your door will be secure and look neat. Give it a try and see the results yourself.