

Is your cordless drill not charging like it used to? Before you rush to buy a new charger or battery, there’s a simple way to find out what’s really wrong.
Knowing how to test a cordless drill battery charger can save you time, money, and frustration. In this guide, you’ll learn easy steps to check if your charger is working properly. By the end, you’ll feel confident fixing the problem or deciding if it’s time for a replacement.
Let’s get started and bring your drill back to life!

Credit: www.wikihow.com
Tools Needed
Testing a cordless drill battery charger needs some basic tools. These tools help check the charger’s condition and ensure it works well. Having the right equipment makes the process simple and safe.
Gather these tools before starting. It saves time and avoids mistakes. Let’s look at the essential equipment and safety gear needed.
Essential Equipment
- Multimeter – Measures voltage and current output
- Battery – Fully charged for testing the charger
- Charger manual – Provides specific instructions and specs
- Small screwdriver – Opens charger casing if needed
- Wire cutters or strippers – For handling wires safely
Safety Gear
- Safety glasses – Protects eyes from sparks or debris
- Insulated gloves – Prevents electric shock
- Work apron – Shields clothes and body from dirt
- Fire extinguisher nearby – For emergencies during testing
Prepare The Charger
Start by unplugging the charger and inspecting it for damage. Ensure the charger is clean and dry before testing. Plug it into a working outlet to begin the process.
Inspect The Charger
Start by checking the charger for any visible damage. Look for cracks, frayed wires, or loose parts. Ensure the power cord is intact and not worn out. A damaged charger can cause charging problems or be unsafe to use. Check the indicator lights to see if they turn on when plugged in. This helps confirm the charger is receiving power properly.
Clean The Contacts
Dirty contacts can stop the battery from charging correctly. Use a dry cloth or a soft brush to clean the metal contacts on the charger. Avoid using water or liquid cleaners, as they can damage the charger. Remove dust, dirt, or corrosion gently. Clean contacts improve the connection between the charger and battery, making charging more efficient.
Check The Power Source
Testing a cordless drill battery charger starts with checking the power source. Without a good power supply, the charger cannot work properly. This step helps find problems early. It saves time and avoids confusion later. Two simple ways to check the power source are verifying outlet functionality and using a multimeter.
Verify Outlet Functionality
Start by plugging another device into the outlet. A lamp or phone charger works well. If the device turns on, the outlet has power. No power means the outlet is faulty or the circuit breaker tripped. Try another outlet to be sure. Fixing outlet issues can restore charger function quickly.
Use A Multimeter
A multimeter measures electrical current and voltage accurately. Set it to AC voltage mode. Insert the probes into the outlet slots carefully. Check the reading on the screen. It should match the outlet voltage, usually 110-120 volts or 220-240 volts. Low or no voltage means a problem with the power source. Testing this way confirms if the outlet supplies enough power for the charger.

Credit: www.youtube.com
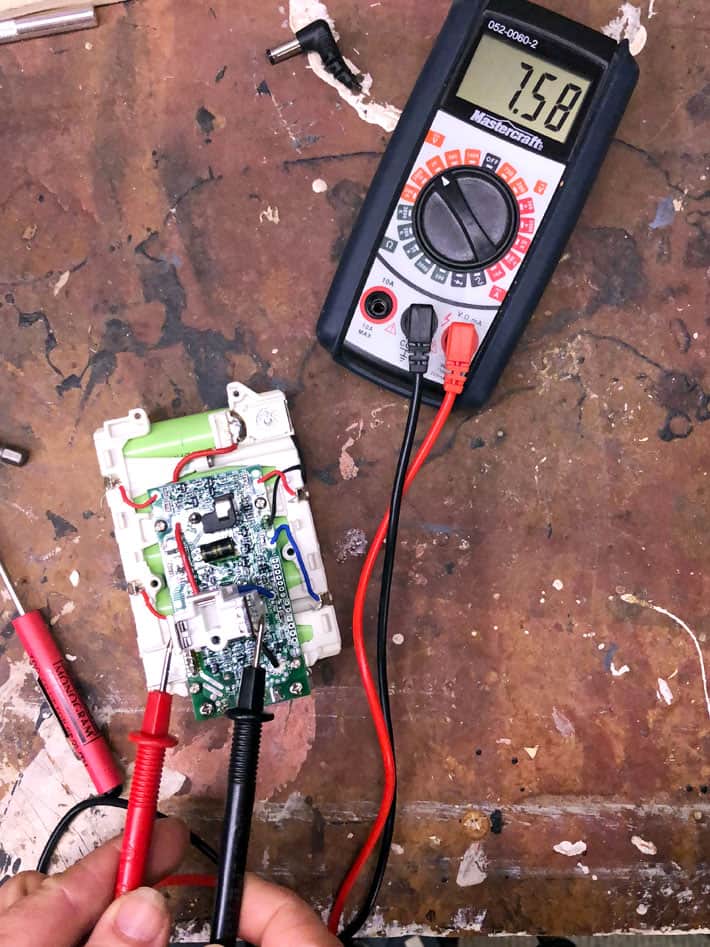
Test The Charger Output
Testing the charger output helps confirm if your cordless drill charger works properly. A faulty charger can stop your battery from charging fully. This section shows how to check the charger’s voltage using a multimeter. The process is simple and safe with basic tools.
Set Up The Multimeter
Start by setting your multimeter to measure voltage. Choose the DC voltage setting, as most cordless drill chargers use direct current. Check the multimeter’s range and set it higher than your charger’s voltage. This prevents damage to the multimeter or inaccurate readings.
Next, plug in the charger but do not connect it to the battery. This ensures you test the charger output alone. Prepare the multimeter probes. The red probe connects to the positive terminal, the black to the negative terminal. Be careful not to touch the probes together.
Measure Voltage Output
Touch the red probe to the charger’s positive output terminal. Place the black probe on the negative terminal. Watch the multimeter display for the voltage reading.
The voltage should match the charger’s rated output, usually marked on the charger label. A lower or zero reading means the charger may be faulty. A much higher reading can also indicate a problem. Record the voltage for comparison with normal values. This step confirms if the charger supplies the correct power to charge the battery.
Test With The Battery
Testing a cordless drill battery charger with the battery is the most direct way to check its function. This method shows if the charger can properly power and recharge your battery. It helps you find problems with either the charger or the battery itself.
Insert Battery Correctly
Place the battery in the charger the right way. Align the battery terminals with the charger’s contacts. Do not force the battery; it should fit smoothly. A loose or wrong fit can stop charging or cause damage. Make sure the battery clicks or locks into place securely.
Observe Charging Indicators
Look at the charger’s lights or display after inserting the battery. Most chargers have LEDs that show charging status. A steady or blinking light usually means charging is active. If no light appears, the charger might not be working. Some chargers change color when charging finishes. Watch these signs to know if the battery is charging correctly.
Credit: www.theartofdoingstuff.com
Troubleshoot Common Issues
Troubleshooting common issues with your cordless drill battery charger helps save time and money. You can often fix problems yourself. This guide covers simple checks and fixes for typical charger problems. Follow these steps to get your charger working again.
No Power To Charger
First, check the power source. Make sure the outlet works by plugging in another device. Look for a loose or damaged power cord. Replace the cord if you see any frays or breaks. Sometimes, the charger’s internal fuse may blow. Consult the manual to locate and test the fuse. Replace it if needed. No power usually points to the power supply or cord.
Incorrect Voltage Output
Use a multimeter to check the charger’s voltage output. Compare it to the voltage listed on the charger label. Low or no voltage means the charger might be faulty. Sometimes dirt or debris on the charger’s contacts causes poor connections. Clean the contacts gently with a dry cloth. If voltage stays incorrect after cleaning, the charger may need repair or replacement.
Battery Not Charging
Check if the battery fits well in the charger. Poor contact stops charging. Remove dirt or corrosion on battery terminals with a soft cloth. Try charging another battery to see if the problem is with the charger or battery. If other batteries charge fine, the battery likely needs replacement. If none charge, the charger might be the issue. Testing both helps find the exact problem quickly.
When To Replace The Charger
Knowing when to replace your cordless drill battery charger is important. A charger that does not work well can cause problems. It can stop your drill from being ready to use when you need it most. This section helps you understand the signs that show your charger needs replacing.
Signs Of Damage
Look closely at your charger for any visible damage. Cracks, broken parts, or frayed wires are clear signs. Damaged plugs or loose connections can also cause charging issues. These physical problems can stop the charger from working safely or correctly. Using a damaged charger can be risky and may harm your drill battery.
Performance Decline
Notice if your charger takes longer to charge the battery than before. A slow charge time can mean the charger is failing. If the battery does not reach full power after charging, the charger might be the cause. Sometimes, the charger may stop charging altogether. These performance drops show that replacement is needed for reliable use.
Frequently Asked Questions
How Do I Check If My Cordless Drill Charger Works?
To check your charger, first inspect it for damage. Plug it in and see if the indicator light turns on. Use a multimeter to test output voltage. If voltage matches the charger’s rating, it works properly. Otherwise, it may need replacement.
What Tools Are Needed To Test A Drill Battery Charger?
You need a multimeter to test voltage output. Also, ensure you have the cordless drill battery and charger manual. These tools help verify correct voltage and charger functionality safely and accurately.
How To Test A Cordless Drill Battery Charger Safely?
Unplug the charger before testing. Use a multimeter set to DC voltage. Connect probes to charger output terminals carefully. Avoid short circuits and follow manufacturer guidelines. Safety precautions prevent damage and ensure accurate testing.
Why Is My Cordless Drill Charger Not Charging?
Possible reasons include a faulty charger, damaged battery, or loose connections. Check the charger’s output voltage with a multimeter. Inspect battery contacts and clean them if dirty. Replace the charger if voltage is inconsistent or absent.
Conclusion
Testing a cordless drill battery charger helps you avoid surprises. Check the charger regularly to ensure it works well. Use simple tools like a multimeter for quick tests. Watch for signs like slow charging or no power. Fix or replace chargers early to save money and time.
Keep your drill ready for any task by maintaining the charger. Small checks make a big difference in tool performance. Stay safe and efficient with proper charger care.