
Are you ready to take your workshop skills to the next level? Building your own 4 drill press might sound tough, but it’s easier than you think—and it gives you a powerful tool tailored just for your needs.
Imagine the satisfaction of creating something with your own hands that saves you time and money while making your projects smoother and more precise. In this guide, you’ll discover simple steps and insider tips to build a reliable 4 drill press, even if you’re new to DIY.
Keep reading, and by the end, you’ll be confident to start building your own—and watch your projects come to life like never before.
Choosing Materials
Choosing the right materials is key to building a sturdy 4 drill press. Quality parts ensure durability and smooth operation. Picking the right tools helps the assembly process go faster and easier.
Selecting Drill Press Components
Start with a strong base to hold the drill press steady. Use thick metal or heavy-duty wood for support. The drill head should fit tightly and spin smoothly. Choose a motor that matches the power you need.
Pick reliable bearings and shafts for smooth drilling. Use durable belts and pulleys to transfer power well. Secure all parts with strong bolts and screws. Avoid cheap materials that wear out quickly.
Tools And Supplies Needed
Gather basic tools like screwdrivers, wrenches, and pliers. A drill and drill bits help make holes for screws. Use a measuring tape and square for accurate cuts. Sandpaper or a file smooth rough edges.
Have safety gear ready: gloves, goggles, and ear protection. Use quality glue or welds to hold parts firmly. Clean cloths help keep the workspace tidy. Proper tools make the build safer and easier.
Preparing The Workspace
Preparing your workspace is the first step to building a 4 drill press. A clean and organized area helps you work faster and safer. It also reduces mistakes and keeps parts from getting lost. Before starting, take time to set up everything properly.
Setting Up A Safe Work Area
Choose a place with plenty of light and space. Make sure the floor is dry and free of clutter. Clear the area of anything that can cause trips or falls. Keep a fire extinguisher nearby. Wear safety glasses and gloves while working. Safety must come first at all times.
Organizing Tools And Parts
Gather all tools needed for the drill press assembly. Place screws, bolts, and small parts in containers to avoid losing them. Arrange tools in the order you will use them. This saves time searching and keeps your focus. A tidy workspace helps you stay calm and efficient.
Assembling The Base
Assembling the base is the first step in building your 4 drill press. A solid base ensures the drill press stays steady during use. This part must be strong and level to avoid any shaking or wobbling. Take your time to build a reliable foundation before moving to other parts.
Building A Stable Foundation
Start by selecting a flat and clean workspace. Use thick plywood or metal as the base material. The base should be wide enough to support the entire drill press. Cut the material to the right size using proper tools. Make sure all edges are smooth and even. A stable foundation keeps the drill press balanced and safe to use.
Securing The Base Components
Place the base parts together on your workspace. Use screws or bolts to join the pieces tightly. Check that all parts fit well without gaps. Tighten each screw firmly to prevent movement. Double-check the base for stability by pressing on it gently. A secure base reduces vibrations and improves drilling accuracy.

Credit: www.youtube.com
Constructing The Column
The column is the backbone of your 4 drill press. It holds the drill head steady and ensures accurate drilling. Building a strong and straight column is vital for the drill press to work well. This section explains how to cut, shape, and attach the column to the base. Each step requires care and attention to detail.
Cutting And Shaping The Column
Start by selecting a sturdy metal or steel tube for the column. Use a saw or cutting tool to cut the tube to the correct height. Measure twice, cut once. Smooth the edges with a file or sandpaper to remove sharp bits. Shape the column so it stands straight and fits the drill press head. Precision is key to prevent wobbling during use.
Attaching The Column To The Base
Place the column on the base where it will be stable and balanced. Mark the spots for screws or bolts to secure the column firmly. Drill holes in both the base and the bottom of the column. Use strong bolts or screws to fix the column tightly. Check the column is vertical using a level. Tighten all fasteners to avoid any movement during drilling tasks.
Installing The Drill Head
Installing the drill head is a key step in building a 4 drill press. This part holds the motor and drill chuck. Proper installation ensures smooth drilling and accurate holes. Take your time to fit each piece correctly. Follow these steps carefully for the best results.
Mounting The Drill Motor
Start by placing the drill motor on the mounting plate. Use bolts to secure it tightly. Make sure the motor sits flat and does not move. Tighten all screws evenly to avoid vibration. Check that the motor shaft points straight down. This helps with accurate drilling and longer motor life.
Aligning The Drill Chuck
Next, attach the drill chuck to the motor shaft. Slide it on gently but firmly. Use a wrench to tighten the chuck securely. Check that the chuck spins true without wobbling. A misaligned chuck causes uneven holes and can damage the drill bit. Adjust as needed for perfect alignment.
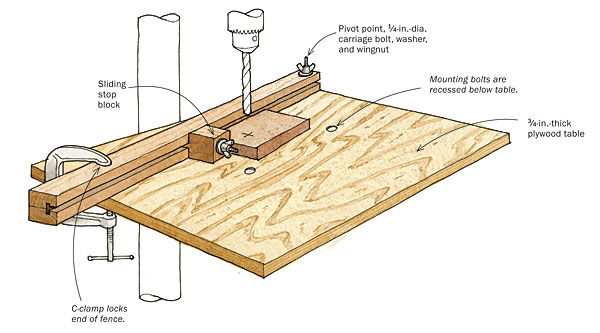
Adding The Worktable
Adding the worktable is a key step in building a 4 drill press. The worktable holds your material steady while drilling. It must be strong and adjustable for different tasks. A well-designed table improves safety and accuracy. Follow the steps below to create and attach a practical worktable.
Designing An Adjustable Table
Choose a sturdy material like thick plywood or metal for the table. Make the table size large enough to support your workpieces. Add slots or holes to clamp down materials securely. Design the table so it can move up and down the column. This adjustability helps work on various sizes and shapes. Use simple mechanisms like a screw or lever to lock the table in place. Keep the design easy to use and maintain.
Mounting The Table To The Column
Attach a bracket or support arm to the drill press column. Make sure the bracket fits tightly and can hold weight without slipping. Connect the worktable to the bracket with bolts or clamps. Check that the table moves smoothly along the column. Test the locking system to keep the table steady during drilling. Align the table so it sits flat and parallel to the drill bit. Secure all fasteners tightly to avoid wobbling.
Wiring And Power Setup
Wiring and power setup are key steps in building a 4 drill press. These steps connect the machine to electricity safely. Proper wiring ensures the drill press runs smoothly and avoids hazards. Follow each step carefully for a reliable setup.
Electrical Connections
Start by choosing the right power source for your drill press. Use a dedicated circuit with the correct voltage and amperage. Connect the power cable to the motor terminals following the wiring diagram. Secure all wire connections tightly with wire nuts or terminal blocks. Use insulated wires to prevent shorts and shocks. Double-check each connection for accuracy before powering the machine.
Safety Checks
Test all electrical parts before the first use. Look for loose wires, exposed conductors, or damaged insulation. Use a voltage tester to confirm no current flows when switched off. Make sure the power switch works smoothly and cuts power instantly. Ground the drill press properly to avoid electric shocks. Never skip these checks to keep yourself and the workspace safe.
Testing And Calibration
Testing and calibration are key steps after building a 4 drill press. These steps make sure the drill press works well and safely. Proper testing helps avoid mistakes and damage to materials. Calibration ensures the drill press performs with accuracy and precision.
Take your time to check every part carefully. Small adjustments can improve the drill press’s function. Let’s explore how to align the drill bit and adjust speed and depth.
Aligning The Drill Bit
Start by checking the drill bit’s position. The bit should be straight and centered. Use a square or ruler to see if the bit is aligned with the table. Adjust the bit holder if it is off-center. Tighten all screws after aligning. Proper alignment prevents crooked holes and damage to the drill press.
Adjusting Speed And Depth
Set the drill press speed according to the material. Use slower speeds for hard materials like metal. Faster speeds work better for wood or soft plastics. Adjust the depth stop to control how deep the bit drills. Test on scrap material to find the right speed and depth. This step protects your workpiece and extends the drill bit’s life.
Maintenance Tips
Maintaining your 4 drill press is key for long life and safe use. Regular care keeps it working well. Small steps prevent big problems. Follow these simple tips to keep your drill press in top shape.
Regular Cleaning
Clean your drill press after each use. Remove dust, wood chips, and metal shavings. Use a brush or cloth to wipe surfaces. Avoid water to stop rust. Check the table, base, and spindle area carefully. Clean the chuck to keep it gripping tight. A clean machine runs smoothly and lasts longer.
Lubrication And Repairs
Lubricate moving parts regularly. Use oil on the spindle, gears, and bearings. This reduces friction and wear. Check belts for cracks or wear. Replace them if damaged. Tighten any loose screws or bolts. Fix small issues early to avoid bigger repairs. Proper lubrication and timely repairs keep your drill press safe and efficient.

Credit: 3bwoodworking.com
Credit: www.finewoodworking.com
Frequently Asked Questions
What Tools Are Needed To Build A 4 Drill Press?
You need a drill, clamps, measuring tape, screws, wood or metal base, and safety gear. Proper tools ensure accuracy and safety.
How Long Does It Take To Build A 4 Drill Press?
Building a 4 drill press typically takes 4 to 6 hours. Time varies based on skill level and tool availability.
Can I Use A 4 Drill Press For Woodworking?
Yes, a 4 drill press is ideal for woodworking. It allows precise, evenly spaced holes in wood or similar materials.
What Safety Measures Should I Take When Building A Drill Press?
Always wear safety goggles and gloves. Work in a well-lit area and keep tools properly secured to prevent accidents.
Conclusion
Building a 4 drill press is easier than you think. Follow clear steps and take your time. Use the right tools and materials for safety and success. Each part fits together to make a strong, useful machine. Practice and patience will improve your skills.
Enjoy the process of creating something with your hands. This project adds value to your workshop and your work. Keep learning and building to grow your abilities.