
Are you wondering how to drill a hole in your aquarium glass without cracking it? You’re not alone.
Drilling glass can seem tricky and risky, especially when you want to keep your aquarium safe and leak-free. But don’t worry—this guide will show you simple, step-by-step methods to get the job done right. By the end, you’ll have the confidence and know-how to make precise holes for filters, air tubes, or decorations.
Keep reading, and discover how easy it can be to customize your aquarium exactly the way you want.

Credit: www.aquariumcoop.com
Choosing The Right Glass
Choosing the right glass is the first step before drilling a hole in an aquarium. Different glasses have different strengths and properties. Picking the correct type ensures safety and success in your project. Understanding glass types and thickness helps avoid cracks and leaks.
Types Of Aquarium Glass
Most aquariums use either tempered glass or regular annealed glass. Tempered glass is stronger but can shatter into small pieces when broken. Annealed glass breaks more safely but is less strong. Many DIY projects prefer annealed glass for easier drilling. Knowing the glass type helps choose the right drill bit and technique.
Glass Thickness And Safety
Glass thickness affects how easy it is to drill and how strong the aquarium will be. Thicker glass is harder to drill but offers better durability. Thin glass might crack during drilling or under water pressure. Measure your glass thickness before starting. Use proper safety gear to protect yourself from glass shards.

Credit: www.youtube.com
Gathering Necessary Tools
Drilling a hole in aquarium glass requires the right tools. Using proper equipment ensures safety and precision. Without the correct tools, the glass can crack or break.
Gathering all necessary tools before starting helps the process go smoothly. It also saves time and avoids mistakes. Two main categories of tools are essential: drill bits made for glass and additional equipment to support drilling.
Drill Bits For Glass
Regular drill bits are too rough for glass. They can cause cracks or shatter the surface. Special drill bits designed for glass are sharp and precise. Diamond-tipped drill bits are the best choice. They cut through glass smoothly and reduce heat build-up. Carbide-tipped bits are another option, but they wear out faster. Choose a drill bit size that matches the hole you want to make. Using the right drill bit protects your aquarium glass from damage.
Additional Equipment
Besides drill bits, other tools help make the drilling safe and easy. A drill with variable speed control works best. Slow speeds prevent the glass from overheating. Water or a wet sponge keeps the area cool and reduces dust. A clamp or suction cup holds the glass steady during drilling. Safety glasses protect your eyes from glass shards. Gloves prevent cuts and improve grip. Preparing all these tools ensures a clean and safe drilling process.
Preparing The Workspace
Preparing the workspace is key before drilling a hole in aquarium glass. A clean, organized area helps prevent accidents and damage. It also makes the task easier and faster. Focus on two main steps: cleaning the glass and protecting the surrounding areas.
Cleaning The Glass
Start by wiping the glass with a soft cloth. Remove dust, dirt, and oil spots. Use a mild glass cleaner or water. Avoid harsh chemicals that could weaken the glass. Clean glass ensures the drill bit works smoothly and accurately. It also helps you mark the drilling spot clearly.
Protecting Surrounding Areas
Cover surfaces near the aquarium with plastic sheets or old newspapers. This protects them from glass dust and water splashes. Tape the plastic securely to avoid movement. Keep tools and drill accessories nearby but out of the way. Clear space reduces the risk of knocking things over during drilling.
Credit: www.aquariumcoop.com
Marking The Drill Spot
Marking the drill spot is an important step before drilling a hole in aquarium glass. It helps ensure the hole is in the right place and prevents mistakes. A well-marked spot makes drilling safer and easier. Take your time to mark carefully.
Selecting The Location
Choose a spot away from edges and corners of the glass. The glass is weaker near edges and may crack. Pick a flat area with enough space for your drill bit. Avoid areas with seams or decorations. This ensures a clean, strong hole.
Using Guides And Templates
Use a guide or template to mark the exact spot. A small piece of tape works well for this. Place the tape on the glass, then mark the spot with a pen or marker. The tape stops the drill bit from slipping. Templates help keep marks precise and steady.
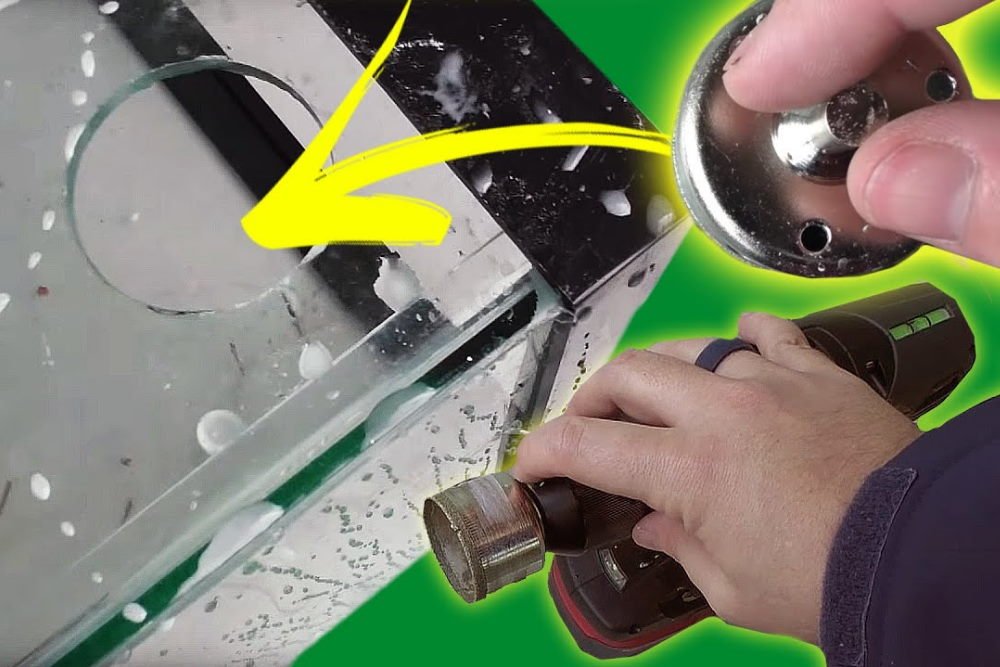
Drilling Techniques
Drilling a hole in aquarium glass needs care and the right technique. Using proper drilling methods reduces the risk of cracking the glass. It also helps create a clean hole without sharp edges. The key points include setting the right drill speed, applying the correct pressure, and cooling the drill bit during the process.
Setting The Drill Speed
Set the drill to a low speed before starting. Slow speeds reduce heat and prevent glass from breaking. High speeds can cause cracks or chips. Use a drill with adjustable speed settings. Start slowly and increase only if needed.
Applying Pressure Correctly
Press the drill gently against the glass. Too much force can crack the glass. Too little pressure makes drilling take longer. Let the drill do the work. Keep your hand steady and avoid sudden movements.
Cooling The Drill Bit
Keep the drill bit cool during drilling. Heat weakens the glass and drill bit. Use water to cool the bit often. Spray or drip water on the drill area. This prevents overheating and keeps the glass safe.
Handling Mistakes
Mistakes can happen while drilling aquarium glass. Staying calm helps fix problems fast. Quick action can stop damage from getting worse. Knowing how to handle errors saves your aquarium glass.
Dealing With Cracks
Cracks in aquarium glass need careful attention. Stop drilling immediately to avoid bigger cracks. Use clear epoxy to fill small cracks. Let the epoxy dry fully before adding water. Large cracks require professional repair or glass replacement. Never ignore cracks as they may cause leaks.
Fixing Imperfect Holes
Imperfect holes can cause leaks or stress points. Smooth rough edges with fine sandpaper or a diamond file. Avoid making the hole bigger than needed. Seal the hole with waterproof silicone to prevent leaks. Check the seal after 24 hours to ensure no water escapes. A clean, smooth hole keeps your aquarium safe.
Post-drilling Care
After drilling a hole in aquarium glass, proper care is very important. It keeps the glass strong and safe for water. Post-drilling care prevents cracks and leaks. It also helps maintain the aquarium’s clean look. Follow these steps to care for your drilled aquarium glass well.
Cleaning The Glass Edges
Clean the edges of the drilled hole carefully. Use a soft cloth or sponge to wipe away dust and glass particles. Avoid sharp tools that might scratch or weaken the glass. Rinse the area with water to remove any leftover debris. Dry the edges gently with a clean towel. This prevents dirt build-up and helps the sealant stick better.
Sealing And Waterproofing
Apply a good quality aquarium-safe sealant around the drilled hole. This stops water from leaking out. Use a silicone sealant made for glass aquariums. Spread it evenly around the hole’s edge using a small brush or your finger. Let the sealant dry completely before adding water back to the tank. This step ensures your aquarium stays watertight and safe for fish.
Safety Tips
Drilling a hole in aquarium glass requires care and attention. Safety is very important to avoid injuries and damage. Follow these tips to protect yourself and your aquarium.
Protective Gear
Wear safety glasses to shield your eyes from glass dust and shards. Use thick gloves to protect your hands from sharp edges. A dust mask helps prevent inhaling glass particles. Dress in long sleeves to cover your arms. These simple steps reduce the risk of cuts and irritation.
Preventing Glass Shards
Place a piece of masking tape over the drilling spot. This tape helps stop the drill bit from slipping. Drill slowly with steady pressure to avoid cracking. Use water to cool the glass and reduce dust. Keep the glass supported on a soft surface to prevent breaks. Clean the area carefully after drilling to remove tiny shards.
Frequently Asked Questions
How Do I Safely Drill A Hole In Aquarium Glass?
Use a diamond-tipped drill bit and keep the glass wet. Drill slowly with gentle pressure to avoid cracking. Always wear safety goggles and gloves for protection.
What Tools Are Needed To Drill Aquarium Glass?
You need a diamond drill bit, a drill, water for cooling, tape to mark the spot, and safety gear. These tools ensure a clean and safe hole.
Can I Drill A Hole In Tempered Aquarium Glass?
No, drilling tempered glass is risky and often causes shattering. It’s best to buy pre-drilled tempered tanks or consult professionals.
How Do I Prevent Cracks When Drilling Aquarium Glass?
Keep the drill bit cool by applying water constantly. Use low speed and light pressure. Secure the glass firmly to avoid vibrations.
Conclusion
Drilling a hole in aquarium glass takes care and patience. Use the right tools and keep the glass wet. Drill slowly to avoid cracks or breaks. Safety matters—wear goggles and gloves. Take your time and follow each step carefully. This way, your aquarium stays safe and strong.
Now, you can add filters or pipes easily. Enjoy your aquarium project with confidence and calm.