
If you’ve ever thought about milling an 80 lower with a drill press, you’re in the right place. This task might seem tricky, but with the right steps, you can do it yourself without expensive machines.
Imagine turning your 80% lower into a fully functional part, saving money and gaining a sense of accomplishment. In this guide, you’ll discover clear, simple instructions that make the process easy to follow—even if you’re new to milling. Ready to take control and build your own lower?
Keep reading, and you’ll learn exactly how to do it safely and effectively.
Credit: www.reddit.com
Required Tools And Materials
Milling an 80 lower with a drill press needs careful planning. The right tools and materials make the job easier and safer. This section covers everything you need to start milling. Understanding these basics helps you avoid mistakes and achieve good results.
Choosing The Right Drill Press
Pick a drill press with a strong motor. It should run smoothly at low speeds. Speed control is important for precise milling. The table must be flat and stable to hold the workpiece well. A drill press with enough throat depth lets you reach all parts of the lower.
Essential Milling Accessories
Use a quality milling bit designed for aluminum or metal. A vise or clamp keeps the lower steady during milling. Safety gear like goggles and gloves protects your eyes and hands. A depth stop helps control how deep the bit cuts. Measuring tools such as calipers ensure accuracy.
Selecting The 80 Lower Receiver
Choose an 80 lower receiver made of high-quality aluminum. It should be free from defects and easy to mill. Look for a well-marked lower to guide your cuts. Check the material thickness to match your drill press power. A good receiver makes the milling process smoother and safer.
Preparing The Work Area
Preparing the work area is the first step to milling an 80 lower with a drill press. A neat and well-organized space makes the process easier. It helps avoid mistakes and keeps you safe. Taking time to set up your work area pays off in better results and less hassle.
Setting Up A Stable Workbench
Choose a strong workbench that does not wobble. The bench should be at a comfortable height. This helps keep your hands steady while milling. A stable surface reduces vibrations that can affect the cut. Use clamps or a vise to hold the lower firmly. Secure the workpiece well before starting the drill press.
Ensuring Proper Lighting And Safety
Good lighting is essential for clear visibility. Bright light helps you see markings and drill points accurately. Use a lamp or overhead light focused on the work area. Wear safety glasses to protect your eyes from metal shavings. Ear protection is also important to guard against noise. Keep a clean space to prevent slips or accidents.
Organizing Tools And Components
Gather all necessary tools before you begin. Keep drill bits, measuring tools, and files within easy reach. Arrange parts in order of use to save time. Labeling components helps avoid confusion during milling. A tidy workspace allows smooth workflow and fewer distractions. Check your tools for damage to ensure safety and precision.
Marking And Securing The Lower
Marking and securing the lower is a key step in milling an 80 lower with a drill press. This stage sets the foundation for accurate cuts. Precise marking and firm securing ensure safety and quality. Taking time here reduces mistakes later. Follow clear steps to prepare the lower correctly.
Measuring And Layout Techniques
Start by measuring the lower carefully. Use a ruler or caliper for exact marks. Mark the outline clearly with a fine-tip marker or scribe. Check the measurements twice to avoid errors. Draw straight lines to guide the milling process. Clear layout saves time during cutting.
Clamping The Lower To The Drill Press Table
Place the lower flat on the drill press table. Use strong clamps to hold it in place. Ensure the clamps do not block the drill path. Tighten clamps firmly to prevent any movement. A steady lower helps achieve smooth, accurate cuts. Avoid using too much force that might damage the part.
Double-checking Alignment
Check the alignment of the lower with the drill bit. Align the marked lines with the drill’s center point. Use a square or straight edge to verify angles. Confirm the lower is level and stable. Double-checking prevents costly mistakes during milling. Adjust clamps if needed before starting the drill press.
Milling Process Step-by-step
The milling process for an 80 lower is precise but manageable with a drill press. It involves shaping specific areas to fit the firearm parts perfectly. Each step requires care and attention to detail. Following these steps helps avoid mistakes and ensures a functional lower receiver.
Drilling The Trigger Pocket
Start by securing the 80 lower in a vise. Use a clamp to keep it steady. Mark the trigger pocket area clearly. Choose the correct drill bit size for the pocket depth. Drill slowly to avoid overheating the metal. Check depth frequently to prevent drilling too deep. Clean metal shavings from the pocket after drilling. This step shapes the area for trigger installation.
Milling The Magazine Well
Next, focus on the magazine well area. Use a milling bit suited for your drill press. Remove the metal inside the marked magazine well. Make smooth, even passes to keep the walls straight. Stop to check the fit with a magazine. Adjust the milling depth if needed. Clean all debris to maintain clear edges. This step ensures the magazine fits securely.
Cleaning The Bolt Catch Area
The bolt catch slot must be precise for proper function. Use a small end mill or file to clean this area. Remove any leftover metal or rough spots. Work slowly to avoid removing too much material. Test the bolt catch fit often during cleaning. A clean slot ensures smooth bolt operation. Finish by wiping the area free of dust and metal pieces.
Safety Tips During Milling
Milling an 80 lower with a drill press requires care and attention to safety. The process involves sharp tools and moving parts. Taking precautions protects your body and your workpiece. Follow these safety tips to prevent injuries and mistakes during milling.
Protective Gear Recommendations
Always wear safety glasses to protect your eyes from flying debris. Use hearing protection to shield your ears from loud noises. Wear gloves to avoid cuts and scrapes, but ensure they fit well and do not get caught in the machine. Use a dust mask to prevent breathing in harmful particles. Dress in close-fitting clothes to avoid loose fabric getting caught.
Avoiding Common Milling Mistakes
Secure the 80 lower firmly to the drill press table before starting. Double-check the drill bit size and speed for the correct cut. Do not force the drill press; let the tool work at its pace. Keep your hands clear of the cutting area at all times. Stop the machine before making adjustments or measurements.
Handling Debris And Dust
Clear away metal shavings and plastic dust regularly to keep the work area clean. Use a brush or vacuum to remove debris instead of your hands. Work in a well-ventilated space to reduce dust buildup. Dispose of waste materials safely and properly. Clean the drill press after each use to maintain performance.

Credit: 3dgunbuilder.com
Finishing Touches
After milling your 80 lower with a drill press, the finishing touches are crucial. These steps ensure your lower is safe, functional, and ready for assembly. Paying attention to small details improves the overall quality and performance.
Deburring And Smoothing Edges
Remove any sharp edges or burrs left from milling. Use a fine file or sandpaper to smooth all surfaces. This prevents cuts and helps parts fit better. Take your time to check all edges carefully. Smooth edges reduce wear on components and improve safety.
Test Fitting Components
Try fitting the trigger group, safety, and other parts into the lower. This confirms the milling is accurate. Parts should slide in easily without force. Check for any tight spots or misalignments. Adjust with light sanding if needed. Proper test fitting avoids problems during final assembly.
Final Inspection Before Assembly
Look over the entire lower for any defects or missed steps. Confirm all holes are clean and free of debris. Use a flashlight to see inside tight spaces. Double-check dimensions with calipers if possible. This final check ensures your 80 lower is ready for safe use.
Troubleshooting Common Issues
Milling an 80 lower with a drill press can bring some challenges. Troubles may arise that slow down your work or cause mistakes. Knowing how to fix these common problems keeps your project on track. This section covers key troubleshooting tips for smooth milling.
Fixing Alignment Errors
Alignment is crucial when milling an 80 lower. Even a small misalignment can ruin the final product. Use a dial indicator to check your workpiece position. Adjust the vise or clamps to correct any shifts before cutting. Double-check measurements after each setup change. Keep the drill press table clean and flat. This prevents the workpiece from tilting during milling.
Addressing Incomplete Cuts
Incomplete cuts often result from dull bits or slow feed rates. Replace or sharpen your milling bit regularly. Do not rush the cut; slow and steady is better. Make multiple shallow passes instead of one deep cut. This protects your tool and ensures cleaner edges. Clear away chips during milling to avoid clogging. Use proper lubrication to reduce heat and wear.
Dealing With Drill Press Limitations
A drill press has size and power limits. Large 80 lowers may not fit or cut evenly. Make sure your drill press table can hold the workpiece securely. Use a milling attachment or jig to improve stability. Consider upgrading to a more powerful drill press for better results. If needed, mill parts in sections instead of one piece. Always follow safety rules to prevent accidents.
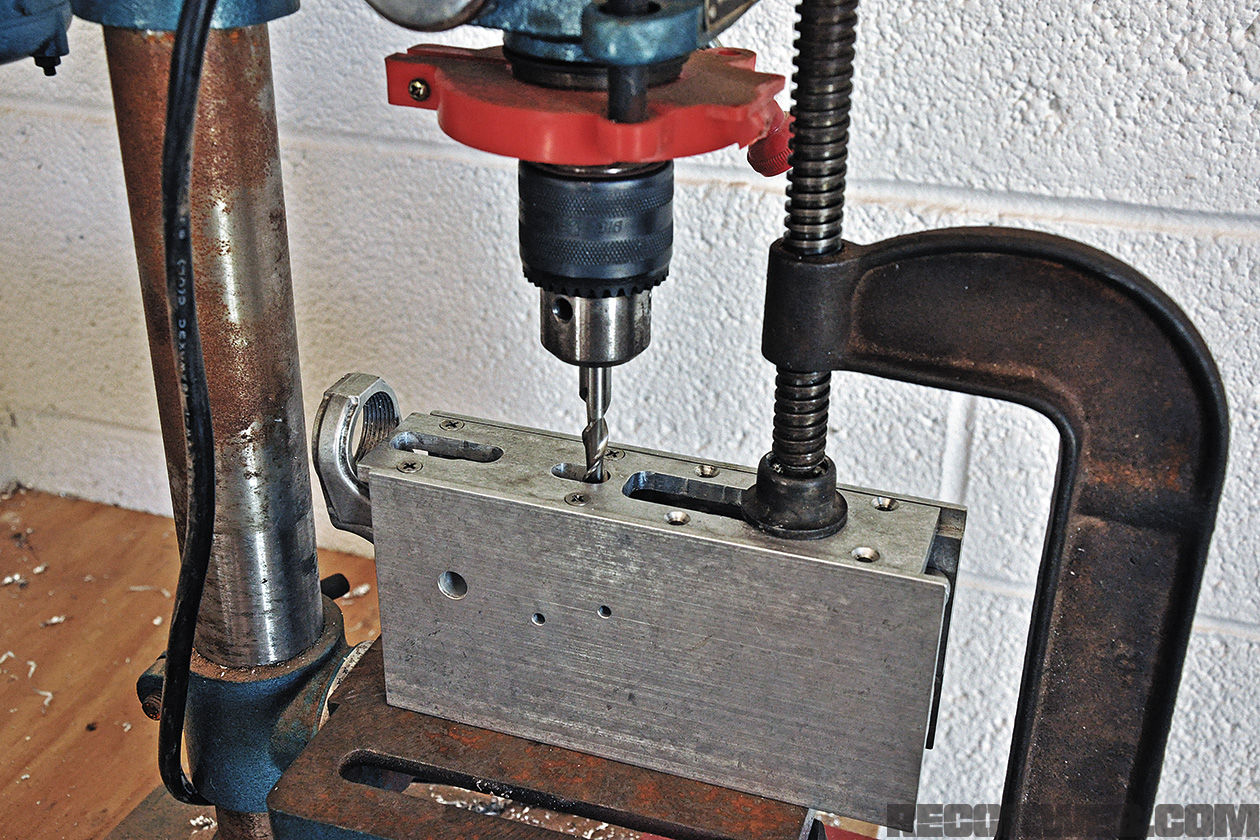
Credit: www.recoilweb.com
Frequently Asked Questions
What Tools Do I Need To Mill An 80 Lower With A Drill Press?
You need a drill press, a jig for the 80 lower, a milling bit, clamps, and safety gear. These ensure accuracy and safety during the milling process.
How Long Does It Take To Mill An 80 Lower With A Drill Press?
Milling an 80 lower with a drill press typically takes 1 to 2 hours. Time varies depending on your experience and equipment quality.
Is Milling An 80 Lower With A Drill Press Legal?
Yes, milling an 80 lower is legal for personal use in most states. Always check local laws before beginning your project.
Can A Beginner Mill An 80 Lower With A Drill Press?
Yes, beginners can mill an 80 lower with proper instructions and patience. Using a jig simplifies the process and improves precision.
Conclusion
Milling an 80 lower with a drill press takes patience and care. Follow each step slowly and check your work often. Use the right tools and safety gear to stay safe. Practice makes the process easier and more precise. Take your time and do not rush.
This guide helps you make a reliable and functional lower receiver. Keep learning and improving with each project. Milling at home is possible with the right approach and focus.