
Have you ever wondered what happens the moment you pull the trigger on your cordless drill? That simple squeeze sets off a chain reaction inside the tool, all controlled by a small but powerful component: the drill switch.
Understanding how your cordless drill switch works can help you use your tool more effectively and even spot problems before they happen. You’ll discover exactly what happens behind the scenes when you power up your drill—and why this knowledge can make a big difference in your DIY projects.
Keep reading to unlock the secrets of your cordless drill’s switch and take your skills to the next level.
Credit: vixencomposites.com
Basic Components
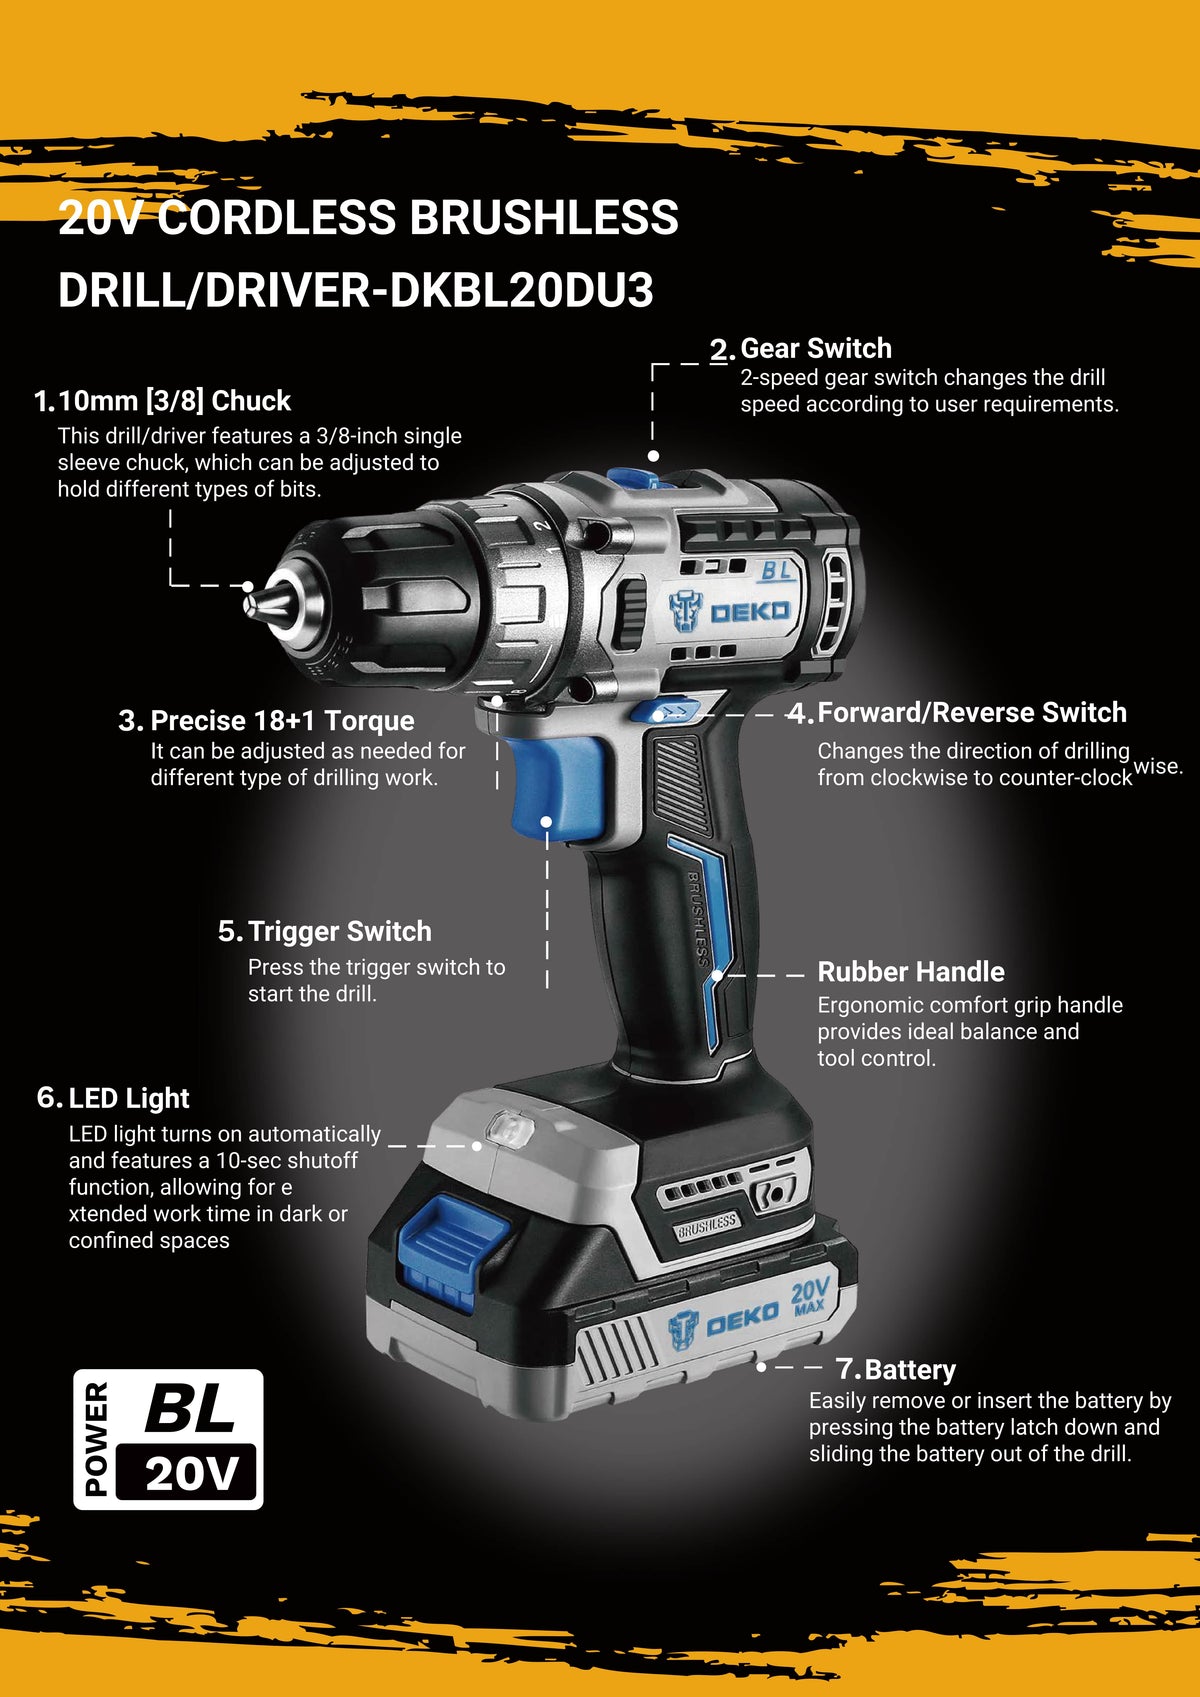
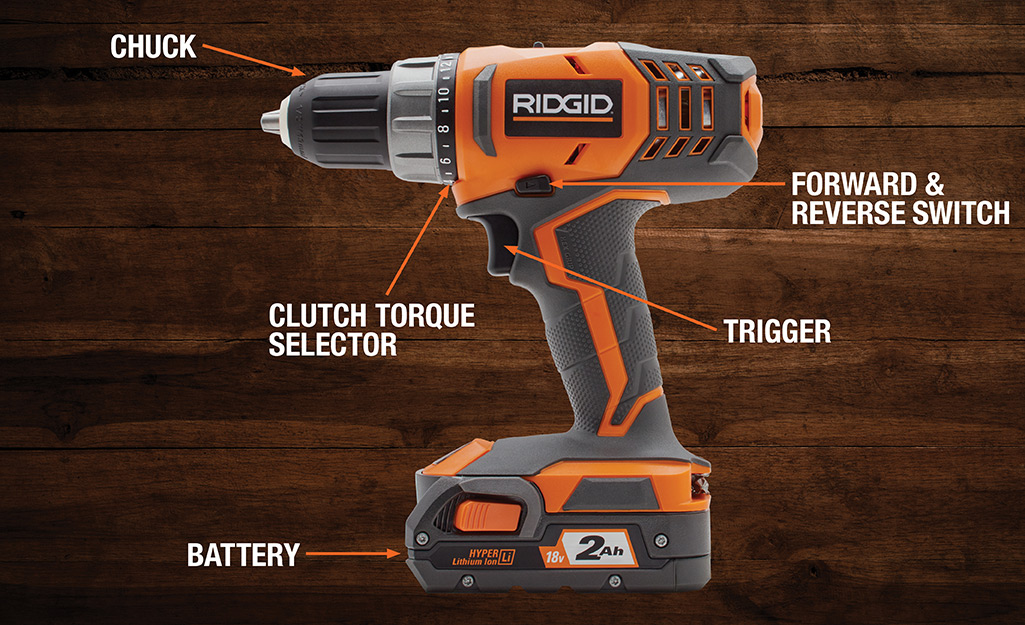
The switch of a cordless drill has several key parts. These parts work together to control the drill’s power and direction. Knowing these parts helps you understand how the drill works.
Each component plays a role in making the drill easy to use and safe. The main parts include the trigger switch, forward and reverse switch, and speed control mechanism.
Trigger Switch
The trigger switch is the main control for turning the drill on and off. It is usually located where your fingers rest. Pressing the trigger sends power to the drill’s motor. The harder you press, the faster the motor runs. Releasing the trigger stops the drill immediately.
Forward And Reverse Switch
This switch changes the drill’s rotation direction. It allows the drill bit to turn clockwise or counterclockwise. This is useful for driving screws in or removing them. The switch is often near the trigger for quick access during work.
Speed Control Mechanism
The speed control lets you adjust how fast the drill spins. It works with the trigger to provide smooth speed changes. Some drills have a dial or switch for fine-tuning speed. Controlling speed helps match the drill to different tasks and materials.
Trigger Switch Operation
The trigger switch is the main control for a cordless drill. It lets you start and stop the drill easily. Pressing the trigger sends power to the motor. The harder you press, the faster the drill spins. This smooth control helps in many tasks, from drilling holes to driving screws.
Electrical Contact Points
Inside the trigger switch, small metal parts touch each other. These are called electrical contact points. When you press the trigger, the contacts connect. This completes the electric circuit. Power flows from the battery to the motor. If the trigger is released, the contacts separate. The circuit breaks and the drill stops.
Variable Speed Control
The trigger can control the drill speed. It does this by changing how much the contacts connect. Light pressure means less power to the motor. The drill turns slower. Press the trigger harder, and more power flows. The drill spins faster. This allows you to match the speed to your work.
Safety Features
Trigger switches include safety parts to prevent accidents. Some have a lock to keep the drill off. This stops the drill from starting by mistake. Others have a brake that stops the motor quickly. These features protect both the user and the tool. They make cordless drills safer to use every day.
Direction Control Switch
The direction control switch on a cordless drill lets you change the drill bit’s spin direction. This switch is vital for drilling and removing screws. It helps you work quickly and safely.
Switch Positioning
The switch is usually near the trigger. It is easy to reach with your thumb or finger. You can move it left or right to change directions. This design keeps your hand steady while working.
Motor Direction Change
Inside the drill, the switch changes the motor’s electrical flow. This flow controls the motor’s spin direction. When switched, the motor spins forward or backward. This feature helps in tightening or loosening screws.
Lock Mechanism
The switch often has a lock to prevent accidental changes. This lock holds the switch in place during use. It keeps the drill running in the chosen direction. This avoids damage or injury from sudden reversals.

Credit: electronics.stackexchange.com
Speed Regulation Techniques
Speed regulation in cordless drills controls how fast the drill spins. This helps users work with more precision and safety. Different techniques manage the drill’s speed in simple and effective ways. These methods balance power use and tool performance.
Pulse Width Modulation
Pulse Width Modulation (PWM) adjusts speed by switching the drill’s power on and off rapidly. The longer the power stays on, the faster the drill spins. This method saves battery power and prevents the drill from overheating. It gives smooth control without extra parts.
Mechanical Speed Control
Mechanical speed control uses physical parts like springs and gears. Turning the trigger changes how much power reaches the motor. This method is easy to use and reliable. It lets users feel the speed change through the trigger’s pressure.
Effect On Battery Life
Speed control affects how long the battery lasts. Using PWM can extend battery life by reducing power waste. Mechanical control can drain battery faster if used at full speed often. Smart speed control helps keep the drill running longer on one charge.
Common Switch Types
Cordless drills use different types of switches to control power flow. Each switch type has a unique way to turn the drill on and off. Some switches also help control speed and direction. Understanding common switch types helps you know how your drill works inside.
Single-pole Single-throw
This switch type is the simplest. It has one input and one output. Pressing the switch completes the circuit and powers the drill. Releasing it breaks the circuit and stops the drill. It works like a basic on/off button. Common in small, lightweight drills.
Double-pole Double-throw
This switch has two inputs and two outputs. It controls two circuits at once. This allows the drill to change direction easily. Forward and reverse modes use this switch type. It helps when you need to remove screws or drill in reverse.
Electronic Switches
These switches use electronic parts instead of mechanical contacts. They control power more smoothly. Electronic switches can adjust the drill speed. They also reduce wear and tear inside the drill. Found in modern cordless drills for better performance.
Credit: www.homedepot.com
Troubleshooting Switch Issues
Troubleshooting switch issues in a cordless drill helps keep it working well. The switch controls the power flow and speed. Problems with the switch can stop the drill from working. Knowing how to find and fix switch problems saves time and money. It also prevents damage to the drill’s motor and battery.
Identifying Faulty Switches
Look for signs like the drill not starting or stopping suddenly. The trigger may feel loose or stuck. Sometimes the drill runs only at full speed or not at all. These signs often mean the switch is faulty. Use a multimeter to check if the switch allows electricity to pass. No continuity means the switch needs attention.
Repair Vs Replacement
Small switch problems can sometimes be fixed by cleaning contacts. Remove dust and dirt carefully. If cleaning does not work, replacing the switch is best. Switches are not expensive and replace quickly. A new switch ensures safe and reliable operation. Repairing a broken switch may cause more problems later.
Preventive Maintenance
Keep the drill clean and dry to avoid switch issues. Avoid dropping the drill or exposing it to water. Check the switch regularly for dirt or wear. Use compressed air to clean inside the switch area. Store the drill in a safe place when not in use. Proper care extends the switch’s life and keeps the drill ready.
Advancements In Switch Technology
Switch technology in cordless drills has improved a lot. These advancements make drills easier and safer to use. The switch controls the power and speed of the drill. New features help users work with better control and less effort.
Brushless Motor Integration
Brushless motors work without brushes, reducing friction and wear. Switches now match these motors well, providing smooth power flow. This integration saves battery life and improves drill speed. It also means less heat and longer tool life.
Smart Switch Features
Smart switches offer more control over drill functions. They can adjust speed based on pressure or task type. Some switches even stop the motor quickly to prevent accidents. These features give users better precision and safety.
Durability Improvements
Switches now use stronger materials and better designs. They resist dust, water, and heavy use. This makes drills last longer, even on tough jobs. Durable switches reduce repair needs and keep tools working well.
Frequently Asked Questions
How Does The Trigger Switch Control A Cordless Drill?
The trigger switch regulates power flow to the motor. Pressing it increases speed, while releasing reduces or stops the drill. It allows precise control for various drilling tasks, making cordless drills versatile and user-friendly.
What Components Make Up A Cordless Drill Switch?
A cordless drill switch typically includes a trigger, contacts, and a speed controller. These parts work together to manage electrical current, enabling smooth speed adjustment and reliable operation during drilling.
Why Is The Switch Important In Cordless Drills?
The switch is crucial as it controls motor activation and speed. Without a functioning switch, the drill cannot start or stop, making it essential for safety and performance.
Can A Faulty Switch Affect Drill Performance?
Yes, a faulty switch can cause inconsistent power delivery, erratic speed, or prevent the drill from working. Timely switch repair or replacement ensures optimal drill function and safety.
Conclusion
A cordless drill switch controls the power and speed of the drill. It connects the battery to the motor when pressed. The harder you press, the faster the drill spins. This simple mechanism makes the drill easy to use. Knowing how the switch works helps you handle the tool better.
It also helps in troubleshooting if the drill stops working. Understanding this part makes your work safer and more efficient. Keep this in mind for your next DIY project.