
Are you struggling to put the chuck on your drill press the right way? Getting this step wrong can slow down your work or even cause damage.
But don’t worry—once you know the simple process, you’ll save time and work with confidence. In this guide, you’ll learn exactly how to put the chuck on your drill press quickly and safely. Keep reading, and you’ll master this essential skill in no time.
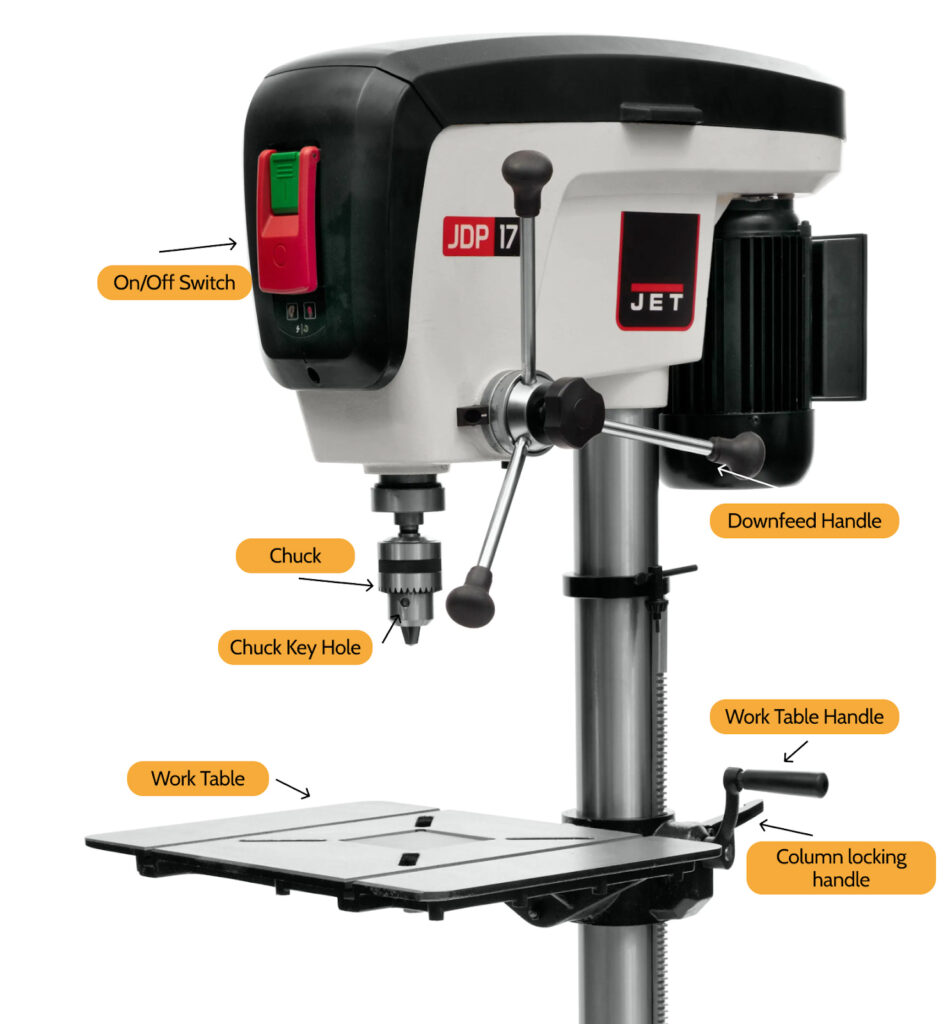
Credit: makerspaces.northeastern.edu
Choosing The Right Chuck
Choosing the right chuck for your drill press is important. It affects how well the drill works and how safe it is. A good chuck holds the drill bit tightly. It also fits well with the drill press. This section explains how to pick the best chuck for your needs.
Types Of Drill Chucks
There are several types of drill chucks. The most common are keyed and keyless chucks. A keyed chuck uses a small wrench to tighten the grip. This gives a strong hold on the bit. A keyless chuck tightens by hand. It is quicker to use but may not hold as tightly.
Another type is the SDS chuck, used mainly for hammer drills. It allows fast bit changes but fits specific drill types. Choose the chuck type based on your drill press and work needs.
Matching Chuck Size To Drill Press
Chuck size matters for drill press compatibility. Common sizes are 1/2 inch and 5/8 inch. Check the spindle size of your drill press. The chuck must fit this size exactly. A wrong size chuck will not work safely or correctly.
Also, consider the maximum drill bit size the chuck can hold. Choose a chuck that matches your drilling tasks. This ensures good performance and safety during use.
Credit: makerspaces.northeastern.edu
Preparing The Drill Press
Preparing the drill press is an important first step before putting the chuck in place. Taking time to prepare ensures the drill press works smoothly and safely. It also helps extend the life of the machine and tools.
Start by checking the drill press for any damage or wear. Make sure all parts are clean and free from dust or metal shavings. This preparation will make the chuck fit properly and reduce the risk of accidents.
Safety Precautions
Always unplug the drill press before starting any work. This prevents accidental starts that can cause injuries. Wear safety glasses to protect your eyes from dust and small particles. Keep your hands clear of moving parts during setup. Use gloves only if they do not reduce your grip or control.
Cleaning The Spindle
Clean the spindle thoroughly before inserting the chuck. Use a clean cloth to wipe away dirt, grease, or metal shavings. Avoid using water or harsh chemicals that can cause rust. A clean spindle ensures the chuck fits tightly and runs true. Inspect the spindle for any damage or wear. Replace or repair damaged parts to avoid machine problems.
Removing The Old Chuck
Removing the old chuck from a drill press is the first step to installing a new one. This task needs care to avoid damage to the drill or the chuck. Follow clear steps to loosen and remove the chuck safely.
Loosening The Chuck
Start by unplugging the drill press for safety. Hold the chuck firmly. Turn it counterclockwise to loosen. Some chucks are tight and need force. Use gentle but steady pressure. Avoid quick or jerky movements. This helps prevent injury and damage.
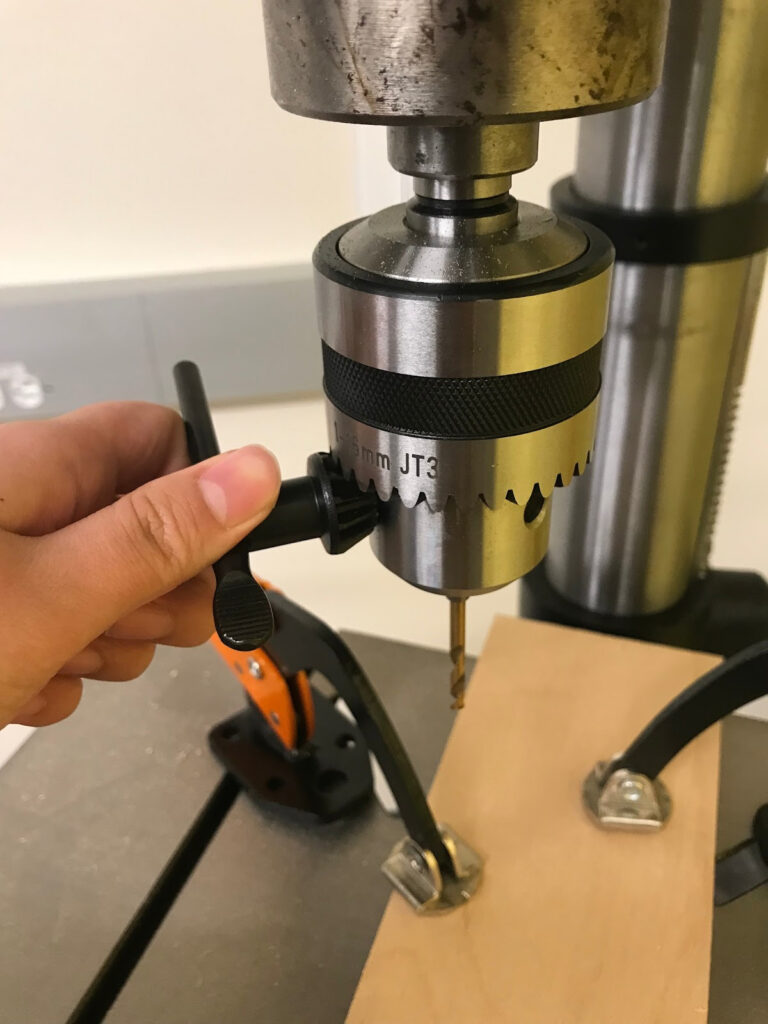
Using A Chuck Key Or Wrench
Most drill press chucks require a chuck key or wrench. Insert the key into the chuck’s hole. Turn it counterclockwise to open the jaws. This action loosens the grip on the drill bit or accessory. If the chuck is stuck, tap gently with a rubber mallet. This can help break the tight grip. Remove the chuck carefully once loose.
Installing The New Chuck
Installing a new chuck on your drill press is a key step for safe and accurate drilling. The chuck holds the drill bit firmly, so it must fit perfectly. Follow careful steps to avoid damage and ensure smooth operation.
Start by preparing the spindle and chuck for installation. Clean both parts well. Remove any dirt, dust, or old grease. This helps the chuck sit tight and work properly.
Aligning The Chuck With Spindle
Place the chuck near the spindle. Line up the center hole of the chuck with the spindle’s taper. Hold the chuck steady. The fit should be snug and straight.
Do not force the chuck onto the spindle. Gently slide it on while keeping it aligned. The chuck should slide in smoothly without wobbling.
Securing The Chuck Properly
Once the chuck is in place, tighten it securely. Use a chuck key to turn the tightening screw inside. Turn clockwise to lock the chuck firmly.
Check for any play by trying to move the chuck by hand. It should not wiggle or shift. Tighten more if needed for a solid grip.
Properly securing the chuck keeps the drill bit stable during work. It also protects the spindle and chuck from damage.
Testing The Setup
Testing the setup after putting the chuck in the drill press is very important. It ensures the chuck is secure and the drill runs smoothly. This step helps avoid accidents and damage. Take your time to check everything carefully.
Checking For Tightness
Start by making sure the chuck is tight on the spindle. Use the chuck key to tighten it firmly. Try to move the chuck by hand. It should not wiggle or feel loose. A loose chuck can cause the drill bit to slip or fly off. Tightness keeps the drill bit steady during work.
Running The Drill Press Safely
Turn on the drill press at a low speed first. Watch the chuck and drill bit closely. Listen for any strange sounds or vibrations. If you see shaking or hear noises, stop the drill immediately. These signs mean the chuck is not set up right. Adjust the chuck and test again. Always wear safety glasses and keep hands away from the drill bit.
Troubleshooting Common Issues
Facing problems with your drill press chuck can slow down your work. Common issues like slipping chucks or strange noises might occur. These problems often have simple fixes. Understanding the cause helps you solve them quickly. This guide covers common chuck press problems and easy solutions.
Chuck Slipping
Chuck slipping means the drill bit turns without gripping properly. This can cause uneven holes or damage. Dirt or rust inside the chuck often causes slipping. Clean the chuck jaws and inside parts with a brush and lubricant. Check the chuck key fits well and tightens the jaws fully. Replace worn jaws or springs if needed. Proper tightening prevents slipping and keeps your drill steady.
Unusual Noises Or Vibrations
Strange sounds or shaking during drilling can signal a problem. Loose parts or unbalanced drill bits cause vibration. Stop the machine and check the chuck and drill bit tightness. Inspect for damaged parts like bearings or gears. Replace any broken components right away. Running the drill at the correct speed also reduces noise and vibration. A smooth drill press works better and lasts longer.
Maintaining Your Drill Chuck
Maintaining your drill chuck is key to keeping your drill press working well. Dirt and rust can cause the chuck to stick or slip. Regular care helps the chuck stay tight and hold drill bits firmly. It also extends the life of your tool. Follow simple steps to clean and lubricate the chuck often. This keeps it smooth and reliable for every job.
Regular Cleaning Tips
Start by removing the drill chuck from the drill press. Use a brush to clear out dust and debris. A small wire brush works well for tight spots. Wipe the chuck with a dry cloth to remove loose dirt. Avoid using water; it can cause rust. For stubborn grime, use a mild solvent or rubbing alcohol. Let the chuck dry completely before reassembling. Clean the inside jaws carefully to avoid damage. Repeat cleaning every few weeks or after heavy use.
Lubrication Guidelines
Apply a light machine oil or a lubricant made for drill chucks. Use only a small amount to avoid attracting dirt. Put oil on the moving parts inside the chuck. Rotate the chuck by hand to spread the oil evenly. Do this after cleaning and before storage. Avoid heavy grease, which can gum up the mechanism. Regular lubrication stops the chuck from sticking and helps smooth operation. Check and oil the chuck every few months or as needed.

Credit: www.youtube.com
Frequently Asked Questions
How Do You Install A Chuck On A Drill Press?
To install a chuck, first remove the existing spindle. Align the chuck with the spindle taper. Push or tap it gently until secure. Tighten any retaining screws if present. Ensure the chuck spins freely without wobbling before use.
What Tools Are Needed To Fit A Chuck On Drill Press?
You typically need a chuck key to tighten or loosen the chuck. Sometimes a rubber mallet helps to tap the chuck into place. No special tools are required beyond these. Always use tools carefully to avoid damage.
Can I Use Any Chuck With My Drill Press?
No, chucks must match the spindle taper and size. Check the drill press manual for compatible chuck types. Using the wrong chuck can cause poor performance or damage. Always use a chuck designed for your specific drill press model.
How Do I Secure The Chuck Properly On Drill Press?
Ensure the chuck sits fully on the spindle taper. Use a chuck key to tighten it firmly. Some chucks have a set screw for extra security. Double-check for any wobble or looseness before operating the drill press.
Conclusion
Putting a chuck on a drill press is simple with the right steps. First, clean the spindle and chuck surfaces well. Then, align the chuck carefully and push it onto the spindle. Tighten it securely to avoid slipping during work.
Regular checks keep your drill press running smoothly. Practice this routine to improve your skills quickly. This process helps you use your drill press safely and effectively every time. Keep your workspace clean and organized for best results.