
Are you ready to take control of your water supply and learn a skill that can save you money and provide clean water anywhere? Drilling a hand pump water well might seem like a big task, but with the right steps, you can do it yourself.
Imagine having fresh water right in your backyard, without relying on expensive services or complicated machines. In this guide, you’ll discover simple, clear instructions that anyone can follow. By the end, you’ll know exactly how to drill your own hand pump water well and enjoy the independence it brings.
Keep reading—your hands-on water solution is closer than you think!
Choosing The Right Location
Choosing the right location for drilling a hand pump water well is very important. The spot you pick affects water quality and how much water you get. A good location saves time, effort, and money. It also helps avoid future problems with the pump.
Assessing Water Table Depth
Check how deep the water table is in your area. The water table is the level where soil stays wet underground. If the water is too deep, drilling is harder and costs more. Find a place where the water is not too far below the surface. Local maps or experts can help find the right depth.
Checking Soil Types
Look at the soil type before drilling. Sandy or gravelly soil lets water flow better. Clay or rocky soil can block water and make drilling tough. Soft soil is easier to drill but may need extra support. Test the soil by digging a small hole or asking local farmers.
Avoiding Contamination Sources
Keep the well far from pollution sources. Avoid areas near septic tanks, garbage dumps, or animal pens. These places can pollute the water and cause health problems. Choose a spot uphill from any waste areas to stop dirty water from reaching the well.

Credit: www.youtube.com
Gathering Essential Tools
Gathering the right tools is the first step in drilling a hand pump water well. Having everything ready saves time and prevents problems during the drilling process. Each tool has a specific role in making the well functional and safe. Proper preparation ensures a smoother experience and better results.
Hand Pump Components
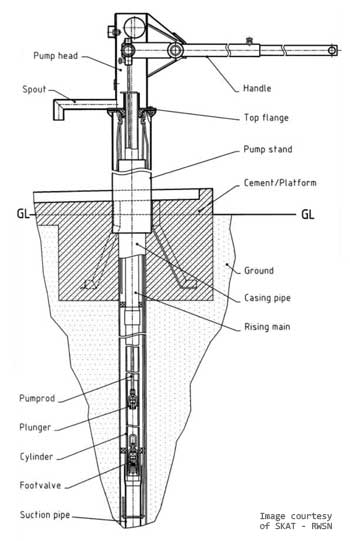
A hand pump has several key parts. The pump handle moves up and down to draw water. The cylinder holds the water and creates suction. The plunger moves inside the cylinder to pull water up. The foot valve stops water from falling back down. These parts must fit well and be strong.
Drilling Equipment
You need tools to dig deep into the ground. A drill bit cuts through soil and rock. A drill rod connects the bit to the handle or machine. A tripod or stand holds the drill steady. Buckets or containers carry removed dirt away. Keep all tools clean and sharp for best work.
Safety Gear
Protect yourself during drilling. Wear safety glasses to shield your eyes. Gloves protect hands from cuts and blisters. Sturdy boots keep feet safe from heavy tools. A hard hat guards against falling objects. Use ear protection if using loud machinery. Safety gear helps prevent injuries on site.
Preparing The Site
Preparing the site is the first step to drill a hand pump water well. It sets the stage for safe and effective drilling. A clean, well-marked, and organized space makes the work easier. Proper preparation saves time and avoids problems later on.
Clearing The Area
Start by removing all plants, rocks, and debris from the site. Clear a wide enough space for the drilling machine and tools. Check the ground for any hidden obstacles that could block the drill. Make sure the area is flat and stable to work safely.
Marking Drill Spot
Choose the exact spot to drill. Use a stick or marker to make a clear mark on the ground. Measure carefully to avoid drilling too close to buildings or trees. Marking helps guide the drill and keeps the work precise. It also prevents damage to nearby structures.
Setting Up Equipment
Arrange all drilling tools and parts near the marked spot. Check that the drill and hand pump parts are clean and in good condition. Position the drill machine on firm ground. Organize cables, pipes, and safety gear within easy reach. Proper setup speeds up the drilling process and keeps workers safe.
Credit: thewaterproject.org
Drilling The Well
Drilling the well is a key step in creating a hand pump water well. This part needs care and patience. The process starts by making a small hole and goes deeper until water is reached. Proper drilling ensures a strong and clean water source.
Keep tools steady and check progress often. The right technique helps avoid problems and saves time. Follow these simple steps to drill safely and effectively.
Starting The Borehole
Begin by marking the spot for your well. Use a drill bit to make a small hole. This hole guides the drill as you go deeper. Keep the drill steady and push gently. Remove loose dirt often to keep the hole clear.
Maintaining Drill Alignment
Keep the drill straight to avoid crooked holes. Check the angle every few inches. Use a level or simple tools to help. A straight hole makes it easier to install the pump. It also prevents damage to the pipe later.
Dealing With Hard Soil
Hard soil can slow drilling. Use a stronger drill bit for tough spots. Move the drill slowly and apply steady pressure. Take breaks to clear debris from the hole. Wetting the soil may help soften it for easier drilling.
Installing The Well Casing
Installing the well casing is a key step in drilling a hand pump water well. It protects the well from dirt and debris. It also keeps the walls from collapsing. The casing guides water into the pump, ensuring clean water flow. Proper installation improves the well’s safety and lifespan.
Selecting The Right Casing
Choose casing material that resists rust and corrosion. PVC and steel are common options. PVC is lightweight and easy to handle. Steel offers strength for deeper wells. Pick a diameter that fits your drill and pump size. Make sure the casing length covers the entire drilled hole.
Securing The Casing
Insert the casing carefully into the drilled hole. Keep it straight and steady. Use clamps or brackets to hold it in place. Secure the casing firmly to avoid movement. Check alignment regularly as you go deeper. Proper securing prevents damage during pumping.
Sealing Around The Casing
Seal the space between the casing and the hole wall. Use bentonite clay or cement grout for sealing. This prevents surface water and contaminants from entering. Apply the seal evenly around the casing. Allow the seal to dry and harden fully before use. Good sealing protects water quality effectively.
Setting Up The Hand Pump
Setting up the hand pump is an important step after drilling the well. It lets you draw water easily from underground. Proper setup ensures the pump works well and lasts long. Follow these steps carefully for a successful installation.
Attaching The Pump Mechanism
Start by placing the pump base over the well casing. Align it so the pipe fits inside smoothly. Use bolts or screws to fix the pump base tightly. Next, connect the handle to the pump lever. Make sure the handle moves up and down without resistance. Attach the spout where water will flow out. Check that all parts are secure before moving on.
Testing The Pump Operation
Pull the handle slowly to test the pump. Water should rise inside the pipe and flow out of the spout. If water does not come out, pump a few more times. This helps remove air inside the pipe. Watch for steady water flow without leaks around the pump. The handle should move smoothly, not stuck or hard to pull.
Troubleshooting Common Issues
If the pump handle is hard to move, check for tight bolts. Loose bolts can cause parts to bind. No water flow may mean air trapped inside the pipe. Pump several times to clear the air. Leaks at joints need tightening or replacing washers. If water flow is weak, the pump cylinder may need cleaning. Regular checks keep the pump working well.
Maintaining Your Water Well
Maintaining your hand pump water well is important for its long life. Regular care keeps the water clean and the pump working well. Small problems can become big if not fixed early. Follow these simple steps to keep your well in top shape.
Regular Cleaning Tips
Clean the pump and surrounding area often. Remove dirt, leaves, and bugs. Wipe the pump handle and spout with a cloth. This stops germs and rust. Check for algae or slime inside the spout. Clean with a mild bleach solution if needed. Let the pump dry before use.
Checking For Leaks
Look for water leaks around the pump and pipes. Leaks waste water and can damage the well. Tighten loose bolts and connections. Replace worn-out seals or washers. A steady drip means repair is needed. Fix leaks quickly to save water and avoid bigger damage.
Ensuring Water Quality
Test your water at least once a year. Use simple water test kits or hire a professional. Check for bacteria, dirt, and chemicals. Keep animals and waste far from the well. Cover the well opening securely. Clean or replace filters as needed. Safe water protects your health and your family.

Credit: www.emergencywaterwell.com
Frequently Asked Questions
How Deep Should I Drill A Hand Pump Water Well?
The depth depends on your water table, usually between 30 to 100 feet. Local geology affects depth. Check local well data for accuracy.
What Tools Are Needed To Drill A Hand Pump Well?
You need a hand auger, drill bits, casing pipes, a hand pump, and safety gear. Proper tools ensure smooth and safe drilling.
How Long Does It Take To Drill A Hand Pump Well?
Drilling time varies from a few hours to several days. It depends on soil type, depth, and tools used.
Can I Drill A Hand Pump Well Myself Safely?
Yes, with proper tools and safety precautions, you can. Follow guidelines, wear protective gear, and avoid underground utilities.
Conclusion
Drilling a hand pump water well takes patience and care. Follow each step slowly for best results. Use the right tools and check your work often. Clean the well to keep water pure and safe. A well-made hand pump provides water for years.
This simple skill helps bring fresh water closer. Start small, learn as you go, and stay safe. Your effort will reward you with clean water daily. Keep practicing and soon you will drill with confidence.