
If you love growing plants, you know how important proper drainage is for healthy roots. Without drainage holes, water can build up and harm your plants.
But what if your pots don’t have any holes? Don’t worry—you can easily fix that. You’ll learn exactly how to drill drainage holes in pots safely and effectively. By the end, you’ll know the simple steps to help your plants thrive and avoid common watering problems.
Ready to give your plants the care they deserve? Let’s get started!
Why Drainage Matters
Good drainage in pots is very important for healthy plants. It helps water flow out of the soil. This stops water from staying too long inside the pot. Proper drainage keeps plant roots safe and strong.
Preventing Root Rot
Root rot happens when roots sit in water too long. Without drainage holes, water collects at the bottom. This creates a wet environment where roots start to decay. Drainage holes let extra water escape. This stops root rot and keeps roots healthy.
Improving Soil Aeration
Drainage holes help air reach plant roots. Soil needs air to let roots breathe. When water drains well, soil stays loose. Loose soil allows air to flow freely. This keeps roots alive and active.
Enhancing Plant Growth
Plants grow better with good drainage. Water moves through the soil easily. Roots absorb water and nutrients well. Strong roots support healthy leaves and flowers. Drainage holes create the right balance of water and air for growth.

Credit: www.youtube.com
Tools You’ll Need
Drilling drainage holes in pots requires the right tools. Using proper equipment makes the job easier and safer. It also helps avoid damage to your pots. Here are the essential tools you’ll need for this task.
Types Of Drills
A cordless drill is ideal for most pots. It offers good control and mobility. A drill with variable speed settings works best. Slow speed helps prevent cracks in fragile pots. An electric drill with a cord can also be used. Choose a drill that feels comfortable in your hand.
Suitable Drill Bits
Use masonry bits for clay or ceramic pots. These bits handle hard, brittle materials well. For plastic pots, standard twist drill bits work fine. For terracotta, diamond-tipped bits reduce chipping. Choose bits that match the hole size you need. Sharp bits make clean holes with less effort.
Safety Gear
Wear safety glasses to protect your eyes from dust and chips. Use gloves to shield your hands from sharp edges. A dust mask helps prevent inhaling small particles. Work in a well-ventilated area for better air flow. Secure the pot firmly before drilling to avoid slips.
Choosing The Right Pot
Choosing the right pot is the first step to healthy plant growth. A good pot helps with water drainage and root health. It also suits the plant’s size and style. Picking the correct pot makes drilling drainage holes easier and safer.
Material Considerations
Pots come in many materials like clay, plastic, metal, and ceramic. Clay pots breathe well but can crack when drilling. Plastic pots are easy to drill but may hold too much water. Metal pots need special tools to drill holes. Ceramic pots look nice but can break if not drilled carefully.
Size And Shape
Choose a pot size that fits your plant’s roots. Small pots need fewer holes. Large pots need more drainage spots. Round pots are easier to drill than square or irregular shapes. Check the pot’s thickness; thick pots need stronger drill bits.
Existing Drainage Features
Some pots already have drainage holes or partial drainage. Check the bottom before drilling new holes. If holes exist, avoid making too many. No holes? Drilling is necessary. Some pots have built-in trays or layers that affect drainage too.
Preparing Your Workspace
Preparing your workspace is the first step to drilling drainage holes in pots. A clean and safe area helps you work better and avoid damage. Organizing your tools and materials makes the process smooth and quick. Follow these simple tips to set up your workspace properly.
Protecting Surfaces
Place a sturdy cloth or cardboard on your work surface. This layer stops scratches and collects dust. Avoid working on delicate or uneven surfaces. A flat, solid table is best. Protect nearby items from dust and debris by covering them.
Securing The Pot
Hold the pot firmly to prevent slipping. Use a clamp or vise if possible. For fragile pots, wrap a towel around them before clamping. This prevents cracks or breaks. Keep your hands away from the drilling area to stay safe.
Gathering Supplies
Collect all tools before you start. You will need a drill, drill bits, safety glasses, and gloves. Choose a drill bit that matches your pot material. Have a water spray bottle ready to cool the drill bit. Keep a cloth nearby to clean dust and water.
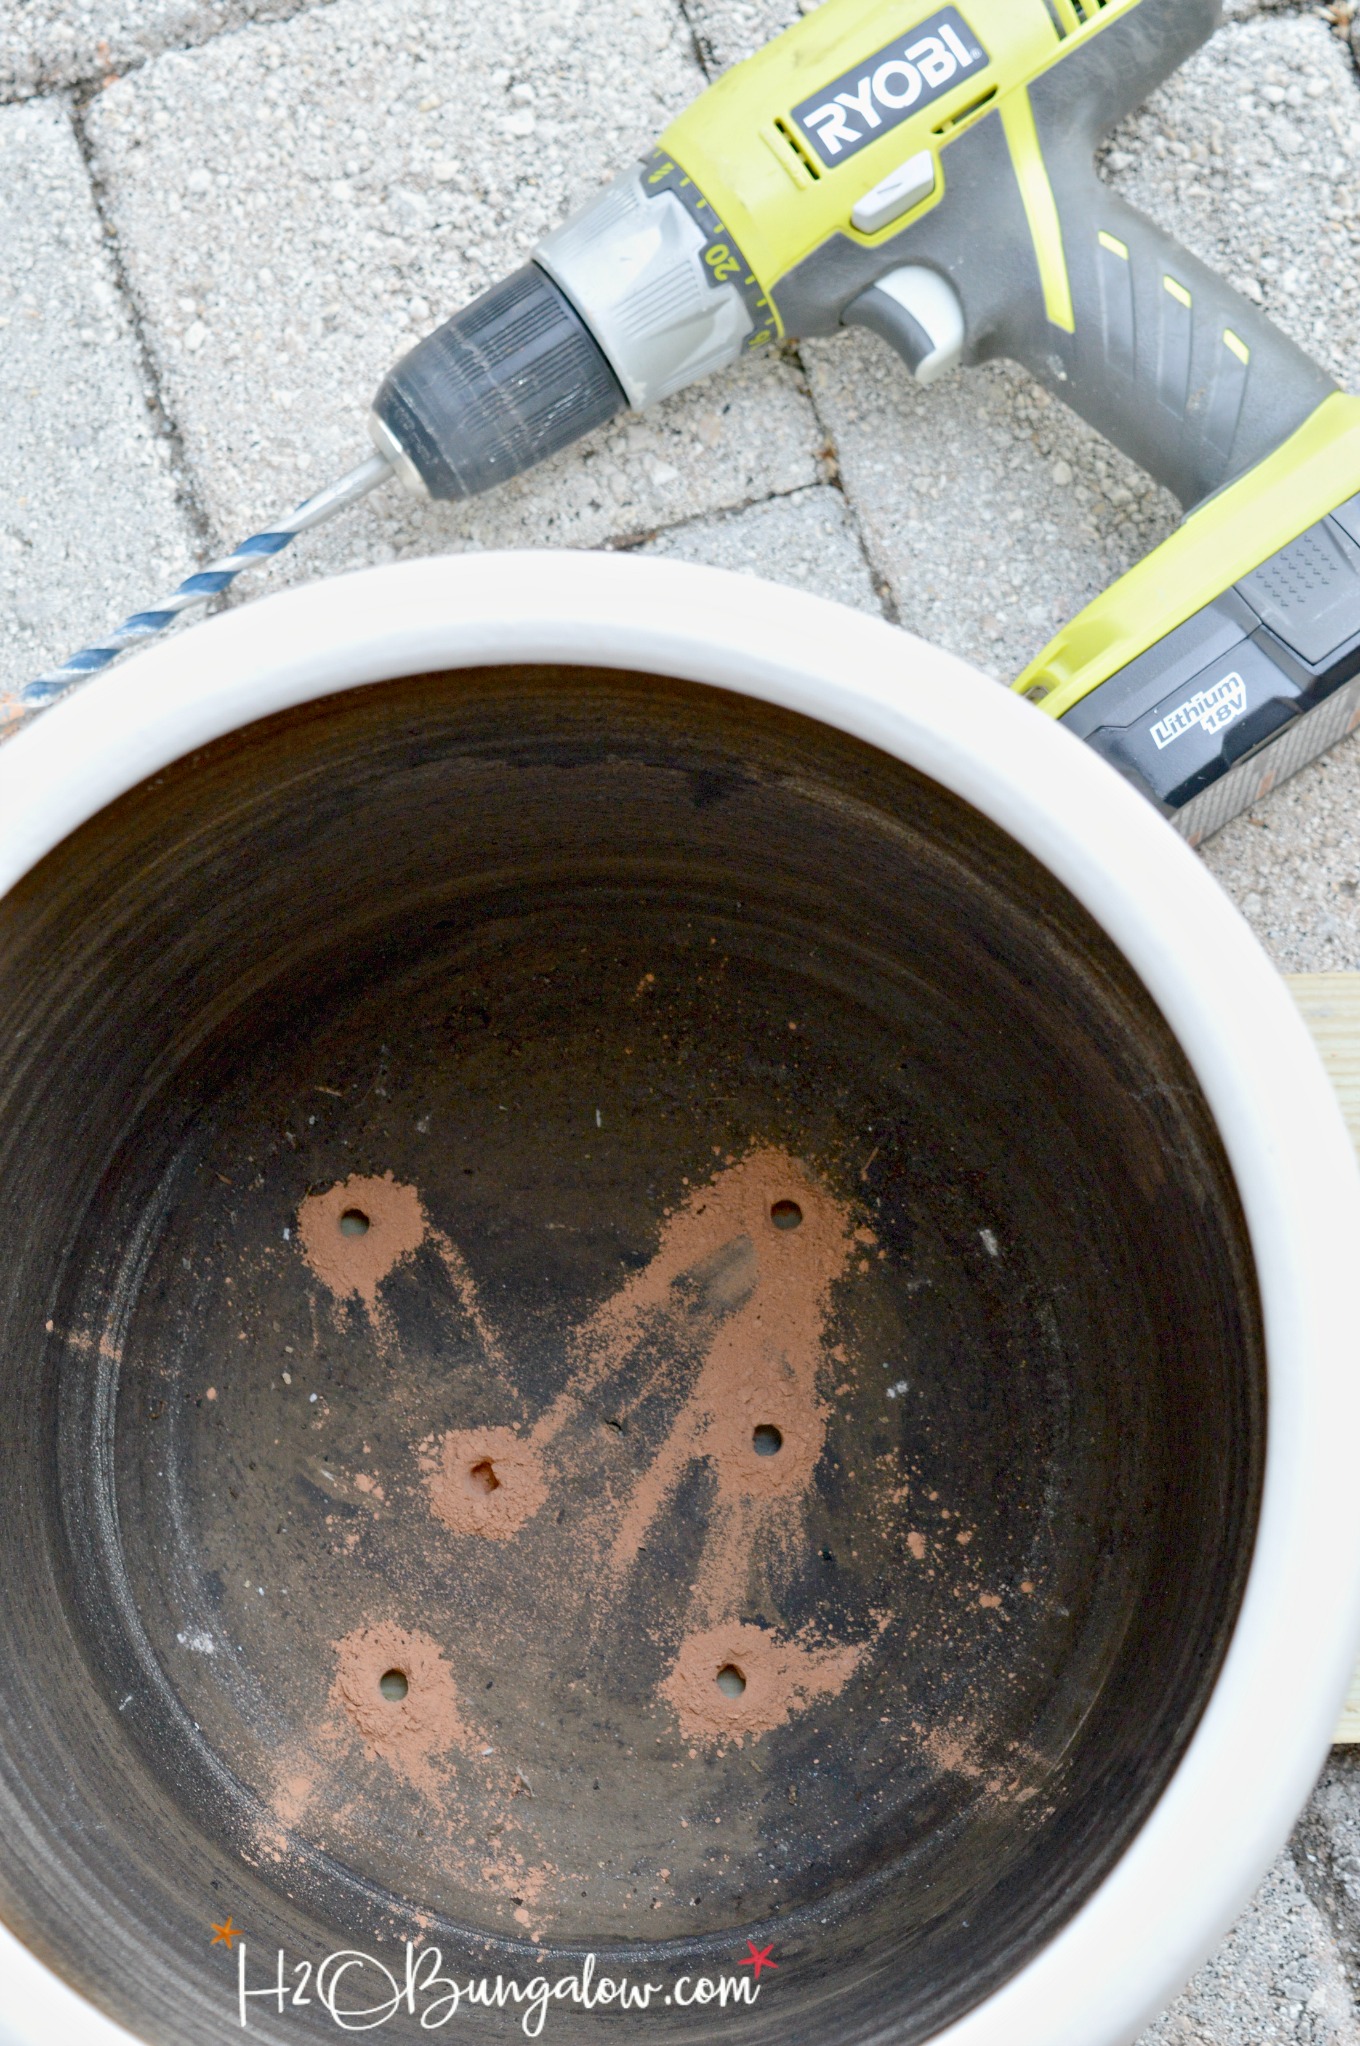
Step-by-step Drilling Process
Drilling drainage holes in pots helps water flow out easily. This stops water from sitting at the bottom. It keeps plants healthy and roots safe. Follow these simple steps to drill holes safely and correctly.
Marking Hole Locations
First, turn the pot upside down. Look for flat areas to place holes. Use a pencil to mark spots evenly spaced. Avoid placing holes too close to edges. This prevents cracks during drilling.
Starting The Drill
Pick a drill bit made for your pot’s material. Hold the pot steady on a soft surface. Begin drilling slowly at the marked spots. Keep the drill straight and steady. Let the drill do the work, not your force.
Drilling Through Different Materials
Plastic pots need low drill speed and light pressure. Clay pots require a medium speed with a masonry bit. Ceramic pots need a diamond or carbide bit. Drill slowly to avoid breaking or cracking the pot.
Smoothing The Hole Edges
Use sandpaper or a file to smooth rough edges. This stops sharp bits from hurting roots or hands. Clean the pot well to remove dust and debris. Your pot is now ready for planting.
After Drilling Care
After drilling drainage holes in your pots, some care is necessary to keep them safe and ready for planting. This step ensures your pot lasts longer and your plants grow well. Small tasks right after drilling can protect your pot from damage and improve water flow.
Cleaning The Pot
Remove dust and debris left from drilling. Use a soft brush or cloth for cleaning. Avoid harsh chemicals that can weaken the pot material. Rinse the pot with water to clear any remaining dust. Let it dry completely before adding soil.
Testing Drainage
Pour water slowly into the pot. Watch how water flows through the holes. Water should drain quickly without pooling. If water drains slowly, check for blockages. Clear any debris blocking the holes with a toothpick or small tool.
Adding Soil And Plants
Place a layer of small stones or broken pot pieces at the bottom. This layer helps improve drainage. Add fresh potting soil on top of the stones. Choose soil suited for your plant type. Plant your chosen plants gently and water them lightly.
Common Mistakes To Avoid
Drilling drainage holes in pots seems simple but can go wrong easily. Avoiding common mistakes saves time and keeps pots safe. These errors can break pots or cause poor drainage. Learn what to watch for.
Overdrilling
Drilling too many holes weakens the pot’s base. It can cause cracks or breaks. One or two holes are enough for water to drain well. Drilling too deep can damage the pot’s bottom. Stop once the hole goes through the pot wall.
Using Wrong Drill Bits
Using the wrong drill bit can crack the pot. Masonry bits work well for ceramic or clay pots. For plastic pots, a standard drill bit is best. Avoid using wood bits on hard pots. Choose bits that match your pot material.
Ignoring Safety Precautions
Drilling without safety gear risks injury. Always wear safety glasses to protect your eyes. Use gloves to avoid cuts from sharp edges. Work in a well-ventilated area to avoid dust. Keep the pot stable to prevent slips during drilling.
Credit: h2obungalow.com
Alternative Drainage Solutions
Not all pots come with drainage holes. Some materials are hard to drill. Alternative drainage solutions help keep plants healthy. They stop water from staying too long in the soil. These methods let excess water escape or stay away from roots.
Using Pot Feet
Pot feet lift the pot off the ground. This creates space for water to drain out. Air can flow under the pot, helping soil dry faster. Pot feet come in different sizes and shapes. They work well with pots without holes. They also stop pots from sitting in water.
Layering With Pebbles
Put a layer of small stones or pebbles at the pot’s bottom. This layer holds extra water away from soil. It lets water drain down and collects at the bottom. Pebbles help prevent root rot by keeping roots dry. Use clean, smooth pebbles for best results. This method is easy and cost-effective.
Self-watering Pots
Self-watering pots have a water reservoir at the base. They feed water to the plant as needed. These pots reduce overwatering risks and keep soil moist. Water stays below roots but does not flood them. They are great for busy gardeners or dry climates. Choose self-watering pots for hassle-free plant care.

Credit: ctrlcurate.com
Frequently Asked Questions
How Do I Drill Drainage Holes In Ceramic Pots?
Use a diamond-tipped drill bit and water to cool the drill. Drill slowly to prevent cracking. Mark hole spots before starting.
What Tools Are Best For Drilling Drainage Holes?
A power drill with a masonry or diamond-tipped bit works best. Use safety goggles and gloves for protection.
How Many Drainage Holes Should A Pot Have?
Most pots need at least one drainage hole. Larger pots benefit from multiple holes to improve water flow.
Can I Drill Drainage Holes In Plastic Pots?
Yes, use a sharp drill bit or a heated metal rod. Drill slowly to avoid cracking or melting the plastic.
Conclusion
Drilling drainage holes in pots helps plants stay healthy. Water drains out, stopping root rot and overwatering. Use the right drill bit and protect the pot. Take your time and drill carefully. This simple step improves plant growth and soil health.
Now, your plants can breathe and grow strong. Try it yourself and see the difference. Good drainage makes all the difference in potted plants.