Have you ever needed to drill a tapered hole but weren’t sure where to start? Whether you’re working on a woodworking project or fixing something around the house, knowing how to create a perfect tapered hole can save you time and frustration.
This skill might seem tricky at first, but with the right steps, you can achieve professional results easily. In this guide, you’ll discover simple techniques and practical tips that anyone can follow. Ready to master drilling tapered holes and take your projects to the next level?
Keep reading—you’re just moments away from becoming confident in this essential skill.
Choosing The Right Drill Bit
Choosing the right drill bit is key to drilling a tapered hole. The right bit makes drilling easier and more precise. It helps avoid damage to the material and the drill bit itself. Understanding the types and features of drill bits can save time and effort.
Types Of Tapered Drill Bits
Tapered drill bits come in various shapes and sizes. Some have a cone-shaped tip for smooth hole tapering. Others have spiral flutes to remove chips quickly. The most common types include Morse taper bits and tapered reamers. Each type fits different drilling needs and tools.
Materials And Coatings
Drill bits are made from steel, carbide, or cobalt alloys. Steel bits are good for soft materials like wood or plastic. Carbide bits work well on hard metals and last longer. Cobalt bits resist heat and wear during heavy use. Coatings like titanium or black oxide reduce friction and increase bit life.
Size Selection Tips
Choose a drill bit size based on the hole diameter needed. The taper angle must match the hole specifications. Measure the material thickness and hole depth before picking a bit. Using the correct size prevents cracks and ensures a tight fit. Always check the drill bit fits your drill chuck securely.
Preparing Your Workspace
Preparing your workspace is the first step to drill a tapered hole safely and accurately. A clean, organized area helps you focus on the task. It prevents mistakes and keeps tools ready. Small details in preparation affect the quality of your work.
Securing The Workpiece
Hold the workpiece firmly before drilling. Use clamps or a vise to keep it steady. Movement can cause uneven holes or damage. A steady piece lets the drill follow the right path. It makes the hole smooth and accurate.
Marking The Drill Spot
Mark the exact spot where you want the hole. Use a pencil or a marker for clear visibility. A center punch can help create a small dent. This dent guides the drill bit and stops slipping. Precise marking leads to a perfect tapered hole.
Safety Precautions
Wear safety glasses to protect your eyes from debris. Use ear protection if the drill is loud. Keep hair and loose clothes away from the drill. Work in a well-lit area to see clearly. Follow these steps to avoid accidents during drilling.
Drilling Techniques For Tapered Holes
Drilling tapered holes requires careful technique to achieve the right shape and size. The process differs from standard drilling because the hole gradually narrows. Precise control over speed, angle, and preparation helps create clean, accurate tapered holes. The following sections explain key drilling techniques for this task.
Setting Drill Speed And Feed
Choose a slower drill speed for tapered holes. A slow speed reduces heat and tool wear. Use a steady feed rate to avoid uneven hole shapes. Too fast feed can cause the drill to wander. Consistent pressure helps maintain the taper angle. Adjust speed and feed based on the material type.
Controlling Drill Angle
Keep the drill aligned to the desired taper angle. Use a drill press or guide to hold the angle steady. Hand drilling needs extra care to avoid slipping. Small angle changes affect the taper shape greatly. Mark the angle on your workpiece for reference. Regularly check the angle during drilling.
Using Pilot Holes
Start with a pilot hole to guide the tapered drill. A small, straight hole reduces drill wandering. It helps center the tapered bit for accuracy. Pilot holes also reduce stress on the drill bit. Drill the pilot hole slightly smaller than the tapered bit’s base. This step improves the final hole quality.
Credit: www.tivoly.com
Using Specialized Tools
Drilling a tapered hole needs precision and the right tools. Specialized tools help shape the hole correctly. They make the process easier and more accurate. Using these tools ensures the tapered hole fits perfectly for its purpose.
Tapered Reamers
Tapered reamers smooth and enlarge drilled holes. They create a precise taper inside the hole. These tools remove small amounts of material for a perfect fit. Using tapered reamers improves the hole’s finish and accuracy. They are ideal for metal and wood surfaces.
Countersinks And Counterbores
Countersinks and counterbores prepare holes for screws and bolts. Countersinks create a conical shape at the hole’s opening. Counterbores make a flat-bottomed recess. Both tools help tapered holes accept fasteners easily. They improve the strength and look of assembled parts.
Tapered Hole Gauges
Tapered hole gauges check the size and shape of the hole. They measure the diameter at different points inside the hole. These gauges ensure the taper is even and fits the required specs. Using tapered hole gauges avoids mistakes in drilling. They save time and reduce material waste.
Troubleshooting Common Issues
Drilling a tapered hole can be tricky. Common problems can slow down your work or ruin the hole. This section helps you fix common issues fast. Follow these tips for better results and less frustration.
Avoiding Drill Bit Wander
Drill bit wander happens when the bit slips from the start point. This causes uneven holes. Use a center punch to mark the spot before drilling. Start drilling slowly to keep the bit steady. A sharp drill bit also reduces wander. Clamp the workpiece firmly to stop movement.
Preventing Overheating
Overheating can damage the drill bit and workpiece. Drill at a slow speed to avoid heat build-up. Use cutting oil or water as a lubricant. Stop drilling now and then to let the bit cool down. Overheating makes the metal hard and harder to cut.
Fixing Inaccurate Tapers
Inaccurate tapers spoil the fit and function of parts. Check the drill bit angle before starting. Use a tapered drill bit made for this job. Keep the drill steady and aligned with the hole axis. Measure the taper depth often to ensure accuracy. Adjust speed and pressure if the taper looks wrong.
:max_bytes(150000):strip_icc()/tool12-3d927a99e6d14d218ce6b8edd66b224f.jpg)
Credit: www.woodmagazine.com
Finishing And Inspecting Tapered Holes
Finishing and inspecting tapered holes is a crucial step in the drilling process. It ensures the hole meets the required shape and size. Proper finishing improves the hole’s performance and durability. Careful inspection catches errors early, saving time and materials.
Deburring Techniques
Deburring removes sharp edges and small metal pieces left after drilling. Use a deburring tool or fine sandpaper to smooth the hole’s edge. Light, even strokes work best to avoid changing the taper shape. Clean the hole thoroughly to remove all metal dust and debris.
Measuring Taper Accuracy
Check the taper angle with a specialized taper gauge or angle finder. Measure the hole diameter at several points to confirm the taper size. Use a micrometer or caliper for precise readings. Compare measurements to the design specifications to ensure accuracy.
Ensuring Proper Fit
Test the tapered hole with the matching tool or part. The fit should be snug but not too tight. Make small adjustments if the part does not fit smoothly. A proper fit prevents damage and ensures stable assembly.
Maintenance And Care For Drill Bits
Proper maintenance and care keep drill bits sharp and long-lasting. Good habits reduce wear and tear. This helps you drill tapered holes smoothly and accurately. Spend time caring for your bits to save money and effort.
Sharpening Tips
Use a bench grinder or sharpening tool for dull bits. Keep the drill bit’s angle correct, usually 118 degrees. Move the bit gently against the grinder. Avoid overheating by dipping the bit in water often. Check the tip shape after sharpening. A sharp bit cuts faster and cleaner.
Storage Recommendations
Store drill bits in a dry, clean box or case. Keep bits separated to prevent damage and dulling. Use foam or plastic holders to keep bits organized. Avoid leaving bits loose in a toolbox. Proper storage stops rust and bending.
Extending Tool Life
Use the right speed and pressure for each material. Avoid pushing too hard; let the bit do the work. Clean bits after use to remove dust and debris. Lubricate bits when drilling metal to reduce heat. Regular care extends drill bit life and performance.
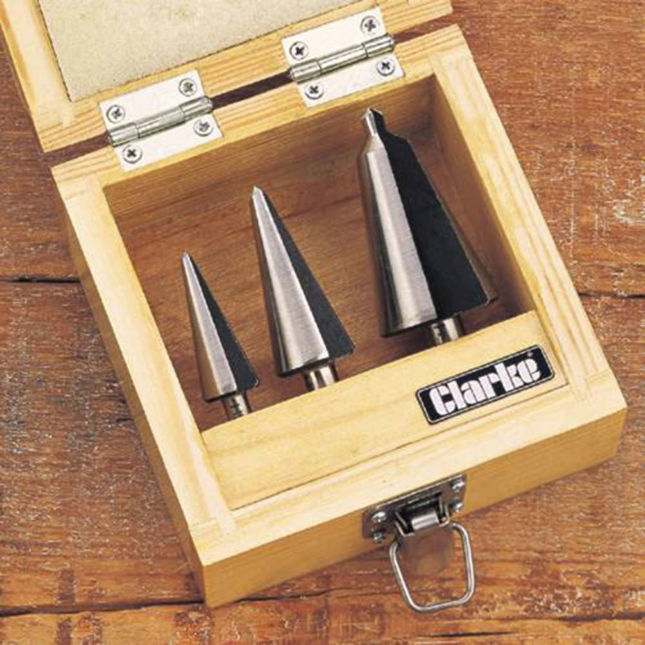
Credit: www.clarkeinternational.com
Frequently Asked Questions
What Tools Do I Need To Drill A Tapered Hole?
You need a tapered drill bit or a step drill bit for accuracy. A drill press can enhance precision. Safety gear like goggles is essential. Measuring tools help set the correct taper size before drilling.
How Do I Prepare The Material For A Tapered Hole?
Secure the material firmly to avoid movement. Mark the hole’s center with a pencil or punch. Choose the correct drill speed based on material type. Clean the surface to remove dust and debris before drilling.
Can I Use A Regular Drill Bit For Tapered Holes?
Regular drill bits create straight holes, not tapered ones. For tapered holes, use specialized tapered drill bits. Using a regular bit may result in improper fit or damage. Always select the right bit for your project’s needs.
How Do I Ensure The Tapered Hole Is Accurate?
Use a drill press to maintain angle and depth. Measure the hole diameter at multiple points. Use a gauge or caliper to verify taper consistency. Drill slowly to avoid overheating and maintain control.
Conclusion
Drilling a tapered hole takes care and the right tools. Start with the correct drill bit and mark your spot clearly. Keep the drill steady and go slow to avoid mistakes. Check your progress often to get the right angle.
Practice helps build confidence and skill. With patience, you will create clean, precise tapered holes. This skill adds value to your woodworking or metalworking projects. Keep these tips in mind for better results next time. Simple steps lead to great outcomes.