

Choosing between a finish nail gun and a brad nailer depends on your project’s size, material, and finish needs. This guide breaks down their differences, uses, and tips to help you pick the right tool.
Key Takeaways
- Finish nail guns use thicker 15- or 16-gauge nails, ideal for heavy trim, crown molding, and baseboards.
- Brad nailers fire thinner 18-gauge nails, perfect for delicate trim, thin moldings, and lightweight materials.
- Brad nails leave smaller holes, reducing the need for extensive wood filler and sanding.
- Finish nailers provide stronger holding power, making them better for structural or load-bearing trim work.
- Brad nailers are lighter, more precise, and less likely to split thin wood.
- Both tools are pneumatic, cordless, or electric—choose based on your workspace and power needs.
- Match your nailer to the project: use brads for detail work, finish nails for strength and durability.
Finish Nail Gun vs. Brad Nailer: Which One Should You Use?
If you’re tackling a woodworking, trim, or home improvement project, you’ve probably wondered: *Should I use a finish nail gun or a brad nailer?* Both tools are essential in a carpenter’s or DIYer’s toolkit, but they serve different purposes. Understanding the differences will save you time, prevent damage to your materials, and ensure a professional-looking finish.
In this guide, you’ll learn exactly what each tool does, when to use it, and how to choose the right one for your project. Whether you’re installing baseboards, building cabinets, or crafting custom moldings, this comparison will help you make the smartest choice.
What Is a Finish Nail Gun?
Visual guide about Finish Nail Gun Vs. Brad Nailer?
Image source: toolsgearlab.com
A finish nail gun is a power tool designed to drive 15- or 16-gauge nails into wood. These nails are thicker and longer than brad nails, typically ranging from 1 to 2.5 inches in length. Because of their size, finish nails offer strong holding power, making them ideal for attaching heavier trim, crown molding, door casings, and baseboards.
Finish nail guns are commonly used in professional construction and high-end woodworking. They’re powerful enough to secure materials that will bear weight or experience stress, such as window and door frames. While they leave slightly larger holes than brad nailers, these holes are still small and can be easily filled with wood filler.
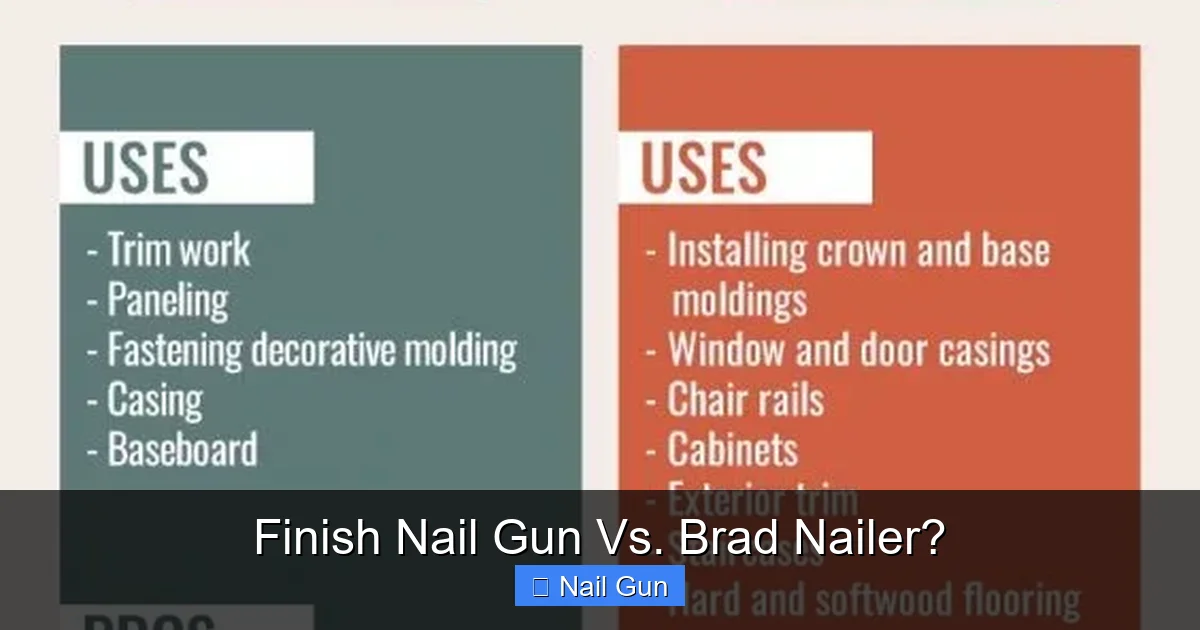
Common Uses for Finish Nail Guns
- Installing baseboards and crown molding
- Attaching door and window trim
- Building cabinets and furniture frames
- Securing chair rails and wainscoting
- Framing light structural elements
Pros and Cons of Finish Nail Guns
Pros:
- Strong hold—great for heavy trim
- Versatile nail sizes (15- and 16-gauge)
- Works well on hardwoods and dense materials
- Fewer nails needed due to holding strength
Cons:
- Leaves larger holes that require filling
- Can split thin or delicate wood if not used carefully
- Heavier and bulkier than brad nailers
- Overkill for lightweight projects
What Is a Brad Nailer?
Visual guide about Finish Nail Gun Vs. Brad Nailer?
Image source: woodworkingtoolkit.com
A brad nailer is a precision tool that fires very thin 18-gauge nails, usually between 5/8 and 2 inches long. These nails are almost invisible once driven in, leaving tiny holes that are easy to conceal—often with just a dab of wood filler or even paint.
Brad nailers are perfect for delicate work where appearance matters. They’re commonly used in fine woodworking, crafting, and installing thin moldings. Because the nails are so fine, they’re less likely to split soft or narrow pieces of wood, such as picture frame strips or decorative trim.
Common Uses for Brad Nailers
- Attaching thin moldings and decorative trim
- Building picture frames and small crafts
- Installing lightweight baseboards (under 3 inches)
- Securing veneers and laminates
- Assembling furniture with delicate parts
Pros and Cons of Brad Nailers
Pros:
- Leaves nearly invisible holes
- Lightweight and easy to maneuver
- Reduces risk of splitting thin wood
- Ideal for detailed, finish work
Cons:
- Weaker holding power—not for heavy materials
- May require more nails for secure attachment
- Not suitable for structural or load-bearing tasks
- Limited nail length and gauge options
Finish Nail Gun vs. Brad Nailer: Side-by-Side Comparison
To help you decide which tool to use, here’s a quick comparison of the key features:
| Feature | Finish Nail Gun | Brad Nailer |
|---|---|---|
| Nail Gauge | 15- or 16-gauge | 18-gauge |
| Nail Length | 1″ to 2.5″ | 5/8″ to 2″ |
| Holding Power | High | Low to moderate |
| Hole Size | Moderate (requires filler) | Very small (minimal filler) |
| Best For | Heavy trim, molding, cabinets | Delicate trim, crafts, thin wood |
| Risk of Splitting | Higher on thin wood | Very low |
| Weight | Heavier | Lighter |
How to Choose the Right Tool for Your Project
Picking between a finish nail gun and a brad nailer comes down to three main factors: material thickness, holding strength needed, and desired finish quality.
Step 1: Assess the Material
Ask yourself: *How thick and dense is the wood I’m working with?*
– If you’re attaching thick baseboards, crown molding, or hardwood trim, go with a finish nail gun. The stronger nails will hold securely over time.
– If you’re working with thin moldings, balsa wood, or delicate veneers, a brad nailer is the safer choice. It won’t split the material and will leave a cleaner look.
Step 2: Consider the Load
Will the trim or molding bear any weight or stress?
– For door casings, window frames, or structural trim, use a finish nail gun. The extra holding power prevents sagging or loosening.
– For decorative elements like picture frames or shelf edging, a brad nailer is sufficient and more precise.
Step 3: Think About the Finish
How visible will the nail holes be?
– If you’re painting the trim, small holes from a brad nailer are easy to hide.
– If you’re staining wood and want a natural look, even small holes might show. In that case, consider using a finish nail gun with nails driven below the surface and filled smoothly.
Practical Tips for Using Each Tool
Using a Finish Nail Gun
- Angle the nailer slightly (about 15 degrees) when nailing into end grain to prevent splitting.
- Use a nail set to countersink nails below the surface for a flush finish.
- Fill holes with wood filler that matches your stain or paint.
- For hardwoods, pre-drill pilot holes if necessary to avoid cracking.
Using a Brad Nailer
- Hold the nailer perpendicular to the surface for straight, clean drives.
- Space nails every 6 to 8 inches for lightweight trim.
- Use a light touch—brad nailers require less pressure than finish nailers.
- For extra hold on loose pieces, apply wood glue before nailing.
Troubleshooting Common Issues
Nails Not Driving Fully
Possible Causes:
- Air pressure too low (for pneumatic models)
- Dull or incorrect nails
- Dirty or worn driver blade
Solution: Check your compressor settings, use fresh nails, and clean the tool regularly.
Nails Bending or Jamming
Possible Causes:
- Nails are too thick for the material
- Driving into end grain or hardwood without pilot holes
- Misaligned magazine or feed mechanism
Solution: Switch to a brad nailer for thin materials, or pre-drill holes. Clear jams carefully with the tool unplugged.
Splitting the Wood
Possible Causes:
- Using a finish nailer on thin or brittle wood
- Nailing too close to the edge
- Incorrect nail angle
Solution: Use a brad nailer for delicate work, keep nails at least 1/2 inch from edges, and angle nails away from the grain.
Final Thoughts: Which One Should You Buy?
If you can only buy one tool, consider your most common projects.
– For general carpentry and trim work, a finish nail gun is more versatile and powerful.
– For fine woodworking, crafts, and detailed trim, a brad nailer offers precision and a cleaner finish.
Many professionals own both—using the brad nailer for delicate tasks and the finish nailer for heavy-duty jobs. If budget allows, having both tools in your arsenal gives you the flexibility to tackle any project with confidence.
Remember: the right tool isn’t just about power—it’s about precision, safety, and results. Choose wisely, maintain your tools, and you’ll achieve professional-quality finishes every time.