

In this guide, you’ll discover how to adjust the nail depth on your Dewalt nail gun. Proper adjustment ensures nails are driven flush or at the desired depth, giving your project a professional finish. Whether you’re a beginner or experienced user, these simple steps will help you master nail depth control.
Key Takeaways
- Understanding the Adjustment Dial: Most Dewalt nail guns have a depth adjustment dial or knob that controls how deep nails are driven.
- Locating the Adjustment Feature: Find the depth adjustment mechanism on your specific Dewalt nail gun model, usually near the muzzle or magazine.
- Setting the Correct Depth: Turn the dial clockwise for deeper nails and counter-clockwise for shallower nails.
- Testing and Fine-Tuning: Always test on scrap material before working on your project to ensure the desired nail depth.
- Maintenance Tips: Keep the adjustment mechanism clean and free of debris for consistent performance.
- Troubleshooting: If nails aren’t setting correctly, recheck the adjustment and ensure the tool is properly maintained.
Introduction
If you’re working with a Dewalt nail gun, achieving the perfect nail depth is crucial for a professional finish. Too deep, and nails may damage the surface; too shallow, and nails might not hold properly. Luckily, adjusting the nail depth on a Dewalt nail gun is straightforward once you know where to look and how to make the changes. In this guide, we’ll walk you through the entire process step-by-step, sharing helpful tips and troubleshooting advice so you can get the most out of your tool.
Understanding Nail Depth Adjustment on Dewalt Nail Guns
Most Dewalt nail guns come with a built-in depth adjustment feature. This feature allows you to control how far the nail is driven into the material. The adjustment typically involves a dial, knob, or screw located near the muzzle or magazine. Properly setting this ensures nails are flush with the surface or set at a specific depth for your project requirements.
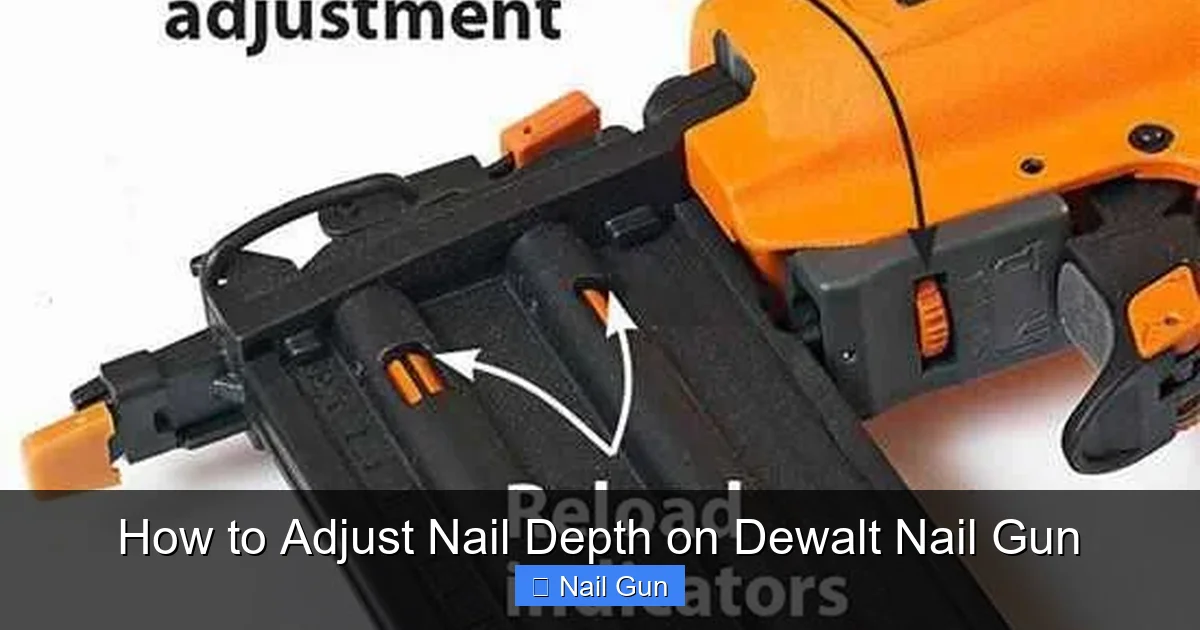
Visual guide about How to Adjust Nail Depth on Dewalt Nail Gun
Image source: toolrom.com
Tools and Materials Needed
- Dewalt nail gun (model-specific)
- Compressed air (if applicable)
- Scrap wood or material for testing
- Small screwdriver or Allen wrench (if required for your model)
- Cleaning cloth or compressed air for maintenance
Step-by-Step Guide to Adjust Nail Depth on Dewalt Nail Gun
Step 1: Safety First
Before starting, ensure your nail gun is unplugged or the battery is removed. This prevents accidental firing during adjustment. Wear safety glasses to protect your eyes from debris or accidental misfires.
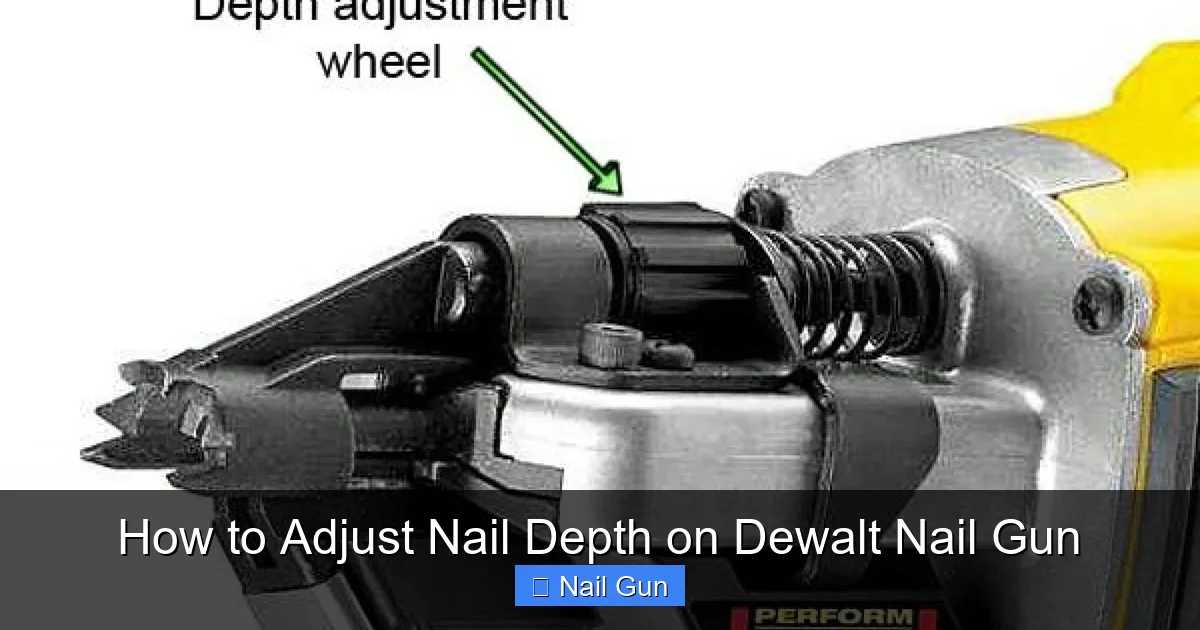
Visual guide about How to Adjust Nail Depth on Dewalt Nail Gun
Image source: wonkeedonkeetools.co.uk
Step 2: Locate the Depth Adjustment Mechanism
The exact location varies by model, but common spots include:
- Near the muzzle: Look at the front of the nail gun where the nails exit. You might see a dial or knob.
- On the magazine: Some models have a screw or wheel on the side or top.
Consult your Dewalt nail gun manual if you’re unsure where the adjustment feature is.
Step 3: Understand the Adjustment Dial or Knob
Most Dewalt nail guns use a depth control dial. Turning this dial adjusts how deep the nail will be driven. Usually, turning clockwise (right) drives nails deeper, while counter-clockwise (left) results in shallower nails.
Step 4: Make the Initial Adjustment
- Start with a neutral setting: Set the dial to the middle position or the manufacturer’s recommended default.
- Turn the dial: Use your fingers or a small screwdriver if needed to turn the dial slowly.
Use the manufacturer’s instructions if available, as some models have specific settings for different materials.
Step 5: Test on Scrap Material
Before working on your actual project, test the adjustment on a piece of scrap wood or similar material. Fire a few nails and observe the depth:
- If nails are too shallow or sticking out, turn the dial clockwise for more depth.
- If nails are too deep or denting the surface, turn the dial counter-clockwise.
Repeat until you achieve the desired nail depth.
Step 6: Fine-Tune the Adjustment
Adjust gradually and test frequently. Small increments make a big difference. Remember, patience is key to getting a perfect finish.
Step 7: Secure and Maintain the Adjustment
Once satisfied, ensure the adjustment dial is secured if your model has a locking mechanism. Regularly clean the adjustment area to prevent debris from causing uneven adjustments.
Additional Tips for Adjusting Nail Depth
- Material Matters: Softer woods like pine require less depth, while hardwoods may need more.
- Consistent Testing: Always test after making adjustments, especially when switching materials.
- Regular Maintenance: Keep the adjustment mechanism clean and lubricated if recommended by the manufacturer.
Troubleshooting Common Issues
- Nails Not Setting Properly: Recheck the depth adjustment; the dial might be loose or not set correctly.
- Nails Denting or Over-Driving: Turn the dial counter-clockwise to reduce depth.
- Inconsistent Nail Depth: Clean the adjustment mechanism and ensure the tool is properly maintained.
- Tool Not Firing or Jamming: Ensure the adjustment dial isn’t interfering with the firing mechanism and check for jams.
Conclusion
Adjusting the nail depth on your Dewalt nail gun is a simple process that can significantly improve your work quality. By locating the adjustment mechanism, making small changes, and testing on scrap material, you can achieve nails that are perfectly flush or set to your desired depth. Regular maintenance and careful testing ensure consistent results. With these tips, you’ll master your Dewalt nail gun and complete your projects with confidence.
Final Tips
- Always consult your specific Dewalt nail gun manual for detailed instructions.
- Practice on scrap material before working on your main project.
- Maintain your tool regularly for optimal performance.
🎥 Related Video: Nailer assembly tutorial 074
📺 SYK372