

Are you tired of stripping screws or damaging materials when using your cordless drill? Knowing how to adjust the torque on your drill can save you time, frustration, and costly mistakes.
With the right torque setting, you’ll have better control, cleaner results, and longer tool life. In this guide, you’ll discover simple steps to easily adjust the torque on your cordless drill—helping you work smarter, not harder. Keep reading to unlock the full potential of your drill and make every project a success.
Cordless Drill Torque Basics
Understanding the basics of cordless drill torque helps you use the tool better. Torque affects how much force the drill applies when turning screws or drilling holes. Knowing torque basics ensures you do tasks safely and effectively. It also protects your materials from damage.
What Torque Means
Torque is the twisting force a drill creates. It measures how hard the drill can turn a screw or bit. Higher torque means more power to turn bigger screws or drill tougher materials. Lower torque is better for delicate tasks to avoid stripping screws or damaging surfaces.
Why Torque Matters
Torque helps control the drill’s power and precision. Using the right torque prevents overdriving screws or breaking bits. It saves your work from damage and keeps the drill working longer. Proper torque also makes the job easier and faster.
Common Torque Settings
Most cordless drills have multiple torque settings. These settings range from low to high torque levels. Low settings are for small screws or soft materials. Medium settings work well for general tasks. High settings handle tough jobs like drilling into wood or metal.
Credit: discover.hubpages.com
Tools Needed For Adjustment
Adjusting the torque on a cordless drill requires specific tools. Having the right tools helps make the process easier and safer. This section explains what tools you need to adjust the torque properly. Understanding these tools prepares you for smooth adjustments.
Checking Your Drill Model
Not all drills have the same torque settings or adjustment methods. First, check your drill’s model number. Look at the user manual or the drill body for details. Some models have a torque ring with numbers. Others may need special tools to change torque. Knowing your model helps find the right instructions.
Additional Tools Required
Most cordless drills need a few basic tools for torque adjustment. A small screwdriver often helps open the drill casing. Some drills require a hex key or Allen wrench. A clean cloth is useful to wipe dust or dirt off parts. Keep these tools ready before you start adjusting torque.
Step-by-step Torque Adjustment
Adjusting the torque on a cordless drill helps control how hard the drill turns. This step-by-step guide makes it simple to set the right torque. Proper torque prevents damage to screws and materials. It also helps finish your project faster and cleaner.
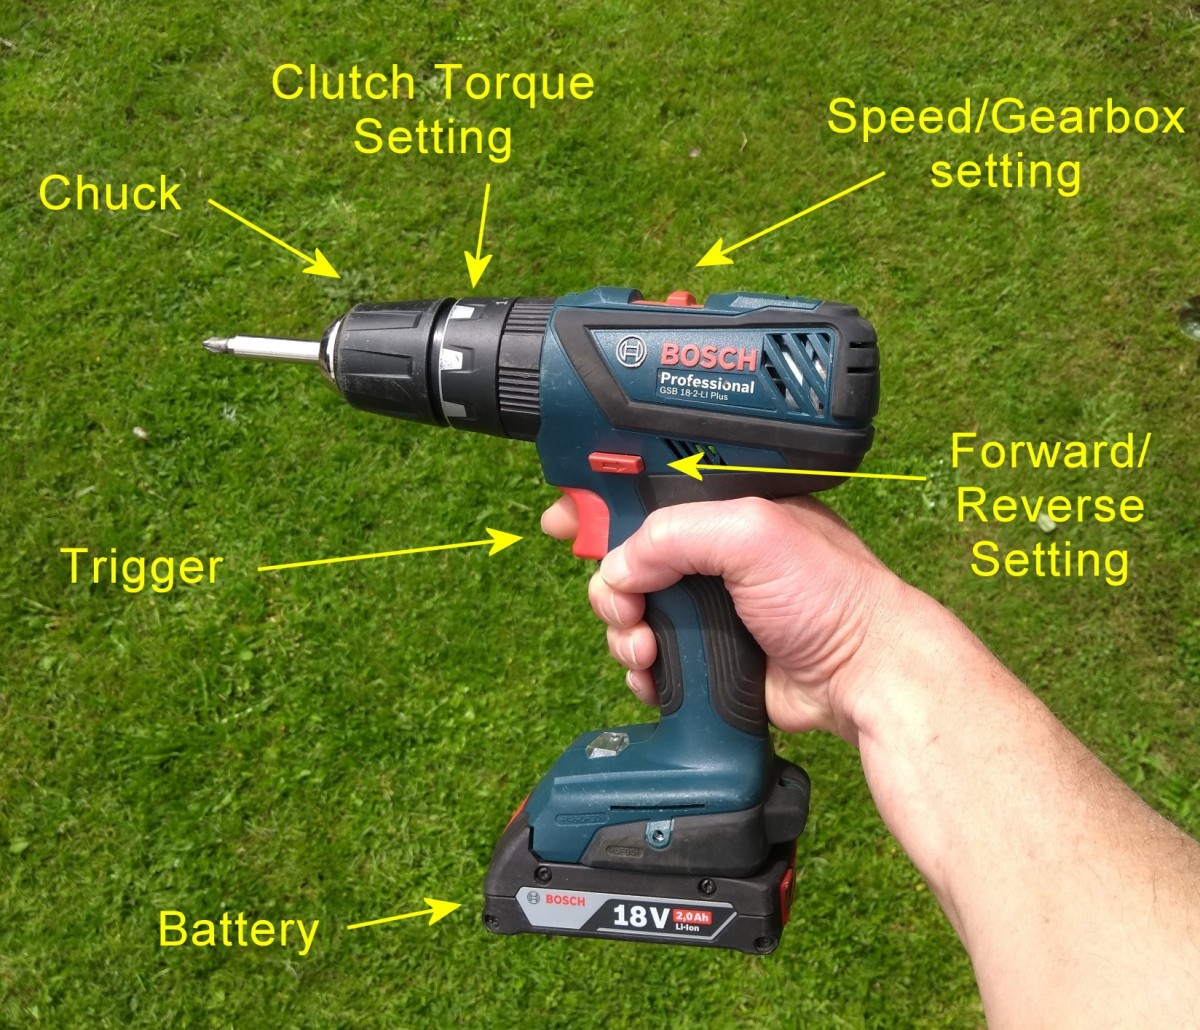
Locate The Torque Collar
Look near the drill’s chuck for the torque collar. It is a ring with numbers or symbols. These numbers show different torque levels. The collar usually spins easily by hand. This part controls the drill’s turning force.
Choosing The Right Setting
Turn the torque collar to select a setting. Use low numbers for small screws or soft materials. Pick higher numbers for larger screws or hard materials. Start with a low setting to avoid stripping screws. Adjust upward only if needed for more power.
Testing The Torque
Test the drill on a scrap piece of wood or material. Watch how the drill stops when the set torque is reached. The drill should stop turning or slow down. Change the setting if the drill slips or overdrives the screw. Repeat until the torque feels right for the task.
Tips For Precision Drilling
Precision drilling requires control and focus. Adjusting the torque on a cordless drill helps achieve clean, accurate holes. Small changes can make a big difference. Follow these tips for better results every time you drill.
Adjusting For Different Materials
Soft materials need low torque to avoid damage. Hard materials require higher torque to drill through. Set the drill’s torque based on the material’s strength. This prevents slipping and keeps the drill bit steady.
Avoiding Over-tightening
Over-tightening can strip screws or damage surfaces. Use just enough torque to secure the screw firmly. Stop tightening as soon as you feel resistance. This saves your materials and extends tool life.
Maintaining Consistent Pressure
Keep steady pressure while drilling to avoid uneven holes. Press too hard, and you risk breaking the bit. Press too lightly, and the drill might stall. Find a balance for smooth, clean drilling every time.
Troubleshooting Torque Issues
Troubleshooting torque issues on a cordless drill helps keep your work smooth. Torque problems can slow down tasks or damage materials. Knowing how to fix common torque issues saves time and effort. Here are some typical problems and easy solutions to try.
Drill Not Responding
Sometimes the drill does not respond when you press the trigger. Check the battery charge first. A low battery can cause no power. Remove and fully charge the battery. Also, inspect the trigger switch for dirt or damage. Clean or replace the switch if needed. Loose connections inside the drill can stop it from working. Tighten any loose parts carefully.
Torque Setting Slips
The torque setting may slip during use. This means the drill turns harder or softer than set. The clutch might be worn out. Try turning the torque ring to see if it clicks firmly. Dirt or dust can block the clutch mechanism. Clean the ring and inside parts gently. If slipping continues, the clutch may need replacement.
Uneven Screw Depths
Screws going in too deep or not deep enough often mean torque issues. Check if the torque is set too high or too low for the material. Adjust the setting to a lower number for softer materials. Also, use the right drill bit size and type. Uneven pressure while drilling can cause varying depths. Hold the drill steady and apply even force.

Credit: www.ozito.com.au

Credit: www.xenontools.com
Frequently Asked Questions
How Do I Change Torque Settings On A Cordless Drill?
To change torque, rotate the clutch ring near the drill chuck. Align the desired torque number with the indicator. Higher numbers provide more torque, while lower numbers reduce it. Adjust based on the material and screw size to avoid stripping or overdriving.
Why Is Torque Adjustment Important For Cordless Drills?
Torque adjustment prevents damage to screws and materials. It controls drill power for precise fastening. Correct torque improves screw holding and tool lifespan. It helps avoid overdriving or underdriving screws, ensuring better project quality and safety.
What Torque Setting Is Best For Wood Drilling?
Use a medium to high torque setting for wood. Start around 10-15 for softwood and 20-25 for hardwood. Adjust based on screw size and wood density. Lower torque may cause incomplete fastening, while too high risks damaging wood.
Can I Adjust Torque Without A Manual?
Yes, most cordless drills have a numbered clutch ring. Turn the ring to change settings; numbers usually indicate torque levels. Test on scrap material to find the right torque. Consult manufacturer guides or online videos for model-specific tips.
Conclusion
Adjusting torque on a cordless drill is simple and useful. It helps avoid damage to screws and materials. You just need to know the right setting for each job. This skill saves time and effort. Practice a bit to get comfortable with the controls.
Soon, your projects will look neater and last longer. Keep your drill ready and set torque carefully every time. Small changes make a big difference in your work.