

Are you ready to tackle your next DIY project but unsure how to attach a drill bit to your cordless drill? Don’t worry—getting your drill bit properly secured is easier than you think.
Whether you’re a beginner or just need a quick refresher, this guide will walk you through each simple step. By the end, you’ll feel confident and ready to drill with precision and safety. Keep reading to discover the quick tricks that make attaching your drill bit fast and hassle-free.

Credit: www.blackanddecker.com
Choosing The Right Drill Bit
Choosing the right drill bit is important for your project. The correct bit makes drilling easier and safer. Using the wrong bit can damage your material or drill. Understanding different drill bit types helps you pick the right one. Also, matching the bit to the material improves your work quality and speed.
Types Of Drill Bits
There are many drill bit types. Twist bits are common and work well for wood and metal. Brad point bits are best for wood because they create clean holes. Masonry bits have a strong tip to drill into brick or concrete. Spade bits make large holes in wood quickly. Each bit has a special shape for different tasks.
Matching Bit To Material
Use bits made for your material. Wood needs sharp bits with pointed tips. Metal requires bits made of high-speed steel or cobalt. Masonry needs carbide-tipped bits to handle hard surfaces. Using the wrong bit can cause slipping or breakage. Always check the material type before choosing a bit.
Credit: www.youtube.com
Preparing Your Cordless Drill
Preparing your cordless drill before attaching a drill bit is important. It helps you work safely and efficiently. Taking time to get your drill ready prevents problems and keeps you safe.
Checking Battery And Power
Check the battery charge level first. A full battery ensures steady power during work. Insert the battery firmly into the drill. Make sure it clicks in place. Loose batteries can cause the drill to stop suddenly. If your battery is low, charge it fully before starting.
Safety Precautions
Wear safety goggles to protect your eyes from dust. Remove any loose clothing or jewelry. Tie back long hair to avoid getting caught. Work in a clean, dry area with good light. Keep your hands dry and steady while handling the drill. Always switch off the drill and remove the battery before changing bits.
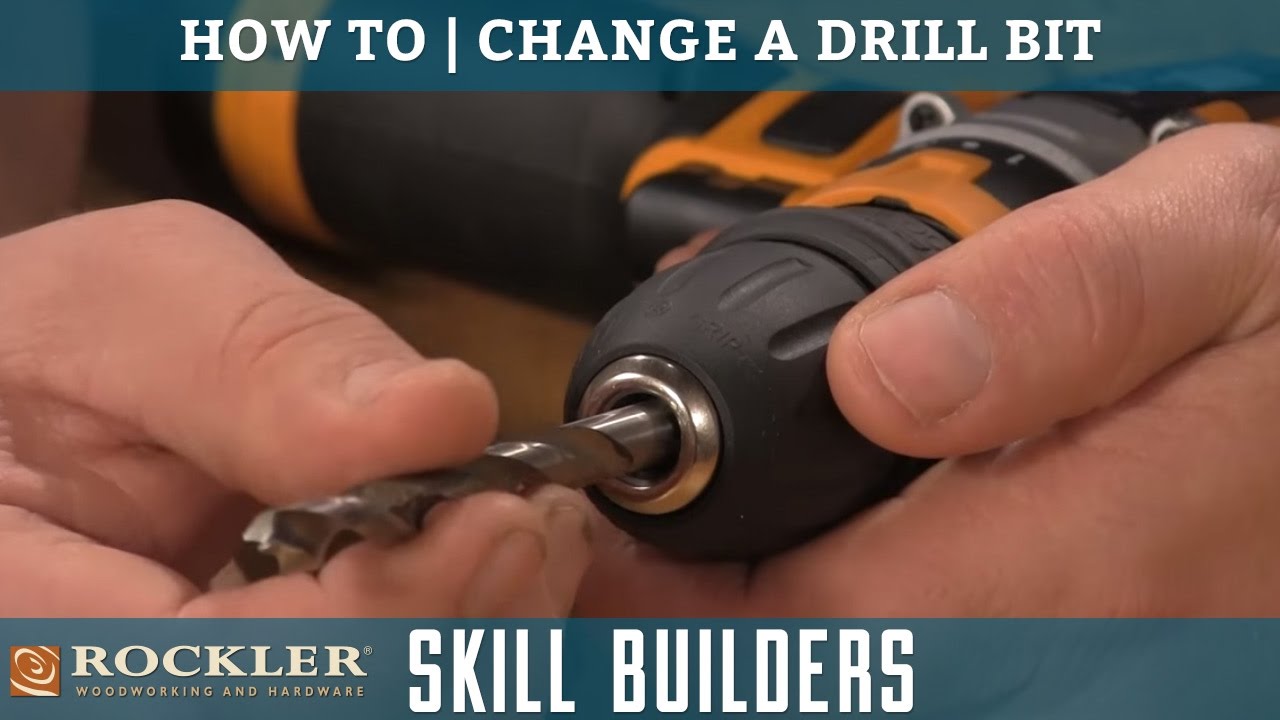
Removing The Old Drill Bit
Removing the old drill bit is the first step before attaching a new one. It keeps your work safe and makes the drill ready. This process is simple and takes only a few moments. Follow the right steps to avoid damage to the drill or bit. Clear steps help you work fast and smooth.
Unlocking The Chuck
The chuck holds the drill bit in place. To remove the old bit, first unlock the chuck. Hold the drill firmly in one hand. Turn the chuck counterclockwise with the other hand. Some drills have a key for this; others use a hand-tight chuck. Keep turning until the chuck opens wide enough. The bit should loosen and move freely.
Extracting The Bit
After unlocking the chuck, pull the bit out carefully. Hold the bit near the base to get a good grip. Pull straight out to avoid bending or breaking it. If the bit is stuck, wiggle it gently while pulling. Do not use force; this can damage the drill. Once removed, check the bit for wear or damage before storing or replacing it.

Credit: www.reddit.com
Inserting The New Drill Bit
Inserting a new drill bit into a cordless drill is a simple step that prepares your tool for the job. It ensures the drill bit fits securely and works correctly. This process helps avoid slipping and keeps your work safe and accurate.
Aligning The Bit
Start by holding the drill firmly. Open the chuck by turning it counterclockwise. Place the new drill bit straight into the chuck’s hole. Make sure the bit is centered and straight. This helps the drill bite evenly into the material.
Securing The Chuck
Hold the drill bit in place. Turn the chuck clockwise to tighten it around the bit. Tighten it as much as you can by hand. For extra security, use the drill’s chuck key if it has one. This keeps the bit from moving during use.
Testing The Drill Bit Attachment
Testing the drill bit attachment is a key step before starting any project. It ensures the bit fits securely and spins properly. A loose bit can cause problems or even be dangerous. Take time to check the attachment carefully. This will help you work safely and efficiently.
Running A Trial Spin
Hold the drill firmly with both hands. Turn it on at a low speed. Watch the drill bit as it spins. It should rotate smoothly without wobbling or shaking. Listen for strange noises. A steady sound means the bit is attached well. Stop the drill if it looks uneven or noisy. This test shows if the bit is ready for use.
Adjusting Tightness If Needed
Stop the drill and turn it off. Use the chuck key or hand-tighten the chuck. Tighten the drill bit more if it moves or feels loose. Avoid over-tightening, which can damage the bit or drill. After adjusting, run the trial spin again. Repeat this process until the bit stays firm and spins straight. Proper tightness keeps your work safe and accurate.
Tips For Maintaining Drill Bits
Maintaining drill bits helps them last longer and work better. Proper care keeps them sharp and prevents damage. It also saves money by avoiding frequent replacements. Follow simple steps to keep your drill bits in top shape.
Cleaning After Use
Remove dirt and dust from drill bits after every use. Use a dry cloth or soft brush to clean them well. Avoid water, as it can cause rust on the metal. If bits have sticky residue, use a little rubbing alcohol. Clean bits drill smoothly and reduce wear on your drill.
Proper Storage
Store drill bits in a dry place to avoid moisture damage. Use a drill bit case or a small container with dividers. Keep bits separated to stop them from hitting each other. Organizing bits by size makes it easier to find them later. Proper storage keeps bits sharp and ready for use.
Frequently Asked Questions
How Do I Attach A Drill Bit To A Cordless Drill?
To attach a drill bit, first loosen the chuck by turning it counterclockwise. Insert the drill bit fully into the chuck. Then, tighten the chuck by turning it clockwise until the bit is secure. Ensure it is firmly held to avoid slipping during use.
Can I Use Any Drill Bit With A Cordless Drill?
Most cordless drills accept standard drill bits with a 1/4 inch shank. Check your drill’s chuck size to ensure compatibility. Avoid using drill bits that are too large or small for your drill. Using the correct bit ensures efficient drilling and prevents damage.
How Tight Should The Drill Bit Be In The Chuck?
The drill bit should be tightened firmly to prevent slipping but not over-tightened. Use your hand to tighten the chuck, then give it a final turn with the drill’s chuck key if available. Proper tightness ensures safe and effective drilling.
What Is The Best Way To Remove A Drill Bit?
To remove a drill bit, hold the drill firmly and turn the chuck counterclockwise. This loosens the chuck and releases the bit. If it’s stuck, use a chuck key or pliers carefully. Always remove bits when changing tasks for safety.
Conclusion
Attaching a drill bit to a cordless drill is simple and quick. Start by opening the chuck and inserting the bit firmly. Tighten the chuck by hand or with a key until it holds the bit well. Always check if the bit is secure before use.
This helps prevent accidents and improves your work. With practice, this process becomes easy and fast. Now, you can handle many drilling tasks confidently. Keep your drill and bits clean for longer life. Ready to drill? Just follow these steps every time.