

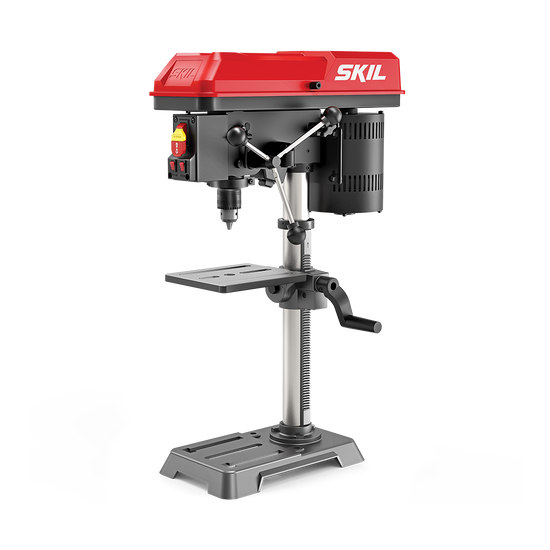
Changing the chuck on your Skil drill press might seem tricky at first, but it’s actually a simple task that anyone can do. Whether you need to switch to a different drill bit size or your current chuck is worn out, knowing how to change it will save you time and frustration.
In this guide, you’ll find clear, step-by-step instructions that make the process quick and hassle-free. Ready to get your drill press working exactly the way you want? Let’s dive in and make sure you have the right tools and confidence to get the job done right.
Preparing The Drill Press
Preparing the drill press is the first step before changing the chuck on your Skil drill press. Proper preparation ensures the process is safe and smooth. Taking time to get ready will save effort later. Follow the right steps to avoid damage and injury.
Gathering Necessary Tools
Collect all tools needed for the job before starting. You will need a chuck key to loosen and tighten the chuck. A wrench or pliers might help to hold parts steady. Having a clean cloth is useful to wipe dust or grease. Check your drill press manual for any special tools required. Organizing tools in one place saves time and avoids interruptions.
Ensuring Safety Precautions
Turn off and unplug the drill press before working on it. This prevents accidental starting, which can cause injuries. Wear safety glasses to protect your eyes from dust and metal bits. Avoid loose clothing or jewelry that can get caught in moving parts. Work in a clean, well-lit area to see clearly. Follow these precautions to keep yourself safe during the chuck change.

Credit: www.ereplacementparts.com
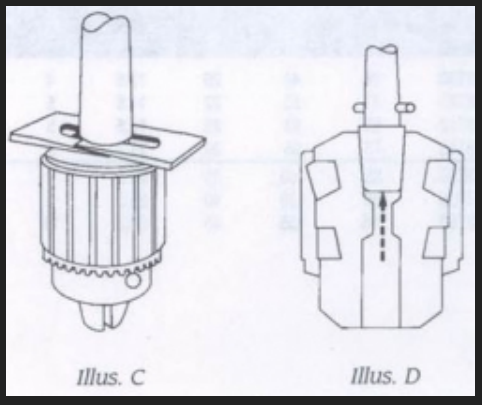
Removing The Old Chuck
Removing the old chuck from your Skil drill press is the first step to installing a new one. This process requires care and the right tools. Follow these steps to safely and easily remove the chuck.
Releasing The Chuck Key
Start by inserting the chuck key into the chuck. Turn the key counterclockwise to open the jaws. This releases any grip on the drill bit or material inside. Remove the chuck key once the jaws are fully open.
Loosening The Chuck
Hold the chuck firmly with one hand. Use the chuck key to turn the chuck counterclockwise. This loosens the chuck from the spindle. If it feels stuck, tap gently with a rubber mallet to help loosen it.
Detaching The Chuck From The Spindle
Once loose, pull the chuck straight down off the spindle. Avoid twisting too hard to prevent damage. Set the old chuck aside carefully, ready for replacement or cleaning.
Installing The New Chuck
Installing the new chuck on your Skil drill press is a simple task. It requires careful steps to ensure the chuck fits tightly and works well. Follow these steps to place the chuck correctly and safely on the spindle.
Aligning The New Chuck
First, check the spindle and chuck for dirt or dust. Clean both parts to avoid poor fitting. Hold the chuck so its hole matches the spindle’s shape. Make sure the parts line up straight. This helps the chuck slide on easily without forcing it.
Securing The Chuck Onto The Spindle
Push the chuck firmly onto the spindle. It should fit snugly without wobbling. Some chucks use a threaded connection; turn the chuck clockwise to screw it on. Others use a taper fit; tap the chuck gently with a soft hammer to seat it fully. Avoid hitting hard to prevent damage.
Tightening The Chuck Properly
Use the chuck key to tighten the jaws around the drill bit. Turn the key clockwise until the bit feels secure. Remove the chuck key before turning on the drill press. Double-check the chuck is tight to avoid slipping during use.
Credit: www.skil.com
Testing The New Chuck
Testing the new chuck on your Skil drill press is important. It ensures safety and accuracy during drilling. This step helps you avoid problems and saves time. Follow these simple checks before starting your project.
Checking For Proper Attachment
Look closely at the chuck and spindle connection. The chuck should fit tightly without any gaps. Try to move the chuck by hand. It must not wiggle or feel loose. A secure attachment prevents accidents and damage.
Verifying Drill Bit Stability
Insert the drill bit into the chuck. Tighten the chuck firmly using the key or hand, depending on the model. The drill bit should not move or slip. Hold the bit and try to twist it. If it feels loose, retighten the chuck again.
Running A Test Drill
Power on the drill press at low speed. Hold the drill press firmly and let it run for a few seconds. Watch the chuck and drill bit closely. If they spin smoothly without wobbling, the chuck is ready. Stop the machine before using it on a workpiece.
Maintaining The Chuck And Drill Press
Maintaining the chuck and drill press is key to keeping your tool working well. A clean and well-lubricated chuck grips drill bits tightly. This helps you drill with accuracy and safety. Regular care also stops rust and wear. It extends the life of your drill press.
Simple steps can keep your equipment in top shape. Checking parts often helps catch problems early. Knowing when to replace worn parts avoids bigger issues. Follow these tips for smooth and safe drilling.
Regular Cleaning Tips
Start by unplugging the drill press. Use a soft brush to remove dust and debris. Wipe the chuck with a dry cloth. Avoid using water to prevent rust. Clean inside the chuck jaws carefully. Use compressed air to blow out small particles. Clean after every use to avoid buildup.
Lubrication Recommendations
Apply a few drops of light machine oil to the chuck. Move the chuck jaws to spread the oil evenly. Lubricate the spindle and other moving parts too. Do this every few months or after heavy use. Avoid over-lubricating, which can attract dirt. Use oil designed for metal tools.
Signs For Replacement
Look for cracks or rust on the chuck body. Check if the jaws no longer hold drill bits tightly. Notice if the chuck is hard to open or close. Listen for unusual noises during operation. Replace the chuck if it shows these signs. Using a damaged chuck can be dangerous.
Credit: forum.nwwoodworkers.org
Frequently Asked Questions
How Do I Remove The Chuck From A Skil Drill Press?
To remove the chuck, first unplug the drill press for safety. Open the chuck jaws fully. Use a chuck key to loosen the chuck by turning it counterclockwise. Once loose, pull the chuck straight off the spindle.
What Tools Are Needed To Change A Skil Drill Press Chuck?
You only need a chuck key to loosen and tighten the chuck. For some models, a wrench may be required to remove the spindle nut. Always consult your drill press manual to confirm the specific tools needed.
How Do I Install A New Chuck On A Skil Drill Press?
Align the new chuck with the spindle taper. Push the chuck onto the spindle firmly. Use the chuck key to tighten the chuck by turning clockwise. Make sure it is secure before using the drill press.
Can I Use Any Chuck On A Skil Drill Press?
No, you must use a chuck that fits your drill press spindle size and taper. Check the manufacturer’s specifications to ensure compatibility. Using the wrong chuck can cause damage or unsafe operation.
Conclusion
Changing the chuck on your Skil drill press is simple and quick. Follow each step carefully to avoid mistakes. Use the right tools and keep the drill press unplugged for safety. A well-maintained chuck helps your drill work better. Practice this process a few times to feel confident.
Now you can change the chuck anytime without hassle. Keep your drill press ready for any project.