

Connecting a nail gun to a hose is essential for efficient and safe operation. This guide walks you through each step, from gathering tools to troubleshooting common issues. With clear instructions and helpful tips, you’ll master the process in no time.
How to Connect Nail Gun to Hose
If you’re working on construction, remodeling, or DIY projects, connecting your nail gun to the hose properly is crucial. A secure connection ensures safety, prevents leaks, and guarantees your nail gun operates efficiently. Whether you’re a beginner or looking to refine your skills, this guide offers simple, clear steps to help you connect your nail gun to a hose confidently.
Key Takeaways
- Proper Equipment: Use compatible hoses and fittings designed for your nail gun and compressor.
- Safety First: Always disconnect power and release pressure before connecting or disconnecting hoses.
- Step-by-Step Connection: Follow a systematic process to ensure secure and leak-free attachment.
- Check for Leaks: Regularly inspect connections to prevent air leaks and ensure optimal performance.
- Use Correct Fittings: Adaptors and fittings should match your nail gun’s inlet size for a tight fit.
- Practice Troubleshooting: Know how to fix common issues like leaks or low pressure for smooth operation.
Introduction
Connecting a nail gun to an air hose might seem straightforward, but there are important details to ensure safety and optimal performance. Using the right fittings, understanding pressure settings, and following proper procedures can make all the difference. In this guide, we’ll cover everything from gathering the right tools to troubleshooting common problems, so you can work smoothly and safely.
Step 1: Gather Your Tools and Equipment
Identify what you need
- Air compressor: Provides compressed air to power your nail gun.
- Nail gun: The pneumatic tool you’ll connect to the hose.
- Air hose: Typically made of rubber or reinforced material, sized appropriately.
- Fittings and connectors: Including quick-connect couplers, adapters, and clamps.
- Wrench or pliers: For tightening fittings.
- Safety gear: Safety glasses and gloves for protection.
Step 2: Ensure Safety Precautions
Power down and depressurize
Before starting, make sure your nail gun and compressor are turned off. Release any built-up pressure in the hose by pulling the trigger or opening the drain valve on the compressor. This step prevents accidental firing or air leaks during connection.
Visual guide about How to Connect Nail Gun to Hose
Image source: sawshub.com

Visual guide about How to Connect Nail Gun to Hose
Image source: air-hose.org
Wear safety gear
Always wear safety glasses and gloves to protect yourself from accidental discharges or sudden air releases.
Step 3: Select and Prepare the Fittings
Identify the correct fittings
Your nail gun will have an inlet size, often 1/4 inch NPT or a quick-connect fitting. Match these with your hose fittings. Using incompatible fittings can lead to leaks or disconnection during use.
Attach fittings to the hose
- Insert the appropriate connector into the hose’s end.
- Use a wrench to tighten securely, ensuring no leaks.
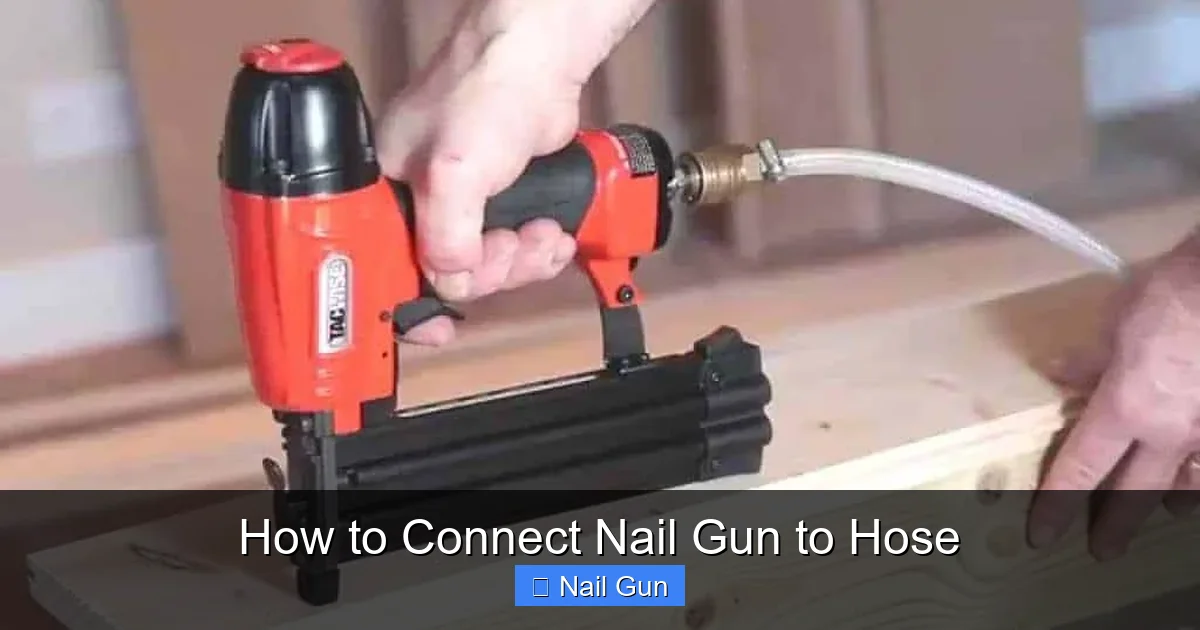
Step 4: Connect the Hose to the Nail Gun
Using quick-connect fittings
- Pull back the collar on the quick-connect coupler.
- Insert the nail gun’s inlet fitting into the coupler.
- Release the collar to lock the connection in place.
- Listen for a click indicating a secure lock.
Using threaded fittings
- Apply a small amount of thread sealant or Teflon tape to the male threads.
- Screw the fitting into the nail gun’s inlet by hand, then tighten with a wrench.
- Ensure the connection is snug but avoid over-tightening.
Step 5: Check the Connection and Test
Inspect for leaks
- Turn on the compressor gradually.
- Listen for hissing sounds indicating leaks.
- If leaks are present, tighten fittings or reapply sealant as needed.
Perform a test firing
With the safety measures in place, test the nail gun on a scrap piece of wood. Confirm that it fires properly and that airflow remains steady. Adjust pressure settings if necessary.
Additional Tips for a Secure Connection
- Use quality fittings: Cheap or incompatible fittings may cause leaks or disconnections.
- Maintain your hose: Regularly inspect for cracks, wear, or damage.
- Keep fittings clean: Dirt or debris can interfere with a tight seal.
- Store properly: When not in use, disconnect fittings to prevent damage and maintain seal integrity.
Troubleshooting Common Issues
Low air pressure or weak firing
Check if the hose is properly connected and if fittings are tight. Ensure your compressor provides enough pressure (usually 70-120 PSI). Adjust the regulator accordingly.
Leaks at the connection points
Re-tighten fittings or reapply thread sealant. Replace damaged fittings if necessary.
The nail gun doesn’t fire
Verify the hose is delivering sufficient air. Check if the nail gun is properly connected and not jammed. Consult the manufacturer’s manual for specific troubleshooting.
Conclusion
Connecting your nail gun to a hose doesn’t have to be complicated. By following these simple steps—gathering the right tools, ensuring safety, selecting compatible fittings, and checking connections—you can set up your pneumatic tool with confidence. Regular maintenance and troubleshooting will keep your setup working smoothly for all your projects. Happy nailing!