

Are you struggling to connect wires to your cordless drill battery? Whether you want to fix a loose connection or customize your drill for a specific task, knowing the right way to handle the wires is crucial.
Getting it wrong can damage your battery or even cause safety issues. But don’t worry—this guide will walk you through every step clearly and safely. By the end, you’ll feel confident working with your drill’s battery wiring, saving time and avoiding costly mistakes.
Keep reading to learn exactly how to do it right.
Tools And Materials Needed
Connecting wires to a cordless drill battery requires specific tools and materials. Having the right items makes the task easier and safer. This section covers what you need before starting your work.
Cordless Drill Battery Types
Know the battery type of your cordless drill. Common types include lithium-ion, nickel-cadmium, and nickel-metal hydride. Each type has different voltage and wiring needs. Identify your battery to select the correct wires and connectors.
Essential Tools
Gather all tools before you begin. You need wire strippers to remove insulation. A soldering iron helps create strong connections. Use a multimeter to check voltage and continuity. Electrical tape or heat shrink tubing protects connections. Small screwdrivers may be required to open battery casing.
Safety Gear
Wear safety glasses to protect your eyes from sparks. Use insulated gloves to avoid electric shocks. Work in a well-ventilated area to prevent inhaling fumes. Keep a fire extinguisher nearby as a precaution. Safety ensures the job finishes without injury or damage.
Preparing The Battery And Wires
Preparing the battery and wires is the first step to a safe and effective connection. This stage sets the foundation for a strong electrical link between the drill and its power source. Proper preparation helps avoid damage and ensures smooth operation.
Inspecting The Battery
Check the battery for any cracks or leaks. Damaged batteries can be dangerous and should not be used. Look at the terminals for dirt or corrosion. Clean terminals with a soft cloth if needed. Make sure the battery is fully charged or partially charged as required.
Selecting The Right Wire
Choose wires that match the battery’s voltage and current needs. Use wires with proper thickness to handle power safely. Thin wires can overheat and cause failures. Pick wires with insulation to protect from shorts and shocks. Copper wires are a good choice for conductivity.
Stripping Wire Ends
Use a wire stripper tool to remove about half an inch of insulation. Avoid cutting into the metal wire strands. Expose clean copper for a good connection. Twist the strands gently to keep them together. Proper stripping prevents loose connections and improves safety.
Identifying Battery Terminals
Identifying the battery terminals is the first step in connecting wires to a cordless drill battery. This step ensures you connect the wires correctly and avoid damage. Batteries have two terminals: positive and negative. Knowing which is which helps maintain safe and proper electrical flow.
Positive And Negative Markings
Batteries usually have clear markings for positive and negative terminals. The positive terminal often has a plus sign (+) near it. The negative terminal has a minus sign (−). These signs are small but important. Sometimes, the positive terminal is red or has a red wire. The negative terminal might be black or have a black wire. Check both sides of the battery for these marks before connecting wires.
Using A Multimeter
A multimeter can help find the positive and negative terminals. Set the multimeter to measure voltage. Touch the red probe to one terminal and the black probe to the other. If the reading shows a positive number, the red probe is on the positive terminal. The black probe is on the negative terminal. A negative reading means the probes are reversed. Swap the probes until the reading is positive. This method gives a clear, accurate result.
Credit: refreshliving.us
Connecting Wires To Terminals
Connecting wires to the terminals of a cordless drill battery is a key step. It ensures the drill gets the right power and runs well. This process requires care to avoid damage or poor contact. Follow these steps to connect wires safely and correctly.
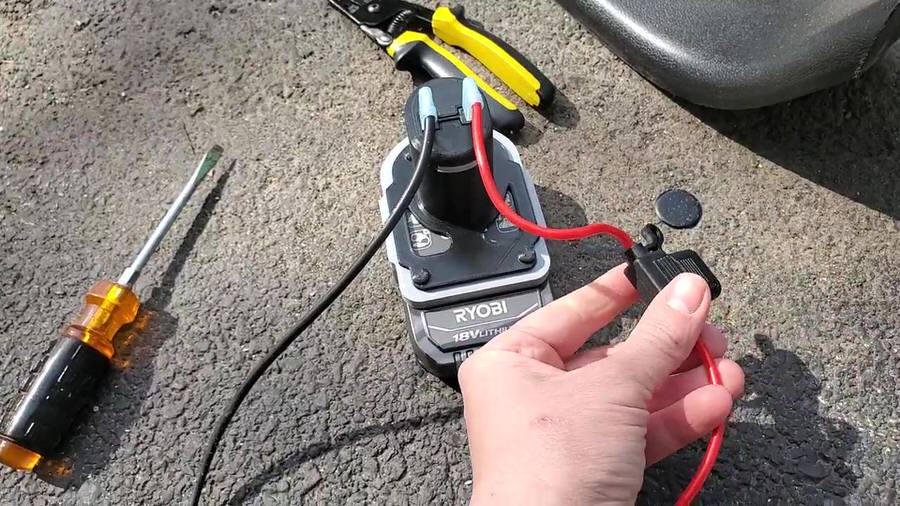
Attaching Positive Wire
Start with the positive wire. It usually has a red color or a plus (+) sign. Find the positive terminal on the battery. Carefully strip the wire end to expose the metal. Attach the wire to the terminal by wrapping or clamping it tightly. Make sure it touches the metal fully for good contact.
Attaching Negative Wire
Next, handle the negative wire. This wire is often black or marked with a minus (-). Locate the negative terminal on the battery. Strip the wire end just like the positive wire. Connect it securely to the negative terminal. Check the wire sits firmly and does not slip off.
Securing Connections
After attaching both wires, secure the connections. Use electrical tape or heat shrink tubing. Wrap the tape tightly around the wire and terminal joint. This protects the connection from moisture and movement. Tug gently on the wires to confirm they hold well. Proper securing avoids loose contacts and power loss.
Testing The Connection
Testing the connection is a key step after wiring your cordless drill battery. It ensures that the wires are properly connected and the drill works safely. This step helps avoid damage to the tool or battery. Follow simple checks to confirm your work is solid and reliable.
Powering On The Drill
Start by inserting the battery into the drill. Press the power button or trigger gently. Watch for any signs of life like lights or sounds. If the drill runs smoothly, the connection is good. If it does not turn on, stop and check the wiring again.
Checking For Loose Connections
Look closely at each wire connection. Tug each wire lightly to see if it moves. Loose wires can cause the drill to fail or spark. Tighten any loose ends with a screwdriver or pliers. Make sure no wires touch each other or metal parts.
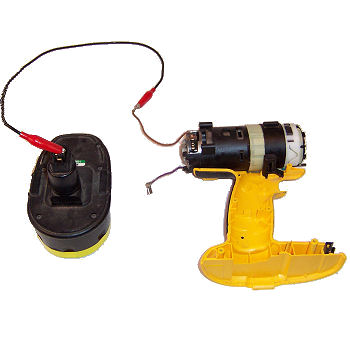
Credit: www.ereplacementparts.com
Troubleshooting Common Issues
Connecting wires to a cordless drill battery can be tricky. Sometimes, the drill may not work as expected. Troubleshooting common issues helps fix the problem quickly. Understanding basic problems saves time and effort.
No Power Problems
Check the battery charge first. A dead battery causes no power. Make sure wires connect tightly to the battery terminals. Loose connections stop the drill from working. Inspect the battery contacts for dirt or rust. Clean them gently with a dry cloth. Test the drill with another battery if possible. This helps find if the problem is with the battery or drill.
Overheating Concerns
The drill may get hot during use. Overheating can damage the battery and wires. Avoid running the drill for too long. Let it cool down between uses. Check if wires are connected properly. Poor connections create heat. Replace damaged wires to prevent further issues. Use the correct battery type for your drill to avoid overheating.
Wire Damage Signs
Look closely at the wires for any cuts or frays. Damaged wires cause power loss and safety risks. Replace wires with visible damage immediately. Use electrical tape for small nicks as a temporary fix. Make sure wires are not pinched or bent sharply. This keeps the connection strong and safe. Proper wire care extends the battery and drill life.
Maintenance Tips For Battery Connections
Keeping your cordless drill battery connections clean and well-maintained helps the tool work better and last longer. Simple care steps stop problems like poor contact and power loss. This section shares easy ways to keep battery connections in top shape.
Cleaning Contacts
Dirt and dust block battery contacts. Use a dry cloth to wipe contacts gently. For tough grime, use a small brush or cotton swab. Avoid liquids that can damage the battery or drill. Clean contacts improve power flow and prevent sparks.
Regular Inspection
Check battery connections often for signs of damage or wear. Look for cracks, corrosion, or loose wires. Catching issues early prevents bigger problems. Tighten loose connections carefully using the right tools. Replace damaged parts quickly to keep your drill safe.
Proper Storage
Store batteries in a cool, dry place. Avoid extreme temperatures that reduce battery life. Keep battery and drill separate if not used for a long time. Use original cases or containers to protect connections from dust and damage.

Credit: www.youtube.com
Frequently Asked Questions
How Do I Safely Connect Wires To A Cordless Drill Battery?
Always disconnect the battery before starting. Use insulated tools and ensure wires match the battery terminals. Secure connections tightly to avoid sparks or shorts. Double-check polarity to prevent damage. Follow manufacturer instructions carefully for safety.
What Tools Are Needed To Connect Wires To A Drill Battery?
You need wire strippers, soldering iron or crimp connectors, electrical tape, and insulated pliers. A multimeter is useful to check continuity and polarity. Use heat shrink tubing for extra insulation and protection.
Can I Replace Damaged Wires On A Cordless Drill Battery?
Yes, damaged wires can be replaced. Cut the damaged section, strip the ends, and reconnect using solder or crimp connectors. Ensure secure and insulated connections. Always test the battery before regular use to confirm proper wiring.
What Wire Gauge Is Best For Cordless Drill Batteries?
Use 16 to 18 gauge wire for most cordless drill batteries. Thicker wires handle current better and reduce voltage drop. Always check the battery’s current rating and choose wire accordingly for safety and efficiency.
Conclusion
Connecting wires to a cordless drill battery is simple with the right steps. Always check the wire connections carefully. Make sure the battery is off before starting. Use proper tools to avoid damage. Double-check your work for safety. This process helps keep your drill working well.
Practice patience and take your time. Soon, you will handle battery connections with ease. Stay safe and enjoy your projects!