

Have you ever tried to hang something on your wall, only to have the nail slip or the drywall crack? It’s frustrating when a simple task turns tricky.
But what if you could learn the right way to drill a nail into drywall, making your walls strong and your decorations secure? In this guide, you’ll discover easy steps that anyone can follow. By the time you finish reading, you’ll feel confident to tackle your next project without worry.
Keep reading, and let’s make your walls work perfectly for you.
Choosing The Right Tools
Choosing the right tools makes drilling a nail into drywall easier and safer. The right equipment helps avoid damage to your wall. It also ensures your nail holds firm. Each tool has a specific role in the process. Knowing what to use saves time and effort.
Selecting The Proper Drill
Use a cordless drill or a corded drill with adjustable speed. Choose a drill with a low speed setting. This prevents the drywall from cracking. A drill with a comfortable grip helps control the tool better. Avoid heavy drills that are hard to handle.
Picking The Correct Drill Bit
Pick a drill bit slightly smaller than the nail or anchor diameter. A 1/8-inch bit works well for small nails. Use a masonry bit only if you drill into concrete behind drywall. Sharp bits make clean holes and reduce wall damage. Replace dull bits for better results.
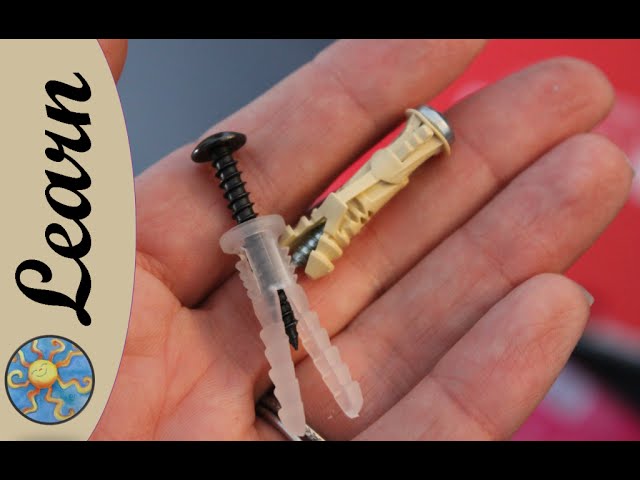
Using The Right Nails Or Anchors
Choose nails designed for drywall, like finishing nails or drywall nails. For heavier items, use drywall anchors or wall plugs. Plastic anchors work for light to medium loads. Metal anchors provide stronger support. Match the nail or anchor size to your drill bit hole.
Credit: www.youtube.com
Preparing The Wall
Preparing the wall is a crucial step before drilling a nail into drywall. Proper preparation helps avoid damage and ensures the nail holds well. Taking time now saves effort later.
Start by finding the best spot to drill. Check the wall carefully and plan your work. This preparation makes the process smooth and safe.
Locating Studs And Marking Spots
Studs are wooden or metal beams behind drywall. Nails hold better when driven into studs. Use a stud finder to locate these beams easily. Mark the spots with a pencil. If no stud is found, choose a place with drywall anchors for support.
Checking For Electrical Wires And Pipes
Drywall may hide wires or pipes. Drilling into them can cause serious damage or injury. Use a wire detector to scan the area. Avoid spots with electrical wires or plumbing. Safety is a top priority.
Cleaning The Surface
Remove dust and dirt from the wall. Wipe the surface with a dry cloth. A clean wall helps the nail grip better. It also prevents slipping or errors while drilling.
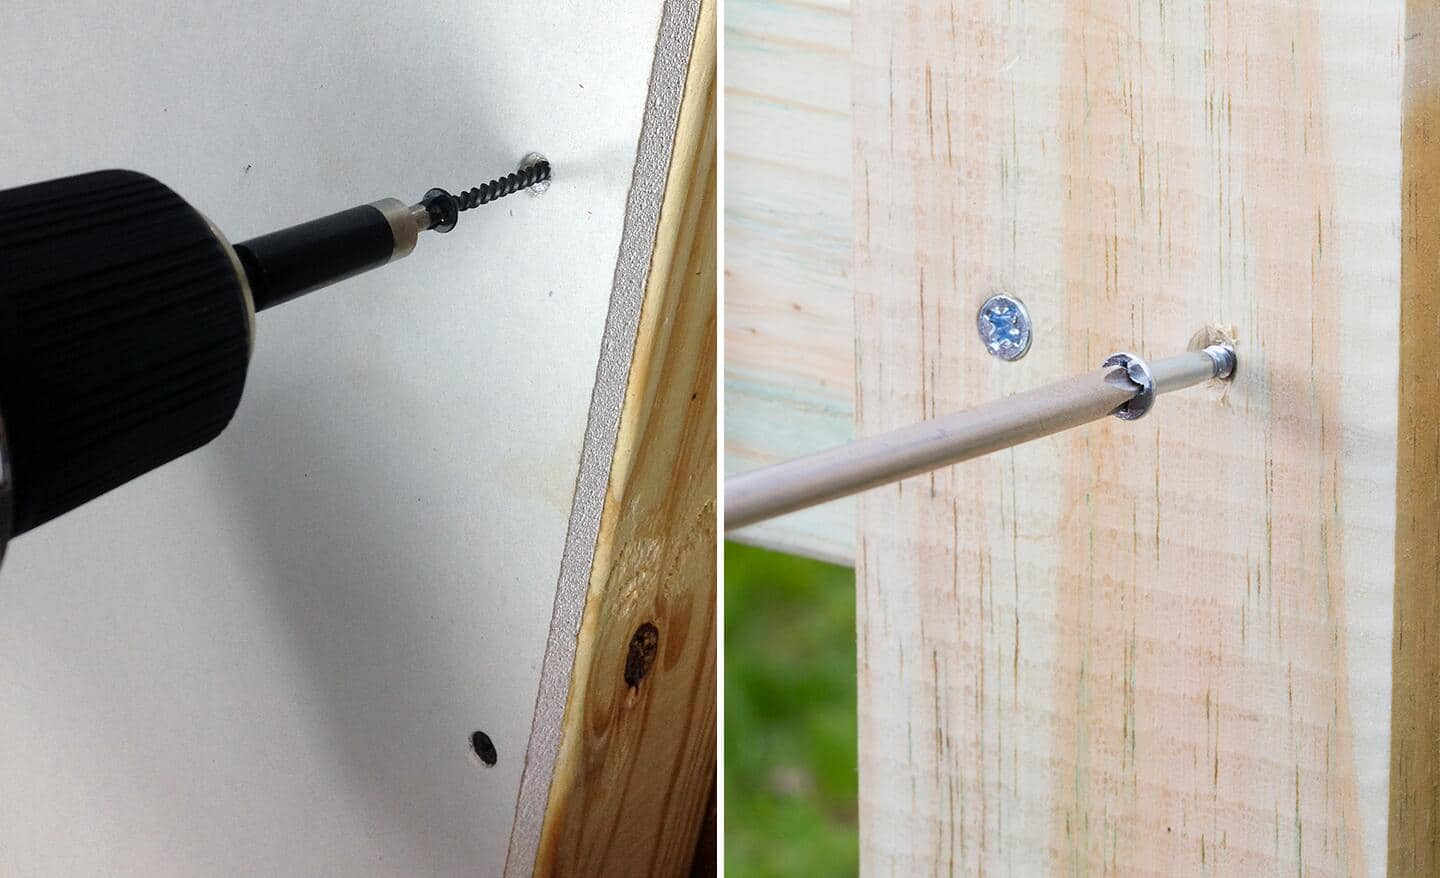
Drilling The Pilot Hole
Drilling a pilot hole is the first important step before driving a nail into drywall. It helps the nail go in smoothly and prevents the drywall from cracking. Taking your time during this step saves effort later and keeps your wall neat.
Setting The Drill Speed
Choose a low to medium drill speed. High speed can damage drywall easily. A slower speed gives you better control. It also reduces dust and keeps the hole clean. This control helps avoid mistakes and makes the process safer.
Drilling At The Correct Angle
Hold the drill straight, at a 90-degree angle to the wall. This angle keeps the hole round and deep enough. Angling the drill can cause the hole to be too big or uneven. A straight hole helps the nail fit tightly and hold well.
Avoiding Wall Damage
Use a small drill bit, about the size of the nail’s shaft. Too big a hole weakens the wall. Drill slowly and stop as soon as the bit passes through the drywall surface. Avoid pushing hard. Gentle pressure prevents cracks and keeps the wall strong.
Credit: www.homedepot.com
Inserting The Nail
Inserting a nail into drywall requires care to avoid damage. Drywall is soft and can crack or crumble easily. Using the right tools and techniques makes the job easier and safer. This section explains how to insert nails properly for strong support.
Choosing Between Nails And Anchors
Nails work well for light items like pictures or small shelves. They hold better in wooden studs behind drywall. For heavier items, nails alone may not be enough. Anchors provide extra grip inside drywall. They spread the weight and prevent nails from pulling out. Choose anchors if the item is heavy or the nail won’t hit a stud.
Hammering Techniques For Drywall
Use a small hammer and gentle taps to start the nail. Push it slowly to avoid cracking the drywall. Stop once the nail head is flush with the wall surface. If the nail bends, remove it and try again carefully. Hammering too hard can break drywall or make a large hole.
Securing Heavy Items
Heavy items need strong support to stay safe on the wall. Locate a stud using a stud finder or tap to hear a solid sound. Drive nails directly into the stud for best hold. Use anchors rated for the item’s weight if no stud is available. Combine nails and anchors for extra security when needed.
Finishing Touches
Finishing touches are key to a neat and safe nail job in drywall. They help ensure the nail holds well and the wall looks good. Small steps now prevent bigger problems later. This section covers checking stability, touching up the wall, and removing or adjusting nails safely.
Checking Stability
Press gently around the nail to test its hold. The nail should feel firm and not wiggle. If it moves, the drywall may need a stronger anchor or a different spot. Confirm the nail supports the weight of the item you want to hang. A stable nail prevents damage and accidents.
Touching Up Wall Surface
Fill small holes or cracks with spackle or putty. Use a putty knife to smooth the surface evenly. Let it dry completely. Lightly sand the area for a flush finish. Paint over the spot to match the wall color. This step hides the nail hole and keeps the wall looking clean.
Removing Or Adjusting Nails Safely
Use a claw hammer or nail puller to remove nails gently. Place a thin piece of wood under the hammer to protect the wall. Pull the nail slowly to avoid tearing drywall. To adjust, tap the nail deeper or pull it out and try a new spot. Handle nails carefully to keep the wall intact.
Common Mistakes To Avoid
Drilling a nail into drywall seems easy but can go wrong fast. Avoiding common mistakes saves time and prevents wall damage. Small errors cause big problems. Learn what to watch out for.
Overdrilling The Wall
Drilling too deep weakens the drywall. It makes the hole bigger than needed. Nails won’t hold well. The wall may crack or crumble. Stop drilling as soon as the hole is ready.
Using Incorrect Hardware
Wrong nails or anchors cause failure. Thin nails bend or break. Large nails crack the drywall. Use nails or screws made for drywall. Anchors help hold heavy items securely.
Ignoring Wall Material Differences
Drywall types vary in thickness and strength. Some walls have wood or metal studs behind. Know your wall before drilling. Use proper anchors for hollow or solid walls. This keeps nails steady and safe.

Credit: www.youtube.com
Frequently Asked Questions
How Do I Drill A Nail Into Drywall Safely?
Use a drill bit slightly smaller than the nail. Drill a pilot hole to prevent drywall damage. Insert the nail carefully and hammer gently to avoid cracking or denting the wall.
What Tools Are Needed To Drill Into Drywall?
You need a power drill, drill bit, hammer, and nails. A stud finder helps locate studs behind drywall. Safety goggles and dust mask are recommended for protection.
Can I Drill Nails Directly Into Drywall?
Drilling nails directly risks damaging drywall. Always drill a pilot hole first. This reduces cracking and ensures the nail holds firmly without weakening the wall.
How To Avoid Drywall Cracking When Drilling Nails?
Use a small drill bit for pilot holes. Drill slowly and stop once the hole is made. Hammer nails gently to prevent pressure cracks or dents on drywall.
Conclusion
Drilling a nail into drywall is simple with the right steps. Always use a drill bit slightly smaller than the nail. This helps avoid cracking the drywall. Take your time and keep the drill steady. Check the wall for wires or pipes before drilling.
With practice, you will feel more confident and precise. Small projects become easier and less stressful. Now, you can hang pictures or shelves safely. Just follow these tips and stay careful. Your walls will stay strong and neat.