

If you’ve ever struggled with screws that stick out or don’t sit flush, learning how to drill a recessed screw hole can change everything. Imagine a smooth, clean finish where your screws disappear perfectly into the surface.
It’s easier than you think, and once you master this simple skill, your projects will look more professional and last longer. In this guide, you’ll discover step-by-step how to get that perfect recessed hole every time—no guesswork, no frustration. Ready to make your next project stand out?
Let’s dive in.
Choosing The Right Tools
Choosing the right tools is key to drilling a perfect recessed screw hole. The tools affect the hole’s size, depth, and finish. Using proper equipment makes the job easier and the results better. This section explains the tools needed for clean, precise recessed holes.
Selecting Drill Bits
Start by picking the correct drill bit size. The bit should match the screw’s inner diameter. A bit too large or small causes loose or tight holes. High-speed steel (HSS) bits work well for wood and metal. For softer materials, brad point bits offer clean entry. Always check the drill bit condition before use.
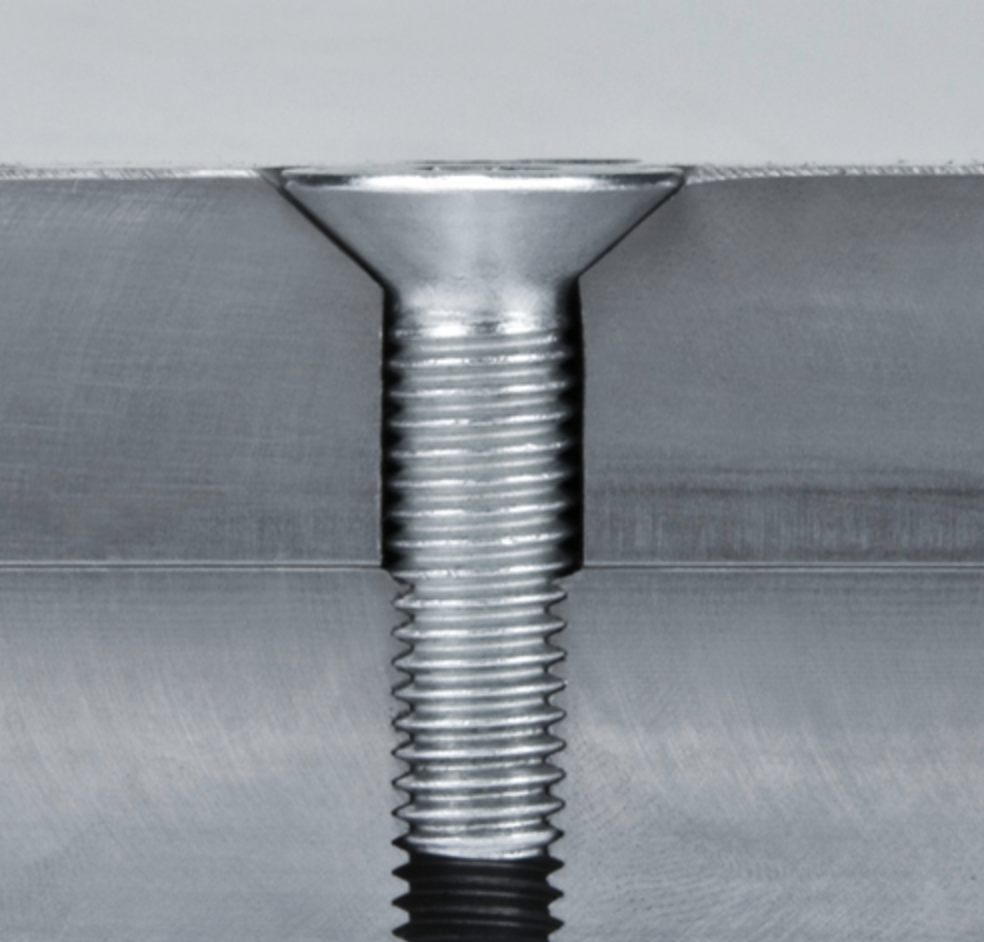
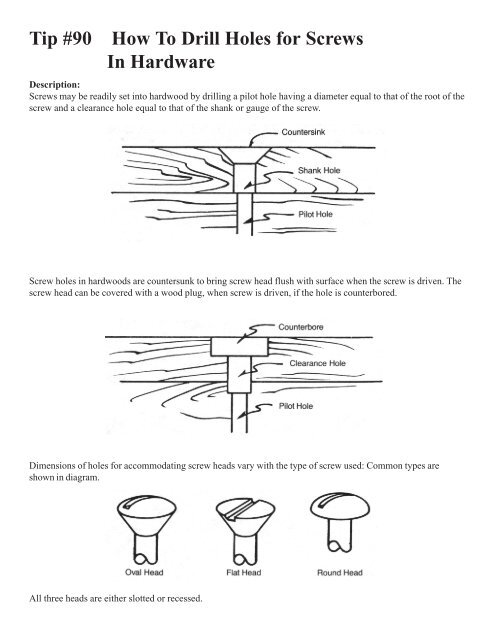
Using A Countersink Or Counterbore
A countersink creates a conical recess for flat-head screws. This tool shapes the hole’s top to fit the screw head flush with the surface. A counterbore makes a flat-bottomed recess for socket head screws. These tools prevent wood from splitting. They also help screws sit firmly and look neat.
Recommended Drill Types
Cordless drills provide good control and portability. They work well for small to medium tasks. For tougher materials, corded drills deliver steady power. Drill presses offer precision for repetitive or deep holes. Choose a drill that matches your project size and material type.
Credit: solutions.travers.com
Preparing The Work Surface
Preparing the work surface is an important step before drilling a recessed screw hole. It helps ensure accuracy and safety. Taking time to prepare the area saves effort later and makes the job easier.
Marking The Screw Position
Start by marking the exact spot for the screw. Use a pencil or a fine-tip marker. A clear mark guides the drill bit and prevents mistakes. Double-check the position before drilling. This step helps keep the hole straight and in the right place.
Securing The Material
Hold the material firmly to avoid movement. Use clamps or a vise to keep it steady. A stable surface stops the drill bit from slipping. This improves precision and protects the material from damage.
Safety Precautions
Wear safety glasses to protect your eyes from dust and debris. Keep your hands away from the drill bit. Work in a clean, well-lit area to see clearly. Follow these safety steps to prevent accidents and injuries.
Drilling The Pilot Hole
Drilling the pilot hole is the first step in creating a perfect recessed screw hole. This small hole guides the screw and prevents the wood or material from splitting. Taking time to drill the right pilot hole ensures a clean, professional finish.
Choosing Pilot Hole Size
Select a drill bit slightly smaller than the screw’s shaft. This size lets the screw grip the material firmly. Too large a hole makes the screw loose. Too small, and the material might crack.
Check the screw package for recommended pilot hole sizes. Match the bit to the screw’s core diameter, not the threads.
Drilling Technique Tips
Hold the drill steady and straight. Drill slowly at first to avoid slipping. Apply even pressure. Stop once you reach the desired depth.
Mark the depth on the drill bit with tape. This helps avoid drilling too deep. Keep the drill bit sharp for clean cuts.
Avoiding Material Damage
Use a clamp to secure the workpiece. This stops movement and prevents mistakes. Avoid pressing too hard; let the drill do the work.
Drill pilot holes in soft spots or grain lines carefully. These areas can split easily. A pilot hole reduces stress and keeps the material intact.

Credit: clairedouglasstyling.co.uk
Creating The Recessed Hole
Creating a recessed hole is an important step for a screw to sit flush with the surface. This technique protects the material and gives your project a neat look. The process needs care to avoid damage to the material or screw.
Setting Depth For Countersink
Start by deciding how deep the recess should be. Use a depth stop or tape on your drill bit. This prevents drilling too deep. Check the screw head size for the right depth. A shallow recess may cause the screw head to stick out.
Using The Right Speed And Pressure
Set your drill to a moderate speed. Too fast can burn or damage the material. Apply steady, gentle pressure. Pressing too hard can crack the wood or metal. Let the drill bit do the work. Slow and steady gives a cleaner hole.
Ensuring A Clean Finish
After drilling, remove any debris or rough edges. Use a countersink bit or sandpaper to smooth the hole edges. A clean finish helps the screw fit perfectly. It also improves the look of your work. Check the hole with the screw before final fixing.
Testing And Adjusting
Testing and adjusting the recessed screw hole is crucial for a perfect fit. It ensures the screw sits flush without damage. This step saves time and prevents mistakes in your project.
Fitting The Screw
Insert the screw gently into the recessed hole. Check if the screw head fits snugly inside the recess. It should sit flush or slightly below the surface. Avoid forcing the screw. A proper fit prevents splitting or cracking the material.
Making Depth Adjustments
Use a drill or chisel to deepen the hole if the screw head sticks out. Remove small amounts of material at a time. Test the screw fit after each adjustment. Stop once the screw sits perfectly. Over-deepening weakens the hold and looks unprofessional.
Common Mistakes To Avoid
Drilling too deep wastes material and weakens the joint. Not testing the fit often causes uneven screw heads. Using the wrong drill bit size leads to loose or tight fits. Rushing adjustments can damage the wood or screw. Take time and work carefully for the best results.
Advanced Tips For Different Materials
Drilling a recessed screw hole changes slightly depending on the material. Different materials need different care to avoid damage. Using the right drill bit and speed makes the task easier. Below are tips for wood, metal, and plastic.
Working With Wood
Use a sharp wood drill bit for clean holes. Start with a small pilot hole to guide the screw. Drill slowly to avoid splintering the wood. Clear sawdust often to keep the hole clean. For hardwood, apply gentle pressure to prevent cracking.
Drilling In Metal
Choose a high-speed steel (HSS) drill bit for metal. Mark the spot with a center punch to keep the bit steady. Use cutting oil to cool the bit and reduce friction. Drill at a slow speed to avoid overheating. Remove metal shavings carefully to prevent injury.
Handling Plastic Surfaces
Use a drill bit designed for plastic or a sharp standard bit. Drill at a medium speed to avoid melting the plastic. Support the plastic piece firmly to prevent cracking. Avoid pushing too hard to stop the plastic from deforming. Clean up plastic shavings gently after drilling.
Maintenance And Care For Tools
Proper maintenance and care extend the life of your tools. Well-kept tools work better and last longer. This saves money and time on repairs or replacements. Keeping tools clean and sharp ensures smooth, accurate drilling. Store tools correctly to avoid damage and rust. Follow these tips to keep your drill bits and countersinks in top shape.
Sharpening Drill Bits
Dull drill bits cause poor holes and damage materials. Use a sharpening tool or grinder to restore the edge. Hold the bit at the correct angle. Sharpen both cutting edges evenly. Avoid overheating the bit during sharpening. Cool it with water if needed. Regular sharpening keeps the bit cutting smoothly.
Cleaning Countersinks
Debris and dust build up inside countersinks after use. Clean them with a small brush or compressed air. Remove all particles to keep the cutting edges sharp. Wipe the countersink with a cloth to remove grease. Proper cleaning prevents clogging and uneven holes. Clean tools ensure precise, smooth recessed screw holes.
Storing Tools Properly
Store drill bits and countersinks in a dry, organized place. Use a case or holder to keep them separated. Avoid dropping or banging tools to prevent damage. Moisture causes rust, so keep tools dry. Apply a light oil coat to metal parts for protection. Proper storage saves your tools and improves performance.
Credit: www.yumpu.com
Frequently Asked Questions
What Tools Do I Need To Drill A Recessed Screw Hole?
You need a drill, countersink bit, measuring tape, and safety gear. These tools help create a clean, accurate recessed hole for screws.
How Deep Should A Recessed Screw Hole Be Drilled?
Drill the hole just deep enough for the screw head to sit flush. Typically, this depth matches the screw head’s thickness.
Can I Use A Regular Drill Bit For Recessed Holes?
No, use a countersink or combination bit for recessed holes. Regular bits don’t create the necessary angled cavity for screw heads.
How Do I Prevent Wood From Splitting When Drilling?
Pre-drill a pilot hole smaller than the screw diameter. Use sharp bits and drill slowly to avoid wood splitting.
Conclusion
Drilling a recessed screw hole is simple with the right steps. Start by marking the spot clearly. Use a drill bit that fits the screw size. Drill carefully to avoid splitting the wood. Creating a recess helps the screw sit flush and looks neat.
Practice makes the process faster and easier. Try it on scrap wood first for confidence. This skill improves your woodworking projects noticeably. Keep your tools sharp and clean for best results. You will find your work looks more professional each time.