

Are you looking to customize your shotgun for better performance or add new accessories? Knowing how to drill and tap a shotgun receiver can give you the control and precision you need.
But the process might seem tricky or even risky if you don’t have the right guidance. You’ll discover simple, step-by-step instructions that make drilling and tapping your shotgun receiver safe and effective. By the end, you’ll feel confident handling this task yourself—and unlock new possibilities for your firearm.
Keep reading to learn exactly what tools you need and how to avoid common mistakes that could cost you time and money.
Tools And Materials Needed
Drilling and tapping a shotgun receiver requires specific tools and materials. Having the right equipment helps ensure accuracy and safety. Prepare everything before starting the process. This preparation makes the work easier and more precise.
Essential Drilling Equipment
Start with a quality drill press or hand drill. A drill press offers more control and stability. Use drill bits sized for the screws or bolts you will install. Choose sharp, high-speed steel bits for clean holes. A center punch marks the drilling spot to prevent bit slipping. A clamp or vise holds the receiver steady during drilling.
Tapping Tools And Supplies
Select taps that match the thread size needed for your shotgun receiver. A tap wrench helps turn the tap smoothly and evenly. Use cutting oil or lubricant to reduce friction and heat. This oil helps protect the tap from breaking. Have a tap guide if available to keep the tap straight. Clean the threads after tapping with a brush or compressed air.
Safety Gear
Wear safety glasses to protect your eyes from metal chips. Use gloves to shield your hands from sharp edges and heat. Hearing protection reduces noise from the drill and taps. Work in a well-ventilated area to avoid inhaling fumes or dust. Keep a clean workspace to prevent accidents and slips.
Credit: www.rem870.com
Preparing The Shotgun Receiver
Preparing the shotgun receiver is the first step in drilling and tapping. It requires care and attention to ensure safe and accurate work. This process helps avoid mistakes and damage to the receiver. Proper preparation sets a solid base for the entire task.
Cleaning And Inspection
Start by cleaning the receiver thoroughly. Remove dirt, oil, and debris with a cloth. Use a small brush to reach tight spots. Check the receiver for cracks or damage. Any flaws could cause problems later. Make sure the metal surface is smooth and dry before proceeding.
Marking Drill Points
Identify the exact spots where you will drill. Use a fine-tip marker or scribe to mark these points. Measure twice to ensure accuracy. Marking helps keep the drill bit steady and prevents slipping. Clear, precise marks guide your drill perfectly.
Securing The Receiver
Firmly secure the receiver in a vise or clamp. This stops movement during drilling and tapping. Use soft jaws or padding to avoid scratches. Double-check that the receiver is stable and won’t shift. A steady receiver ensures clean holes and safe work.
Drilling Process
Drilling the shotgun receiver requires care and precision. This step is important to ensure a strong and safe installation of parts. The drilling process must be done slowly and with the right tools. Mistakes can damage the receiver and cause problems later.
Choosing The Right Drill Bit
Select a drill bit that matches the hole size needed. Use high-speed steel or cobalt bits for metal. Check that the bit is sharp to avoid slipping. A dull bit can make rough holes and damage the receiver. The drill bit must be straight and fit the drill chuck tightly.
Drilling Technique Tips
Secure the receiver firmly before starting to drill. Use a vise or clamps to hold it steady. Start drilling at a slow speed to keep control. Apply steady, even pressure on the drill. Let the drill bit do the work. Stop frequently to remove metal shavings and cool the bit. Keep the drill perpendicular to the receiver surface.
Avoiding Common Mistakes
Do not rush the drilling process. Drilling too fast can cause overheating and damage. Avoid using excessive force that may crack the metal. Do not skip marking the hole location carefully. Drilling off-center can ruin the receiver. Clean the area before and after drilling. This keeps metal debris from causing problems later.
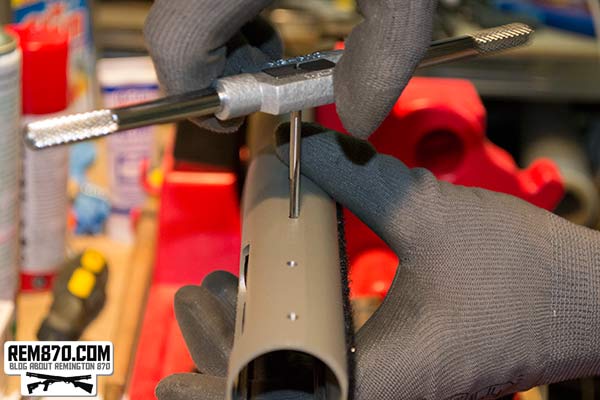
Tapping The Receiver
Drilling and tapping a shotgun receiver requires careful measurement and steady hands. Use the right tools to create clean threads for secure parts fitting. Precision ensures safety and proper function.
Selecting Tap Size And Type
Choosing the right tap size is key for a clean thread in the receiver. Use the tap size that matches the screw or bolt you plan to install. Check the firearm’s manual or measure the fastener for accuracy. Select a tap type designed for metal, such as a spiral point or plug tap. These types cut threads smoothly and reduce damage to the receiver.
Proper Tapping Angle
Keep the tap straight and aligned with the drilled hole. A wrong angle can cause crooked threads and weaken the hold. Use a tapping guide or a drill press stand for better control. Start tapping slowly and check the angle frequently. Correct alignment ensures strong, precise threads in the shotgun receiver.
Lubrication And Thread Cutting
Apply cutting oil or lubricant to the tap before use. Lubrication reduces friction and heat during thread cutting. Turn the tap slowly and carefully, backing off slightly to clear chips. This prevents tap breakage and keeps threads clean. Clean the receiver and tap after finishing to remove metal shavings.
Finishing Touches
After drilling and tapping your shotgun receiver, the final steps are very important. These finishing touches ensure your work is safe and functional. They help keep your shotgun reliable and ready to use.
Cleaning Metal Shavings
Metal shavings can get trapped inside the receiver. Clean them out carefully using a small brush or compressed air. Remove all debris to avoid damage or jamming later. A clean receiver is safer and lasts longer.
Inspecting Threads
Check the tapped threads closely for any damage or uneven cuts. Use a thread gauge or the actual screw to test the fit. Smooth, clean threads are essential for a secure hold. Fix any problems before moving forward.
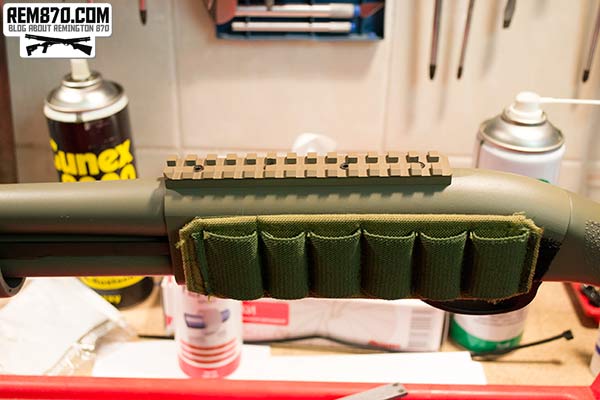
Test Fitting Components
Place the parts back onto the receiver to test the fit. Ensure screws and bolts slide in smoothly without forcing. The components should fit snugly and align correctly. This step confirms your work is done right.

Credit: www.youtube.com
Troubleshooting Tips
Troubles can arise while drilling and tapping a shotgun receiver. These issues might cause delays or damage. Knowing how to fix common problems helps keep the work smooth and safe.
Below are simple tips to solve frequent troubles during the process.
Fixing Misaligned Holes
Misaligned holes can ruin the receiver. Check measurements before drilling. Use a center punch to mark the spot. This keeps the drill bit steady. If holes are off, use a larger drill bit carefully. Fill the wrong hole with epoxy or metal filler. Let it dry fully before re-drilling.
Dealing With Stripped Threads
Stripped threads weaken the hold of screws. Use a thread repair kit for a quick fix. Insert a helicoil or thread insert to restore threads. Avoid overtightening screws to prevent stripping. Always use the correct tap size for threading.
Handling Drill Slippage
Drill slippage can scratch or damage the receiver. Apply masking tape over the drilling spot for better grip. Start drilling with a small pilot hole to guide the drill bit. Hold the drill steady and drill at a slow speed. Use sharp, high-quality drill bits to reduce slippage.
Credit: www.rem870.com
Frequently Asked Questions
How Do I Safely Drill A Shotgun Receiver?
Use proper safety gear and secure the receiver firmly. Mark the drill points accurately. Drill slowly with a sharp bit to avoid damage. Always follow firearm safety protocols during the process.
What Tools Are Needed To Tap A Shotgun Receiver?
You need a drill, drill bits, tap set, cutting oil, and a vise. Ensure the tap matches the screw thread size. Use a tap wrench for precision and control.
Can I Drill And Tap Any Shotgun Receiver?
No, not all receivers are suitable. Check the material and thickness first. Consult the manufacturer’s guidelines to avoid damaging your firearm.
How Do I Prevent Damage When Tapping Threads?
Use cutting oil to reduce friction. Tap slowly and back out frequently to clear chips. Apply steady, even pressure to avoid breaking the tap.
Conclusion
Drilling and tapping a shotgun receiver takes patience and care. Follow each step slowly to avoid mistakes. Use the right tools and measure twice before cutting. Safety should always come first during this process. Practice on scrap metal before working on your receiver.
This helps build confidence and skill. Taking your time ensures a strong, clean result. Now, you can customize your shotgun with ease and precision. Keep learning and stay safe on every project.