

Are you ready to upgrade your door with a brand-new handle but feel unsure about drilling the holes yourself? You might think it’s a tricky job best left to professionals, but with the right steps, you can do it quickly and accurately.
Imagine the satisfaction of fitting your door handle perfectly, saving time and money. In this guide, you’ll discover simple, clear instructions that make drilling door handle holes easier than you expect. Keep reading, and you’ll be confident to take on this project and get the job done right the first time.
Credit: prettyhandygirl.com
Tools And Materials Needed
Drilling holes for a door handle needs the right tools and materials. Having everything ready makes the job easier and safer. This section covers the basic tools, the correct drill bits, and safety gear. Each part is important for a clean and precise hole.
Essential Drilling Tools
You need a good power drill that fits your hand well. A cordless drill works best for flexibility. A tape measure helps mark the exact spots for drilling. A pencil or marker is useful for clear marks. A level ensures holes are straight. Clamps hold the door steady during drilling. A hammer and screwdriver may be needed for handle installation.
Choosing The Right Drill Bits
Select drill bits based on the door material. Wood doors need spade bits or hole saws. Metal doors require high-speed steel (HSS) bits. Match the drill bit size to the handle’s hole size. Use a smaller pilot bit first to guide the larger bit. Sharp bits make cleaner holes and reduce damage. Replace dull bits to avoid extra effort and mistakes.
Safety Gear And Accessories
Wear safety glasses to protect your eyes from dust and debris. Use ear protection to reduce loud drill noise. Gloves protect your hands but avoid loose ones near the drill. A dust mask stops you from inhaling fine particles. Keep a clean workspace to prevent accidents. Have a first aid kit nearby for minor injuries.

Credit: doorcorner.wordpress.com
Preparing The Door
Preparing the door correctly is the first step to a smooth drilling process. This step ensures the holes align perfectly with the door handle parts. Careful preparation saves time and avoids mistakes.
Measuring And Marking Hole Positions
Measure the exact spot for the door handle holes. Use a tape measure or ruler for accuracy. Mark the positions lightly with a pencil. Double-check the marks before drilling. Proper marking prevents misaligned holes.
Checking Door Thickness And Material
Know the door’s thickness to pick the right drill bit. Measure the door with a caliper or ruler. Identify the door material—wood, metal, or composite. Different materials require different drill bits and techniques. This step avoids damage and ensures clean holes.
Securing The Door For Drilling
Fix the door firmly on a stable surface. Use clamps to hold it steady. Prevent any movement during drilling. A stable door makes drilling safer and more precise. Avoids uneven holes and accidents.
Drilling The Holes
Drilling holes for a door handle requires care and precision. This step is crucial to fit the handle and lock properly. Preparing the drill and marking the spots correctly will help avoid mistakes. Follow the right speed and depth for clean and accurate holes.
Setting The Drill Speed And Depth
Choose a low to medium drill speed to control the tool better. High speeds can cause wood to splinter or the drill bit to overheat. Use a drill with adjustable depth settings or a depth stop collar. Set the depth according to the door handle specifications. This prevents drilling too deep or too shallow.
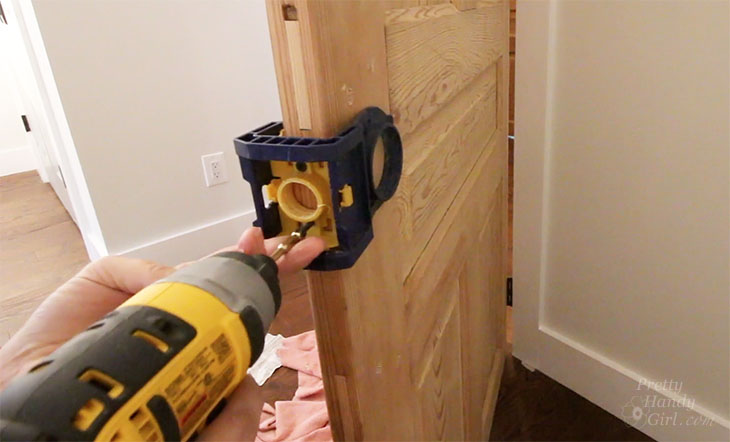
Drilling The Face Hole
Mark the center point on the door face clearly. Use a hole saw bit that matches the size of the handle hole. Hold the drill straight and steady to avoid angled holes. Drill slowly and apply even pressure to avoid damaging the door surface. Clear wood shavings often to keep the hole clean.
Drilling The Edge Hole
Mark the exact spot on the door edge for the latch. Use a spade bit or hole saw suited for the latch size. Keep the drill perpendicular to the door edge for a perfect fit. Drill carefully to avoid splintering the wood around the hole. Smooth the edges with sandpaper for a neat finish.
Installing The Door Handle
Installing the door handle is the next important step after drilling the holes. Proper installation ensures the handle works smoothly and fits securely. Follow these steps carefully for a perfect fit and function.
Aligning The Handle Components
Start by placing the handle parts on each side of the door. Match the holes in the handle with the drilled holes in the door. Make sure the spindle, the metal rod, fits through the latch mechanism inside the door. Check that the handle faces are straight and aligned evenly. This alignment prevents the handle from sticking or wobbling.
Securing Screws And Fasteners
Use the screws that came with your handle set. Insert them through the holes on the handle plates into the door. Tighten screws carefully with a screwdriver. Avoid over-tightening to prevent damage to the door or handle. Ensure all screws are tight enough to hold the handle firmly in place.
Testing Handle Functionality
After securing, test the handle by turning it several times. The latch should move smoothly without resistance. Check that the door opens and closes easily with the handle. Make sure the handle returns to its original position after use. Fix any issues before finishing the installation.
Troubleshooting Common Issues
Drilling holes for door handles can be tricky. Small mistakes can cause big problems. This section helps you fix common issues fast. Clear steps make your work easier and your door look perfect.
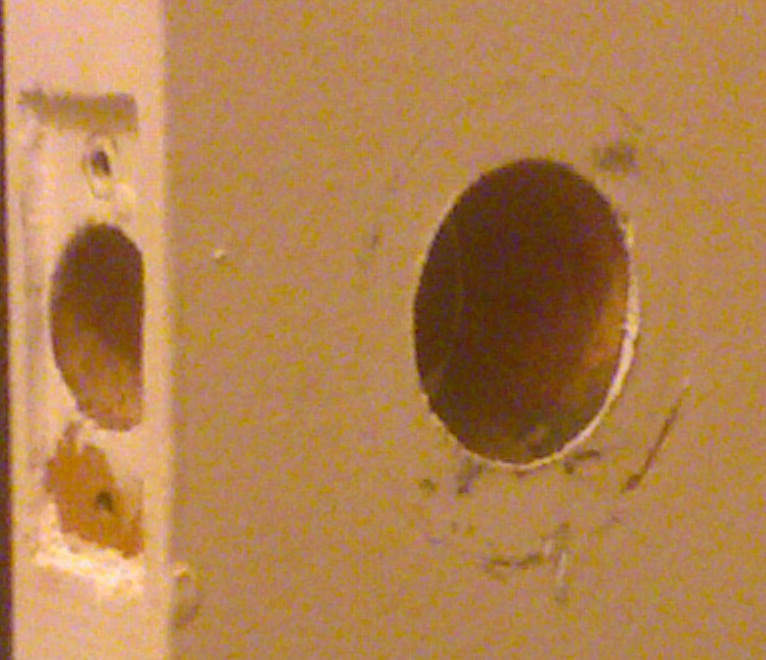
Fixing Misaligned Holes
Misaligned holes cause handles to not fit properly. Use a wood filler to fill the wrong hole. Let it dry fully before sanding smooth. Mark the correct spot carefully with a pencil. Drill slowly and check alignment often. A level tool can help keep holes straight.
Dealing With Splintering Wood
Splintering happens when the drill bit pulls wood fibers out. Place painter’s tape over the drilling spot. Drill through the tape to reduce splinters. Use a sharp drill bit made for wood. Drill at a slow speed for clean cuts. Sand the edges gently to smooth rough spots.
Adjusting For Loose Handles
Loose handles can be unsafe and annoying. Tighten screws first using the correct screwdriver. If screws spin without tightening, fill holes with toothpicks and wood glue. Let glue dry before reinserting screws. Use longer screws if the hole is too big. Check handle fit after each adjustment.
Maintenance Tips
Proper maintenance keeps your door handle working smoothly. Small efforts can stop bigger problems later. Follow these simple tips to maintain your door handles.
Regular Inspection
Check your door handles often for signs of wear or damage. Look for cracks, rust, or loose parts. Early spotting helps fix problems fast. Use a flashlight for a clear view inside tight spaces.
Lubricating Moving Parts
Apply lubricant to the moving parts of the handle. This reduces friction and prevents squeaking. Use a light oil or spray made for door hardware. Avoid over-lubricating to stop dirt buildup.
Tightening Loose Screws
Loose screws make handles wobble and fail quickly. Use a screwdriver to tighten all screws on the handle and plate. Check screws under the handle too. Tight screws keep the handle secure and safe.
Credit: diy.stackexchange.com
Frequently Asked Questions
How Do I Measure For Door Handle Holes Accurately?
Measure the door’s thickness and mark the handle height with a pencil. Use a template to mark hole positions precisely. Double-check measurements before drilling to ensure a perfect fit and alignment.
What Drill Bit Size Is Needed For Door Handle Holes?
Typically, use a 2 1/8-inch hole saw for the main handle hole. For the latch hole, a 1-inch spade bit works best. Always confirm sizes with your door handle’s installation instructions.
Can I Drill Door Handle Holes Without Damaging The Door?
Yes, use painter’s tape over the drill spot to prevent splintering. Drill slowly and steadily, keeping the bit perpendicular. This helps avoid cracks and ensures a clean hole.
What Tools Are Essential For Drilling Door Handle Holes?
You’ll need a power drill, hole saw bits, a tape measure, pencil, and a chisel. These tools help you mark, drill, and finish the holes accurately and safely.
Conclusion
Drilling door handle holes is easier than it seems. Take your time and measure twice before drilling. Use the right tools for clean and straight holes. Stay safe by wearing protective gear and working carefully. Practice on scrap wood if you feel unsure.
With patience, you will get good results. Enjoy your new door handle and the sense of accomplishment. Simple steps lead to great outcomes. Keep learning and improving your DIY skills.