

Are you ready to boost your home security by installing a camera, but unsure how to drill the perfect hole? Drilling for a security camera might seem tricky, but with the right steps, you can do it safely and cleanly.
Imagine having a clear view of your property without worrying about messy walls or damaged wires. This guide will walk you through everything you need to know, making the process simple and stress-free. Keep reading, and you’ll gain the confidence to install your security camera like a pro!

Credit: www.amazon.com
Choosing The Right Drill
Choosing the right drill is important for installing a security camera. The drill must be strong enough to make a clean hole. It should also fit the surface where you want to install the camera. Picking the correct drill helps avoid damage to walls and the camera itself.
Different drills suit different materials and tasks. Understanding these types saves time and effort. The drill bits also play a big role. They must match the surface to make a perfect hole.
Types Of Drills Suitable For Security Cameras
Cordless drills offer easy movement and good power. They work well for most home walls. Corded drills give constant power and are best for tough surfaces like concrete. Hammer drills add a pounding action that helps drill into brick or stone. Choose a drill based on the wall type and hole size needed.
Drill Bits For Different Surfaces
Wood requires standard twist drill bits. These bits cut cleanly without splintering. Masonry bits have a special tip to handle brick and concrete. They usually have a carbide tip for strength. Metal surfaces need high-speed steel bits. These bits can cut through metal without dulling quickly. Use the correct bit to avoid cracking or damaging the wall.
Selecting The Camera Location
Choosing the right spot for your security camera matters a lot. It affects how well the camera sees and protects your property. The location decides what the camera captures and if it avoids blind spots. Careful picking helps catch clear images and avoids wasting effort on poor views.
This section guides you to find the best place for drilling holes and mounting your camera. Small details here can improve your camera’s effectiveness and safety.
Optimal Height And Angle
Place the camera at a height between 7 and 10 feet. This height covers a wide area and stops people from reaching it easily. Angle the camera slightly downward. It helps capture faces and actions clearly. Adjust the tilt so the camera sees the entrance or key area fully.
Check the camera view before drilling. Make sure no important spot is out of sight. Avoid pointing the camera straight up or down to keep the image clear.
Avoiding Obstructions And Interference
Look around for trees, poles, or walls that block the camera. Obstructions limit the camera’s vision and cause blind spots. Move the camera to a spot with a clear line of sight.
Keep the camera away from bright lights or reflective surfaces. These can cause glare or lens flare, spoiling the video quality. Also, avoid places near wireless routers or devices that may cause signal interference.
Clear views and good signals help your security camera perform its best.
Preparing The Surface
Preparing the surface is a key step before drilling holes for a security camera. This step makes sure the installation is safe and the camera holds firmly. Taking time here helps avoid problems later.
Cleaning And Marking Drill Points
Start by cleaning the surface where you want to drill. Remove dust, dirt, and grease. A clean surface helps the drill bit work better and prevents slipping.
Next, mark the exact spots for drilling. Use a pencil or marker to make small dots. Double-check the measurements to place the camera correctly. Clear marks guide your drill and keep holes straight.
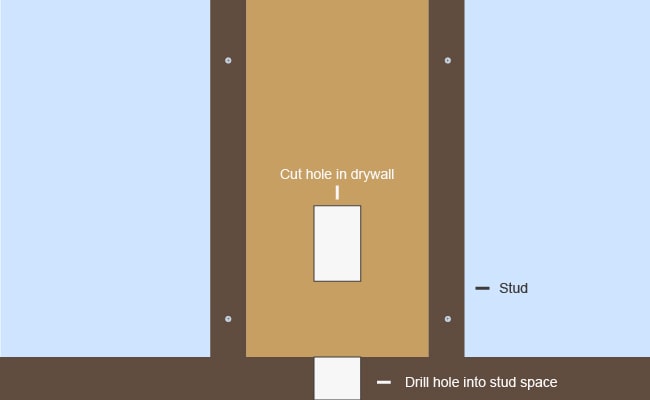
Checking For Wires And Pipes
Check the wall or ceiling for hidden wires or pipes. Use a stud finder with wire and pipe detection features. Avoid drilling into electrical cables or water pipes to prevent damage and accidents.
If you do not have a detector, knock lightly on the surface. Listen for hollow or solid sounds to guess where wires or pipes might be. Be cautious and drill slowly to stay safe.
Credit: kdfoundation.org
Drilling The Hole
Drilling the hole for your security camera is a key step. It allows you to mount the camera firmly and run wires neatly. Precise drilling prevents damage to walls and cables. Follow clear steps to make this task easy and safe.
Setting Drill Speed And Pressure
Choose a low to medium drill speed. High speeds can cause the drill bit to slip. Apply steady, gentle pressure. Pressing too hard may crack the wall. Let the drill bit do the work.
Step-by-step Drilling Process
Mark the spot where you want the hole. Use a pencil or masking tape to guide you. Attach the right drill bit size for the cable or screws. Hold the drill straight and start slowly. Drill a small pilot hole first. Then, increase the hole size if needed. Clear dust from the hole with a brush or air. Check if the hole is the correct depth.
Safety Tips During Drilling
Wear safety goggles to protect your eyes. Use ear protection to avoid loud noise damage. Keep your hands away from the drill bit. Make sure the area behind the wall is clear of wires or pipes. Work in a well-lit space. Take breaks if your hands get tired. Use clamps to hold loose materials steady.
Installing The Security Camera
Installing a security camera correctly is key to getting clear video and lasting protection. This process involves a few important steps. Each one helps ensure the camera works well and stays safe from weather and damage. Follow these simple steps to install your camera properly.
Feeding Cables Through The Hole
Start by pushing the camera cables through the drilled hole. Gently feed the wires to avoid damage. Leave enough cable inside for easy connection. Use a fish tape or wire puller if needed. Make sure the cables reach your recording device or power source.
Mounting The Camera Securely
Place the camera base over the hole. Use screws to fix it tightly to the wall or ceiling. Check that the camera does not move after mounting. Tighten all screws to keep the camera stable. Adjust the angle to cover the desired area clearly.
Sealing And Weatherproofing
Seal around the hole with silicone or weatherproof sealant. This stops water and dust from entering the hole. Cover the cable entry point well. Use weatherproof camera housings for outdoor models. Proper sealing protects your camera and wiring from damage.

Credit: www.amazon.com
Testing And Adjustments
After drilling the hole and mounting your security camera, testing and adjustments are important. This step ensures your camera captures the right area clearly. A small change in angle or position can improve security coverage a lot.
Take time to check the camera’s view. Adjust it to cover the most important areas. This process helps avoid blind spots and ensures the camera works well day and night.
Checking Camera Angle And Coverage
Look at the screen to see what the camera shows. Check if the key areas are visible. Make sure no objects block the view. Test the camera in different lighting. Check the angle height and direction. Adjust if the image misses important spots.
Adjusting For Optimal Performance
Move the camera slowly to find the best angle. Tighten screws to keep the camera steady. Test video clarity and motion detection. Adjust focus or zoom if your camera allows. Check night vision by testing in low light. Keep adjusting until the image is clear and covers all needed areas.
Frequently Asked Questions
How Do I Choose The Right Drill Bit Size?
Select a drill bit slightly smaller than the camera’s mounting screws. This ensures a tight, secure fit without cracking walls. Measure the screw diameter before drilling. Using the correct bit prevents damage and improves stability for your security camera installation.
What Safety Precautions Should I Take When Drilling?
Wear safety goggles and gloves to protect from debris. Check for electrical wires or pipes inside the wall. Use a stud finder if needed. Always drill slowly and steadily to avoid accidents or damage to the structure.
Can I Drill Through Concrete For A Security Camera?
Yes, use a masonry drill bit designed for concrete. Mark the hole location, start drilling slowly, and increase speed gradually. Use a hammer drill if available for efficiency. Always wear protective gear to handle concrete dust safely.
How Deep Should The Hole Be For Mounting?
Drill a hole slightly deeper than the screw length. This allows the screw to fit fully and hold the camera securely. Avoid drilling too deep to prevent wall damage or difficulty in mounting the camera base.
Conclusion
Drilling a hole for your security camera is simple with the right steps. Use the correct drill bit and measure carefully before you start. Avoid mistakes by taking your time and working safely. A clean hole helps secure your camera properly.
Proper drilling protects your walls and ensures good camera function. Now, your camera can watch over your space without issues. Trust your skills and stay patient during the process. This small task improves your home security in no time.