

If you’re ready to install cabinet door hinges but unsure how to drill the perfect holes, you’re in the right place. Getting this step right is key to making your doors open smoothly and look professional.
Imagine saving time, avoiding costly mistakes, and having your cabinets looking flawless. In this guide, you’ll discover simple, clear steps that anyone can follow—even if you’ve never used a drill before. Keep reading, and soon you’ll have the confidence to tackle your cabinet doors like a pro.
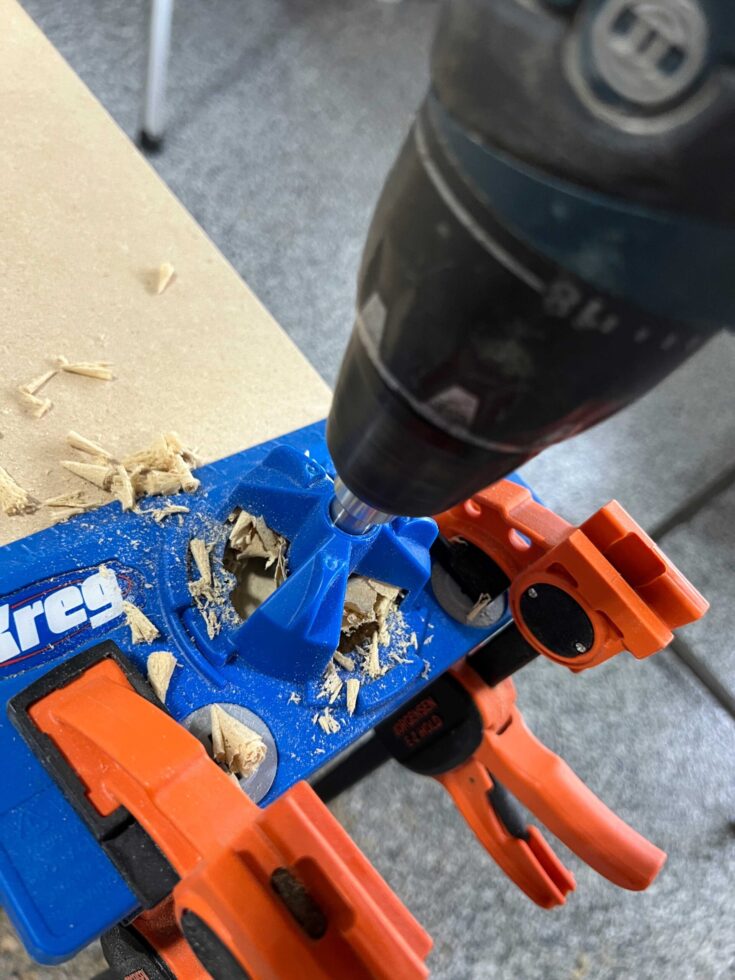
Credit: erinzubotdesign.com
Tools And Materials Needed
Drilling holes for cabinet door hinges requires the right tools and materials. Having everything ready helps you work fast and accurate. It also keeps the cabinet door strong and the hinges secure. Below are the main tools and materials you need for this job.
Drill Types And Bits
A cordless drill works best for drilling hinge holes. It offers good control and ease of use. Choose a drill with adjustable speed settings for more precision. For bits, use a Forstner bit to make flat-bottomed holes. A 35mm Forstner bit fits most cabinet hinges. Also, keep a smaller drill bit handy for pilot holes. Pilot holes guide screws and prevent wood splitting.
Measuring Tools
Accurate measuring tools ensure the hinge holes are in the right place. Use a tape measure to find the distance from the door edge. A combination square helps mark straight lines and right angles. Mark the drill spots clearly with a pencil. Precise measurements avoid misaligned doors and uneven gaps.
Safety Gear
Safety gear protects you while drilling. Wear safety glasses to shield your eyes from wood chips. Use ear protection to reduce noise from the drill. A dust mask stops you from breathing in fine wood dust. Gloves can protect your hands but avoid loose ones that catch in the drill.

Credit: kitchenwarehouseltd.com
Choosing The Right Hinge
Choosing the right hinge is key to a smooth cabinet door fit. It affects how the door opens, closes, and stays in place. The wrong hinge can cause misalignment or damage. Understanding hinge types and sizes helps ensure a perfect match for your cabinet doors.
Hinge Styles
There are several hinge styles for cabinets. The most common are concealed hinges, also called European hinges. They sit inside the cabinet, hidden from view. Surface-mounted hinges attach to the outside and show when the door is closed. Pivot hinges allow the door to swing in both directions. Choose a style that fits your cabinet design and use.
Size And Compatibility
Hinges come in different sizes to match door thickness and weight. Check the cabinet door’s thickness before buying hinges. The hinge cup size must fit the drilled hole perfectly. Also, consider the overlay, which is how much the door covers the cabinet frame. Compatibility ensures the door opens fully and closes tightly without gaps.
Marking Hinge Placement
Marking hinge placement is a key step before drilling holes for cabinet door hinges. It ensures the door fits and works correctly. Careful marking helps avoid mistakes that waste time and materials. Accurate marks make drilling easier and more precise.
Measuring Door And Frame
Start by measuring the cabinet door height. Measure from the top edge down to where the hinge will sit. Next, measure the frame where the door will attach. Use a tape measure for precise numbers. Write down these measurements clearly. Consistent measurements on both door and frame ensure a perfect fit.
Marking Drill Points
Use a pencil to mark drill points on the door and frame. Mark the center of each hinge cup on the door. Check the measurements twice before marking. On the frame, mark the screw holes for the hinge plate. A small square tool helps keep marks straight. Clear, exact marks guide the drill and prevent slipping.
Setting Drill Depth
Setting the right drill depth is important for cabinet door hinges. Too shallow, and the hinge will not fit. Too deep, and the wood may be damaged. Proper depth ensures a snug and strong fit for the hinge cup. This step makes the installation smooth and precise.
Using A Drill Stop
A drill stop controls how deep your drill bit goes. Attach it to the drill bit at the needed depth. This tool prevents drilling too far into the wood. It helps keep each hole the same depth. Using a drill stop saves time and avoids mistakes.
Adjusting For Hinge Cup
The hinge cup size varies by hinge type. Measure the cup depth before drilling. Set the drill depth slightly deeper than the cup depth. This allows the hinge to sit flush with the door. Check the hinge instructions for exact measurements. Proper adjustment avoids gaps or uneven doors.
Drilling The Holes
Drilling the holes for cabinet door hinges requires precision and care. Properly drilled holes ensure the hinge fits well and the door works smoothly. This step sets the foundation for a strong, lasting installation. Use the right tools and follow measurements closely to avoid mistakes.
Drilling The Cup Hole
The cup hole is the large hole where the hinge cup sits. Use a Forstner bit, usually 35mm in diameter. Mark the exact spot on the door for the hinge cup. Place the drill carefully to keep it straight. Drill to the right depth, about 12mm, to fit the hinge fully.
Keep the drill steady and slow to avoid splintering the wood. Check the hole depth with a ruler. If it is too shallow, the hinge won’t fit. Too deep, and the door may weaken.
Drilling Screw Holes
Screw holes hold the hinge securely to the door and frame. Use a small drill bit to make pilot holes. These guide the screws and prevent the wood from splitting. Mark the screw positions using the hinge as a template.
Drill straight holes, not angled, for a tight fit. Pilot holes should be slightly smaller than the screws. This helps the screws bite into the wood firmly. After drilling, attach the hinge and check its movement.
Installing The Hinges
Installing hinges on cabinet doors requires care and attention. Proper installation ensures the door opens smoothly and fits well. This part involves attaching hinges to the door and then mounting the door on the cabinet frame. Each step needs accuracy for the best results.
Attaching Hinges To Door
Start by placing the hinge in the marked position on the door. Use a pencil to mark screw holes clearly. Pre-drill small pilot holes to avoid wood splitting. Align the hinge carefully before driving in the screws. Tighten screws firmly but do not over-tighten. Check that the hinge moves freely after attachment.
Mounting Door To Cabinet
Hold the door against the cabinet frame in the correct spot. Use clamps or a helper to keep the door steady. Align the hinge plates with the cabinet side. Mark screw holes for the cabinet carefully. Drill small pilot holes for screws. Screw the hinge plates to the cabinet securely. Open and close the door to check the fit and movement. Adjust screws slightly if needed for perfect alignment.
Testing And Adjusting Door Alignment
Testing and adjusting door alignment is important after drilling holes for cabinet door hinges. It ensures the door fits well and opens smoothly. Poor alignment can cause the door to stick or not close properly. Taking time to check and adjust saves frustration later.
Checking Door Fit
Close the door gently and see if it sits flush with the cabinet frame. Look for gaps between the door and cabinet edges. Check if the door swings open and closes without rubbing. Notice if the door is level or tilts to one side. Use a pencil to mark any areas that touch or rub.
Making Adjustments
Loosen the hinge screws slightly to allow movement. Shift the door up, down, left, or right to improve fit. Tighten screws once the door is in the correct position. For big changes, remove the door and adjust the hinge placement. Test the door again after each adjustment. Repeat until the door opens smoothly and fits well.
Tips For A Professional Finish
Getting a professional finish for cabinet door hinges takes care and attention. Small details make a big difference in how the doors look and work. Follow these tips for neat, clean holes that hold hinges firmly without damage.
Preventing Wood Splitting
Use a sharp drill bit made for wood. Dull bits tear the wood and cause splits. Drill slowly to keep control and reduce heat. Place a small piece of scrap wood under the door. This supports the wood and stops splitting at the exit point. Start with a small pilot hole before drilling the full size. The pilot hole guides the drill and lowers pressure on the wood.
Cleaning Up
Clear away wood dust after drilling each hole. Dust can stop screws from fitting tightly. Use a small brush or vacuum to remove all debris. Smooth rough edges with fine sandpaper or a file. This gives a clean look and helps the hinge sit flat. Check holes for any cracks or chips before attaching hinges. Clean, smooth holes make doors last longer and work better.

Credit: www.youtube.com
Frequently Asked Questions
How Do I Measure Hinge Placement On Cabinet Doors?
Measure from the top and bottom edges of the door. Mark the hinge locations evenly to ensure proper alignment. Use a ruler or tape measure for accuracy. This helps the door open and close smoothly without gaps.
What Drill Bit Size Is Needed For Cabinet Hinges?
Use a 35mm Forstner bit for most European-style hinges. This size creates a clean, shallow hole for the hinge cup. Always check hinge specifications before drilling to match the bit size properly.
How Deep Should I Drill Holes For Cabinet Hinges?
Drill to a depth of about 12-13mm for standard hinges. This depth allows the hinge cup to fit flush with the door surface. Use a drill stop or tape to control hole depth accurately.
Can I Drill Hinge Holes Without A Jig?
Yes, but a jig ensures precise and consistent hole placement. Without a jig, carefully measure and mark each spot. Take your time to avoid misalignment, which can cause door fitting issues.
Conclusion
Drilling holes for cabinet door hinges is simple with the right steps. Measure carefully and mark where each hole goes. Use the correct drill bit size for clean holes. Take your time and drill straight to avoid mistakes. Properly installed hinges help doors open smoothly and last longer.
Practice on scrap wood if unsure. This guide helps you feel confident with your project. Soon, your cabinets will look neat and work well. Just follow these tips and enjoy your handiwork.