

Have you ever wanted to turn beautiful seashells into unique, eye-catching jewelry? Drilling holes in seashells is the key to creating your own necklaces, bracelets, and earrings.
But it can feel tricky if you don’t know the right steps. In this guide, you’ll learn simple, safe methods to drill perfect holes without cracking or breaking your shells. Keep reading, and soon you’ll be crafting stunning jewelry that’s truly one of a kind—made by you!
Choosing The Right Seashells
Choosing the right seashell is key for making beautiful jewelry. Not all shells are good for drilling. Some break easily or have thin spots that cause cracks. Picking strong shells ensures your work lasts long. It also makes drilling easier and safer.
Look for shells that feel solid and have a smooth surface. Avoid shells with chips or holes. These can weaken the shell and cause problems during drilling. Taking time to select the best shells improves your jewelry quality and your crafting experience.
Best Shell Types For Drilling
Hard shells work best for jewelry. Examples include conch, clam, and scallop shells. These types have thick walls that resist breaking. They also have nice shapes and colors for jewelry. Thin or fragile shells like oyster or mussel may crack easily.
Choose shells with a good size. Very small shells are hard to drill. Larger shells give more space and hold the jewelry parts well. Picking the right type and size makes your work smooth and enjoyable.
Inspecting Shell Thickness And Strength
Check shell thickness before drilling. Hold the shell up to light. Look for thin or see-through spots. Thin areas break easily under pressure. Avoid shells with uneven thickness or cracks.
Feel the shell’s weight. Heavier shells usually mean thicker and stronger material. Tap the shell lightly. A sharp sound means it is solid. A dull sound might mean it is brittle. Choosing strong shells reduces breakage and saves time.
Essential Tools And Materials
Drilling holes in seashells requires the right tools and materials. Having the proper equipment makes the process easier and safer. It also helps prevent damage to the shells. Below are the key tools and materials you need before starting your jewelry project.
Drill Types And Bits
A small, handheld drill works best for seashells. A rotary tool like a Dremel is a popular choice. It offers good control and speed. Use a drill bit designed for delicate materials. Diamond-tipped or carbide bits work well. These bits drill cleanly without cracking the shell. Choose a bit size that matches your desired hole diameter. Start with a small bit and increase size if needed.
Safety Gear And Workspace Setup
Wear safety glasses to protect your eyes from dust and shell fragments. A dust mask helps avoid inhaling fine particles. Work in a well-lit area with good ventilation. Use a stable surface to hold the shell firmly. A small clamp or vise can keep the shell from moving. Place a soft cloth under the shell to prevent slipping and damage. Keep your workspace clean for better focus and safety.
Preparing Seashells For Drilling
Preparing seashells for drilling is an important step to make beautiful jewelry. Proper preparation helps avoid cracks and damage during drilling. It also ensures the holes are clean and smooth. Take your time with these steps for the best results.
Cleaning And Drying Shells
Start by cleaning the seashells well. Remove sand, dirt, and any leftover tissue inside the shell. Use warm water and a soft brush to scrub gently. Avoid harsh chemicals that can weaken the shell.
After cleaning, dry the shells completely. Place them on a towel in a warm, dry spot. Let them air dry for at least 24 hours. Dry shells drill more easily and reduce the risk of breaking.
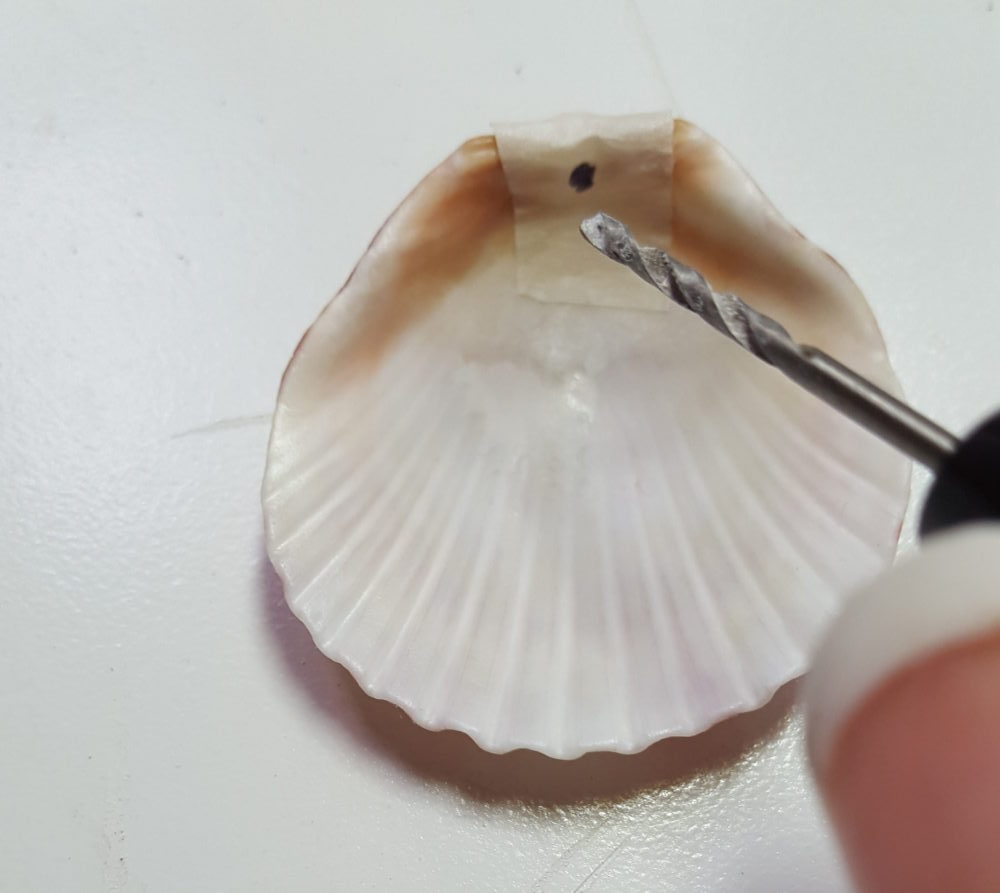
Marking Drill Spots Accurately
Next, mark the exact spot where you want to drill. Use a pencil or a fine-tip marker for clear marks. Find a flat or thick part of the shell to avoid cracks.
Check the marks from all angles before drilling. Accurate marks help guide the drill bit and keep holes neat. Take a steady hand and work slowly to place each mark.

Credit: www.youtube.com
Drilling Techniques For Seashells
Drilling holes in seashells requires careful techniques to avoid cracks or breaks. The right method helps create clean holes for your jewelry projects. Choosing the correct drill and handling it properly makes the process smoother. Below are key tips for drilling seashells safely and effectively.
Using A Hand Drill Vs. Power Drill
A hand drill gives more control but takes more time. It is gentle and less likely to damage the shell. You turn the drill slowly and steadily. This method suits beginners or delicate shells.
A power drill works faster and is good for many shells. It requires a steady hand and low speed. Use a small drill bit to avoid large holes. Always hold the shell firmly and steady the drill carefully.
Controlling Speed And Pressure
Keep the drill speed low to prevent shell cracks. High speed creates heat that can break the shell. Use gentle pressure. Pressing too hard risks splitting the shell.
Let the drill bit do the work. Move slowly and pause if the shell feels hot. Cooling the shell with water during drilling helps. It reduces heat and keeps the shell strong.
Preventing Shell Damage
Drilling holes in seashells requires care to keep them intact. Shells are delicate and can crack or break easily. Preventing damage is key to making beautiful jewelry pieces.
Using the right techniques helps protect shells during drilling. Small steps can make a big difference in preserving their shape and look.
Supporting Shells During Drilling
Place the shell on a soft, stable surface. A piece of foam or cloth works well. This support stops the shell from moving or slipping.
Hold the shell gently but firmly. Avoid squeezing too hard, which can cause cracks. Use clamps with padding for extra stability if needed.
Drill slowly and steadily. Fast drilling can shake or break the shell. Take your time to keep control.
Cooling Methods To Avoid Cracks
Heat builds up quickly when drilling. This heat can cause shells to crack. Cooling the shell helps prevent this damage.
Use water or a wet cloth to cool the shell while drilling. Apply it gently to avoid slipping. Pause often to let the shell cool down.
Keep the drill bit cool too. Dip it in water between uses. This reduces heat and protects both the shell and drill bit.
Finishing Touches
After drilling holes in seashells, the finishing touches make your jewelry look perfect. These steps help your shells feel smooth and shine beautifully. They protect the shell and make sure your jewelry lasts longer. Let’s explore how to smooth rough edges and seal your shells for a polished look.
Smoothing Rough Edges
Drilling can leave sharp or rough edges around the hole. These edges may hurt skin or catch on clothes. Use fine sandpaper or a small nail file to gently smooth the edges. Move the sandpaper in a circular motion around the hole. Check often to avoid sanding too much. Smooth edges give your jewelry a clean, safe finish.
Sealing And Polishing Shells
Sealing your seashells protects them from water and dirt. Use a clear sealant like varnish or a shellac spray. Apply a thin, even coat and let it dry fully. This step adds shine and strengthens the shell’s surface. After sealing, polish with a soft cloth for extra glow. Polishing makes your seashell jewelry look professional and fresh.
Creative Jewelry Ideas
Creative jewelry ideas with seashells open many fun possibilities. Drilled shells become unique pieces that show your style. Crafting jewelry from seashells gives a personal touch to your accessories.
Seashells have natural beauty and colors. Their shapes make every piece different. Simple drilling turns shells into wearable art. You can make gifts or keep them for yourself.
Necklaces And Pendants
Drilled seashells make stunning pendants. Use a small hole at the top for a chain or cord. Pair shells with beads or charms for variety. Layer shells of different sizes for a bold look. Natural textures blend well with leather or hemp cords. Light, beachy necklaces match any casual outfit.
Try grouping multiple shells on one necklace. Mix colors and shapes for an eye-catching design. A single large shell can be a statement piece. Seal shells with a clear coat to protect and shine.
Earrings And Bracelets
Seashell earrings bring a fresh, natural vibe. Drill small holes near the edge for hooks or studs. Match pairs or create asymmetrical designs. Combine shells with metal or wood for contrast. Lightweight shells make comfortable earrings all day.
Bracelets can use drilled shells as charms. Add shells to chains or string them with beads. Stretch cord bracelets hold shells securely and fit all sizes. Layer shell bracelets with other natural materials for a boho look. These accessories capture the essence of the sea.
Credit: lisassimplelife.com
Troubleshooting Common Issues
Drilling holes in seashells can be tricky. Many crafters face common problems during the process. These issues can damage your shells or tools. Knowing how to fix these problems helps you save time and materials. Below are solutions for the most frequent challenges.
Fixing Cracked Shells
Cracks often appear when the shell is too dry or pressure is too high. To avoid cracks, keep the shell moist before drilling. Use a spray bottle to lightly wet it. Start drilling with low speed and little pressure. If cracks appear, stop immediately.
If a crack forms, apply a small amount of clear glue. Press the crack gently to close it. Let the glue dry fully before continuing. This can hold the shell together while you finish your project.
Dealing With Drill Bit Breakage
Drill bits can break from too much pressure or using the wrong type. Use a fine diamond or carbide bit for seashells. These bits are strong and cut smoothly. Always drill slowly to avoid overheating and breaking the bit.
Replace broken bits right away. Using a dull or broken bit can crack shells. Keep spare bits on hand to avoid delays. Clean the bits often to maintain sharpness and efficiency.

Credit: www.youtube.com
Frequently Asked Questions
How Do I Drill Holes In Seashells Safely?
Use a small drill bit and secure the shell firmly. Drill slowly with gentle pressure to prevent cracking. Wearing safety goggles protects your eyes from debris.
What Tools Are Best For Drilling Seashells?
A handheld rotary tool or a small electric drill with a fine bit works best. Diamond-tipped bits reduce shell damage and create clean holes.
How Can I Prevent Seashells From Breaking While Drilling?
Soak shells in water for a few hours before drilling. This softens them and reduces the risk of cracking during the process.
What Size Drill Bit Should I Use For Jewelry Holes?
Choose a drill bit between 1mm and 3mm. The size depends on the string or wire thickness for your jewelry design.
Conclusion
Drilling holes in seashells takes care and patience. Use the right tools and go slow. Keep shells steady to avoid cracks or breaks. Small holes work best for jewelry making. Practice on extra shells to build skill. Soon, you can create pretty, unique pieces.
Enjoy crafting and wearing your handmade jewelry. Simple steps lead to great results every time.