

Are you tired of struggling to hang your favorite items because the hooks just won’t stay put? Knowing how to drill hooks into wood the right way can save you time, frustration, and even damage to your walls or furniture.
Whether you want to hang a picture, a plant, or your keys, mastering this simple skill ensures your hooks are secure and your space stays organized. Keep reading, and you’ll discover easy, step-by-step tips that anyone can follow to get the job done perfectly every time.
Credit: todayshomeowner.com
Choosing The Right Hooks
Choosing the right hooks is important for your wood project. The right hook holds items securely. It also prevents damage to the wood. Different hooks serve different purposes. Picking the correct hook makes your work easier. It helps the hook last longer in wood.
Types Of Hooks For Wood
Several types of hooks work well with wood. Cup hooks are small and curved. They hold light items like keys or mugs. Screw hooks have a sharp end that screws into wood easily. They are strong and good for hanging plants or tools. Eye hooks have a loop at one end. They are good for hanging ropes or wires. S-hooks are simple and easy to use. They fit into eye hooks or other anchors. Choose the type based on what you want to hang.
Material And Size Considerations
Hooks come in different materials like steel, brass, and plastic. Steel hooks are strong and last long. Brass hooks resist rust and look nice. Plastic hooks work for very light items. Size matters too. Small hooks hold light objects. Bigger hooks support heavier items. Match the hook size to the weight of your items. Also, consider the thickness of the wood. Thin wood may need smaller hooks to avoid splitting. Thicker wood can hold larger, heavier hooks safely.

Credit: us.amazon.com
Selecting Drill Bits
Selecting the right drill bit is key to drilling hooks into wood. The drill bit size affects how well the hook fits and holds. Using the wrong bit can make the hole too big or too small. This can cause the hook to be loose or the wood to split. Knowing how to pick the correct bit helps the hook stay strong and steady.
Matching Drill Bits To Hook Size
Choose a drill bit that matches the hook’s screw size. The hole should be just a bit smaller than the hook’s screw. This lets the screw bite into the wood tightly. For example, a hook with a 1/8 inch screw needs a drill bit slightly smaller than 1/8 inch. Test the fit by holding the bit next to the screw. If the bit looks slightly thinner, it’s a good match.
Material-specific Drill Bits
Wood types vary in hardness. Softwoods like pine need regular twist bits. Hardwoods like oak require stronger, sharper bits. Brad point bits work best for clean holes in wood. They prevent the bit from slipping on the surface. Avoid metal bits for wood, as they may not cut smoothly. Using the right bit for your wood type makes drilling easier and cleaner.
Preparing The Wood Surface
Preparing the wood surface is an important first step before drilling hooks. It ensures a clean and strong hold for the hooks. Taking time to prepare makes the job easier and helps avoid mistakes. Follow simple steps to get the wood ready.
Cleaning And Marking Spots
Start by wiping the wood surface with a dry cloth. Remove dust, dirt, and grease. Clean wood helps the drill bit work smoothly and prevents slipping. After cleaning, use a pencil to mark the exact spots. Mark where you want the hooks. Clear marks guide the drill and keep holes straight.
Checking Wood Condition
Look closely at the wood for cracks or soft areas. Damaged wood can break when you drill. Test the wood by pressing gently with your finger. Hard wood is best for drilling hooks. If the wood is weak, choose a different spot or repair it first. Strong wood holds hooks securely for long use.

Credit: www.youtube.com
Drilling Pilot Holes
Drilling pilot holes is an important step before installing hooks into wood. These small holes guide the screw and prevent the wood from splitting. They also make screwing easier and more precise. Taking time to drill pilot holes improves the strength and durability of the hook installation.
Marking Drill Points
Start by marking the exact spot for each pilot hole. Use a pencil or a fine-tip marker. Measure carefully to keep hooks aligned and level. Marking helps avoid mistakes and keeps the work neat. A small indentation with a nail or an awl can keep the drill bit from slipping.
Drilling Depth And Angle Tips
Drill the hole at the right depth, slightly shorter than the screw length. This gives the screw wood to grip firmly. Hold the drill steady and straight, perpendicular to the wood surface. Drilling at an angle weakens the hold and may cause damage. Stop drilling once you reach the marked depth to avoid going too deep.
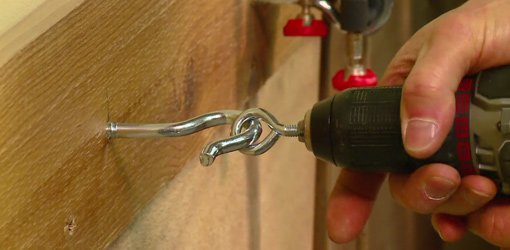
Inserting The Hooks
Inserting hooks into wood is a simple task. Doing it right keeps hooks strong and steady. This part explains how to insert hooks properly.
Hand-twisting Vs. Using Tools
Hooks can be twisted in by hand or with tools. Hand-twisting works well for small hooks. Use your fingers to turn the hook slowly. This gives control and prevents damage to the wood.
For larger hooks, tools help a lot. Pliers or a wrench provide better grip and power. They make turning easier and faster. Tools reduce strain on your hands and avoid slipping.
Ensuring Secure Fit
Start by making a small pilot hole. This helps the hook go in straight. The hole also stops the wood from splitting.
Twist the hook in until it is tight and firm. The hook should not wobble or feel loose. Check by gently pulling on the hook. A secure fit holds weight safely and lasts longer.
Preventing Wood Splitting
Wood splitting can ruin a neat hook installation. It weakens the wood and looks messy. Preventing splitting keeps your project strong and clean. Follow simple steps to protect your wood.
Proper Pilot Hole Size
Drill a pilot hole before screwing in the hook. The hole guides the screw and reduces pressure on the wood. Use a drill bit slightly smaller than the screw’s diameter. This allows the screw to grip but not force the wood apart.
Too small a hole can cause the wood to crack. Too big and the hook won’t hold well. Measure your screw and pick the right bit size. This simple step saves a lot of trouble.
Using Lubricants
Lubricate the screw to ease insertion. Wax or soap on the screw threads reduces friction. It helps the screw turn smoothly into the wood. Less force means less chance of splitting.
Rub the screw in a bar of soap or candle wax. Avoid oils that can stain the wood or weaken glue. This small tip can make screwing faster and safer for your wood.
Testing Hook Stability
Testing hook stability is a key step after drilling hooks into wood. It ensures the hook holds firmly and can support the weight. This check helps avoid accidents and damage.
Try simple tests before hanging heavy items. This process makes sure the hook stays secure and safe to use.
Applying Weight Gradually
Start by hanging a small weight on the hook. Watch for any movement or loosening. Slowly increase the weight step by step. This method shows how much the hook can hold. Stop if the hook feels loose or wobbly. This careful approach protects the wood and the hook.
Adjusting Hook Placement
If the hook feels unstable, try moving it slightly. Drill a new hole a little higher or lower. Test the new spot for strength again. Sometimes wood grain or knots affect hook grip. Adjusting placement helps find a stronger area. This simple fix improves hook stability quickly.
Maintenance Tips For Hooks
Proper maintenance keeps hooks in wood strong and safe. Regular care prevents damage and extends their life. Simple steps help hooks hold weight better and avoid accidents.
Regular Inspections
Check hooks often for any signs of wear or damage. Look for rust, bending, or loosening in the wood. Early spotting of problems stops bigger issues later. Tighten or replace hooks that seem weak or unsafe.
Cleaning And Tightening
Clean hooks with a dry cloth to remove dust and dirt. Avoid water to stop rust on metal hooks. Use a screwdriver to tighten screws or fasteners regularly. This keeps hooks steady and safe for use. Loose hooks can fall and cause injuries.
Frequently Asked Questions
How Do I Choose The Right Drill Bit For Wood Hooks?
Select a drill bit slightly smaller than the hook’s screw diameter. This ensures a tight fit and prevents wood splitting. Use a standard twist bit for softwoods and a brad-point bit for hardwoods for cleaner holes.
What Is The Best Drill Speed For Drilling Wood Hooks?
Use a low to medium drill speed when drilling wood for hooks. High speeds can cause overheating and damage. Slow and steady drilling ensures cleaner holes and better screw grip in the wood.
Should I Pre-drill Holes Before Screwing Hooks Into Wood?
Yes, always pre-drill holes to prevent wood splitting and ensure easy screw insertion. Pre-drilling also helps align the hook correctly and provides a cleaner, more secure fit in the wood.
How Deep Should I Drill Holes For Wood Hooks?
Drill holes slightly shorter than the hook’s screw length. This provides enough grip without weakening the wood. Mark the drill bit with tape to control depth accurately during drilling.
Conclusion
Drilling hooks into wood is simple with the right steps. Start by choosing the correct drill bit size. Mark the spot clearly and drill a pilot hole to avoid splitting. Screw the hook in carefully, keeping it straight. Check that the hook feels secure before use.
Taking time ensures a strong hold and safe hanging. Practice these tips for better results each time. You can easily add hooks to wood for many projects. Just follow the steps and work patiently.