

Are you ready to tackle your next project with confidence? Knowing how to drill in lag bolts the right way can save you time, effort, and frustration.
Whether you’re hanging heavy shelves, building a sturdy deck, or securing large pieces of wood, getting this step right is crucial. In this guide, you’ll discover simple, clear instructions that anyone can follow. By the end, you’ll feel equipped to handle lag bolts like a pro, making your work stronger and safer.
Keep reading to unlock the tips that will make your project a success.
Choosing The Right Lag Bolts
Choosing the right lag bolts is key for a strong and lasting hold. The wrong bolt can cause damage or fail to secure your project. Understanding the materials, sizes, threads, and lengths helps you pick the best lag bolts for your work.
Material And Size Selection
Lag bolts come in different materials like steel, stainless steel, and brass. Steel offers high strength but may rust outdoors. Stainless steel resists rust and suits wet conditions. Brass is less strong but looks good for decorative uses.
Size matters for holding power. Thicker bolts provide more strength but need bigger pilot holes. Choose a size that fits the wood or material thickness. Too small bolts can pull out easily. Too large bolts can split wood.
Thread Types And Lengths
Lag bolts have coarse or fine threads. Coarse threads grip wood better and are common. Fine threads are better for metal or hard materials.
Length depends on the thickness of materials you join. The bolt should go deep enough to hold firmly but not pass through. Usually, the bolt length should be twice the thickness of the wood piece.
Credit: www.birdbgone.com
Tools Needed For Drilling
Drilling in lag bolts requires the right tools to make the job easier and safer. Having proper equipment ensures clean holes and strong holds. It saves time and avoids damage to materials. Below are the essential tools needed for drilling lag bolts.
Drill Types And Bits
A cordless drill is the best choice for drilling lag bolts. It offers good power and easy handling. Choose a drill with adjustable speed settings. This helps control the drilling speed for different materials.
Use a high-quality drill bit designed for wood or metal. Spade bits and auger bits work well for wood. For metal, use a cobalt or titanium bit. The bit size should match the lag bolt diameter for a tight fit.
Safety Gear Essentials
Safety gear protects you from accidents and injuries. Always wear safety goggles to shield your eyes from flying debris. Use gloves to protect your hands from splinters and sharp edges.
Wear ear protection if you use a loud drill. A dust mask helps prevent inhaling dust particles. Dress in close-fitting clothes to avoid getting caught in the drill.
Preparing The Work Area
Preparing the work area is the first important step to drill lag bolts safely and correctly. A clean and organized space helps prevent mistakes and accidents. It also makes the job faster and easier. Take time to set up your work area before starting to drill.
Marking Drill Points
Mark the exact spots where you need to drill. Use a pencil or marker to make small dots. Measure twice to be sure the marks are in the right place. Clear and accurate marks guide the drill bit and keep holes straight. This step helps the lag bolts fit perfectly.
Clearing And Securing The Surface
Remove any dirt, dust, or objects from the drilling area. A clean surface prevents slipping and damage to the material. Secure the workpiece using clamps or a vise. Holding the surface steady stops it from moving during drilling. This improves safety and drilling precision.

Credit: www.fastenersplus.com
Drilling Pilot Holes
Drilling pilot holes is a crucial step when installing lag bolts. These small holes guide the bolts and prevent the wood from splitting. They also make it easier to drive the bolts in straight and tight. Taking time to drill pilot holes correctly saves effort and ensures a strong hold.
Choosing The Correct Drill Bit Size
Select a drill bit slightly smaller than the lag bolt’s shaft. This size allows the bolt threads to grip the wood firmly. Check the bolt package or measure the bolt’s diameter. Avoid bits that are too large, as the bolt will be loose. Bits that are too small can cause the wood to crack.
Drilling Techniques For Accuracy
Mark the spot clearly before drilling. Hold the drill steady and start slowly to avoid slipping. Keep the drill perpendicular to the surface for a straight hole. Drill just deep enough for the bolt length. Clean the hole of debris to help the bolt fit smoothly.
Installing Lag Bolts
Installing lag bolts correctly is key to strong, safe connections in wood and other materials. Lag bolts need a pilot hole drilled first to avoid splitting the wood. After drilling, the bolts are driven in tightly to hold pieces together firmly. The right tools and careful tightening make the job easier and more secure.
Understanding the best tools and how tight the bolts should be helps ensure a solid installation. Below are tips on tool choices and proper tightening techniques for lag bolts.
Hand Vs. Power Tools For Installation
Hand tools like a ratchet wrench or socket wrench give good control. They are slower but reduce the risk of over-tightening. Power tools, such as impact drivers, speed up the process. They are best for many bolts or harder materials. Use a lower power setting to avoid stripping the bolt head.
Choose hand tools for precision and power tools for speed. Both can work well if used carefully.
Ensuring Proper Tightness
Lag bolts must be snug but not over-tightened. Tightening too much can damage the wood or strip the bolt threads. Tighten until the bolt head is flush with the surface or just below. Stop if the wood starts to crush or the bolt turns too easily. Testing with your hand tool can help sense the right tightness.
Proper tightness keeps the joint strong and safe. Check bolts after installation to maintain strength over time.
Common Mistakes To Avoid
Drilling in lag bolts seems simple but many make basic mistakes. These errors can weaken the hold or damage the material. Avoiding common mistakes ensures a strong and safe connection. Pay close attention to the details before you start drilling.
Over-tightening Risks
Over-tightening lag bolts can cause serious problems. It may crack or split the wood around the bolt. The bolt threads can also strip, reducing grip strength. Use a wrench with care. Tighten bolts until firm but stop before you feel resistance.
Incorrect Pilot Hole Sizes
Choosing the wrong pilot hole size affects the bolt’s hold. A hole too small makes it hard to insert the bolt. This can also crack the wood. A hole too large lets the bolt spin without gripping. Use a drill bit that matches the bolt’s core diameter. This ensures a snug, secure fit.
Maintenance And Inspection
Maintaining and inspecting lag bolts is key to keeping structures safe and strong. Regular checks help spot problems early. This prevents damage and costly repairs. Proper care extends the life of the bolts and the materials they hold together.
Checking For Rust And Wear
Rust weakens lag bolts and makes them unsafe. Look closely at the bolt surface. Check the threads and the head for any rust spots. Wear can cause the bolt to lose grip. Remove any rust with a wire brush. Replace bolts that look heavily corroded or worn out.
Re-tightening Tips
Lag bolts can loosen over time. This happens due to movement or vibration. Use a wrench to check tightness regularly. Tighten bolts until snug, not too tight. Over-tightening can strip the wood or bolt threads. Re-tighten bolts after heavy use or storms to keep them secure.
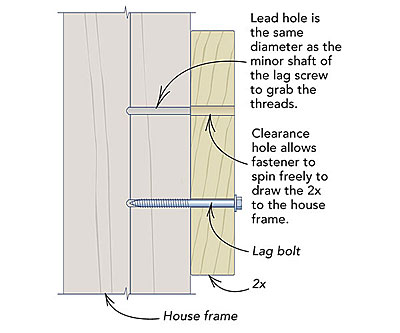
Credit: www.finehomebuilding.com
Frequently Asked Questions
What Drill Bit Size Is Needed For Lag Bolts?
Use a drill bit slightly smaller than the lag bolt’s diameter. This ensures a tight, secure fit without splitting the wood.
How Do You Drill Pilot Holes For Lag Bolts?
Mark the spot, select the correct bit size, and drill straight into the wood. Pilot holes prevent wood splitting and ease bolt insertion.
Can I Drill Lag Bolts Into Concrete Or Metal?
No, lag bolts are designed for wood. Use anchors or bolts specifically made for concrete or metal applications.
How Deep Should I Drill Pilot Holes For Lag Bolts?
Drill pilot holes as deep as the length of the lag bolt’s threaded section. This provides proper holding strength and prevents wood damage.
Conclusion
Drilling lag bolts is easier than it seems. Use the right drill bit and tools. Take your time and drill straight holes. This helps lag bolts hold strong and last longer. Remember to wear safety gear while working. Practice makes your skills better each time.
Follow these tips for a safe, strong fix. Your projects will look neat and hold tight. Keep drilling with care and patience. Soon, it will feel like second nature.