

Drilling into tiles can feel risky. You want to hang something important, but the fear of cracking your tiles holds you back.
What if a simple mistake ruins your beautiful wall? The good news is, you don’t have to worry. With the right steps, you can drill into tiles safely and confidently. You’ll discover easy, practical tips to protect your tiles and get the job done perfectly.
Keep reading to learn how to drill in tiles without cracking them—and save yourself time, money, and stress.
Credit: www.tilewizards.com.au
Choosing The Right Tools
Choosing the right tools is the first step to drill tiles without cracking them. The correct tools give control and precision. This lowers the chance of damage. Using wrong tools can lead to broken tiles and wasted time.
Best Drill Types For Tiles
A drill with variable speed control works best on tiles. It allows slow drilling to avoid cracks. Cordless drills are easy to handle and move around. Hammer drills should be avoided because their impact can break tiles.
Selecting The Proper Drill Bits
Use drill bits made for tiles, like carbide-tipped or diamond-tipped bits. These bits cut through tiles smoothly without applying too much pressure. Avoid using standard wood or metal bits. They can cause the tile to crack or chip.
Essential Safety Equipment
Wear safety goggles to protect your eyes from flying dust and shards. Use gloves to keep your hands safe and steady. A dust mask helps avoid inhaling tile dust. Safety gear keeps you safe and focused on drilling carefully.

Credit: www.youtube.com
Preparing The Tile Surface
Preparing the tile surface is a crucial step before drilling. Proper preparation helps avoid cracks and ensures a clean hole. Take time to get this step right for the best results.
Marking The Drill Spot
Start by marking the exact spot where you want to drill. Use a pencil or a marker with a fine tip. Make a small dot to guide your drill bit. This helps keep the drill steady and accurate.
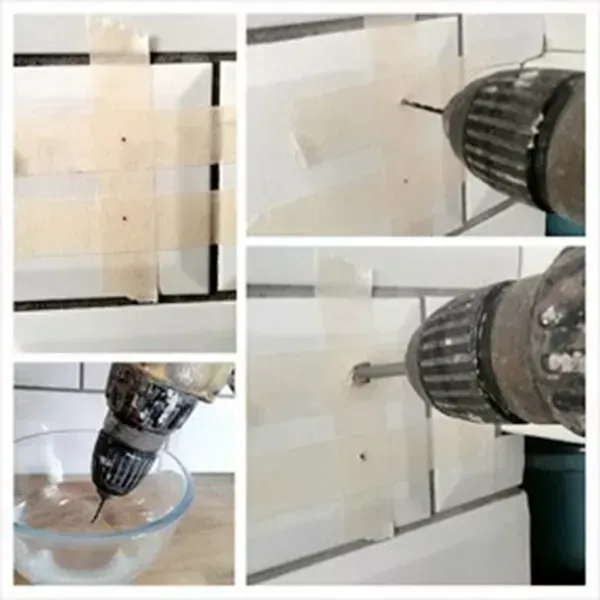
Using Tape To Prevent Slippage
Place a piece of masking or painter’s tape over the marked spot. Tape adds grip and stops the drill bit from slipping. It also reduces the chance of cracking the tile during drilling.
Cleaning The Area
Clean the tile surface around the drill spot. Remove dust, dirt, and grease with a damp cloth. A clean surface helps the tape stick better and keeps the drill bit from slipping.
Drilling Techniques
Drilling tiles requires care and the right technique. Tiles are hard but fragile. Using the proper drilling methods helps avoid cracks and damage. Focus on steady actions and the right tools for success.
Starting With A Pilot Hole
Begin by marking the drill spot clearly. Use a small drill bit to create a pilot hole. This hole guides the larger bit and reduces tile stress. It makes drilling smoother and safer.
Controlling Drill Speed
Keep the drill speed low and steady. High speed can cause heat and cracks. Slow drilling protects the tile and drill bit. Patience prevents damage and ensures a clean hole.
Applying The Right Pressure
Use gentle, even pressure on the drill. Pressing too hard can break the tile. Let the drill bit do the work. Light pressure keeps the tile intact and drilling precise.
Preventing Tile Cracks
Drilling into tiles needs care to stop cracks. Tiles are fragile and break easily under pressure or heat. Taking steps to protect tiles helps keep them intact. Small actions can prevent damage and save money on repairs.
Cooling The Drill Bit
Keep the drill bit cool while working. Heat makes tiles more likely to crack. Use water to cool the bit during drilling. Spray water or dip the bit often. This lowers the temperature and reduces stress on tiles.
Avoiding Excessive Heat
Drilling too fast causes heat build-up. Use slow and steady pressure. Let the drill do the work, not force. Frequent breaks help cool both the tile and bit. Heat softens the tile and causes cracks.
Handling Different Tile Materials
Tiles come in many types like ceramic, porcelain, and glass. Each needs a different drilling approach. Porcelain is harder and needs a diamond drill bit. Glass tiles require very gentle pressure. Know your tile type before starting to drill.
Troubleshooting Common Issues
Troubleshooting common issues while drilling tiles helps avoid damage. Small problems can stop your project if not handled properly. This section covers how to fix slipping drill bits, minor cracks, and knowing when to stop.
Dealing With Slipping Drill Bits
Slipping drill bits cause frustration and damage. To prevent slipping, start with a small pilot hole. Use tape on the tile surface to create grip. Hold the drill steady and avoid too much pressure. A slow speed helps the bit stay in place.
Fixing Minor Cracks
Minor cracks can happen even with care. Stop drilling immediately if you see a crack. Clean the crack gently with a soft cloth. Apply clear epoxy resin to seal the crack. Let it dry fully before continuing work.
When To Stop And Seek Help
Some problems need expert advice. Stop drilling if cracks grow or tiles break. Call a professional if you feel unsure or unsafe. Asking for help saves money and prevents bigger damage.
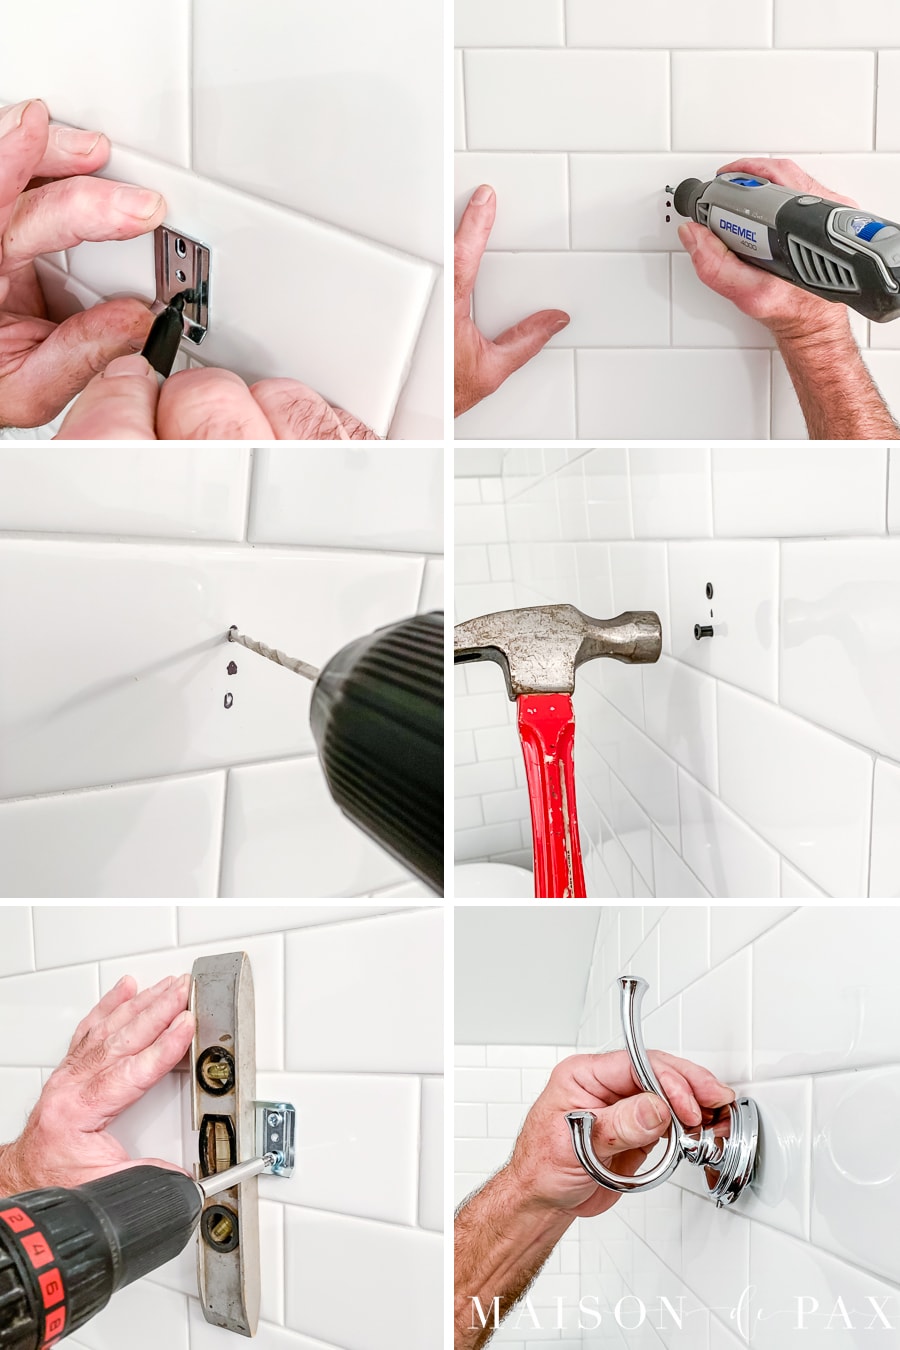
Credit: www.maisondepax.com
Post-drilling Care
After drilling tiles, proper care is key to keep them strong and clean. Taking a few simple steps can stop damage and keep your tiles looking good. Follow these tips for the best post-drilling care.
Cleaning Residue
Remove dust and debris from the drilled holes quickly. Use a soft brush or cloth to clear out loose particles. Avoid harsh chemicals that may damage the tile surface. A damp cloth works well to wipe the area gently. Clean holes prevent dirt buildup and help with sealing.
Sealing Drill Holes
Seal the holes to stop water from entering and causing damage. Use a clear silicone sealant or tile grout for this step. Apply the sealant carefully inside the hole using a small tool or finger. Let it dry fully before exposing the tile to water. Sealing protects tiles from cracks and mold.
Maintaining Tile Integrity
Check tiles regularly for any signs of cracks or loosening. Avoid heavy impacts near drilled areas to keep tiles intact. Use gentle cleaning methods to prevent wear around drilled spots. Taking care ensures your tiles last longer and look neat. Small efforts make a big difference in tile maintenance.
Frequently Asked Questions
How Do I Prevent Tiles From Cracking When Drilling?
Use a carbide-tipped drill bit and apply painter’s tape over the drilling spot. Drill slowly with steady pressure to avoid cracks. Cooling the tile with water while drilling also helps prevent heat damage and cracking.
What Drill Bit Is Best For Tiles?
A diamond-tipped or carbide-tipped drill bit is ideal for drilling tiles. These bits are designed to cut through hard surfaces without causing cracks or damage, ensuring clean and precise holes.
Should I Use A Hammer Drill On Tiles?
No, avoid using a hammer drill on tiles as the impact can crack them. Use a standard drill with a suitable bit and apply gentle, consistent pressure instead.
How Can I Mark Tiles For Accurate Drilling?
Use a pencil or marker on painter’s tape placed on the tile. The tape prevents the drill bit from slipping and helps keep your mark visible for precise drilling.
Conclusion
Drilling into tiles takes care and the right tools. Use a drill bit made for tiles to avoid cracks. Start slowly and keep the drill steady. Applying tape over the spot helps stop slipping. Cool the tile by spraying water while drilling.
Patience pays off; rushing can cause damage. Following these steps will protect your tiles well. You can complete your project without worry or stress. Small efforts lead to good results every time. Keep practicing, and drilling tiles will feel easy soon.