

If your Chevy ignition lock cylinder is stuck or broken, you know how frustrating it can be. You might feel stuck, unsure of what to do next.
The good news is that you don’t have to call a locksmith or replace the entire ignition system right away. By learning how to drill out a Chevy ignition lock cylinder safely and correctly, you can save time and money.
This guide will walk you through each step clearly, so you can get your vehicle back on the road without stress. Keep reading to discover the simple tricks and tools you need to tackle this task like a pro.

Credit: www.youtube.com
Tools Needed
Drilling out a Chevy ignition lock cylinder requires the right tools. Using proper equipment makes the job safer and faster. Below are the essential tools needed for this task. Each tool plays a key role in removing the lock cylinder smoothly.
Drill Types
A power drill is necessary to drill out the lock cylinder. A cordless drill offers easy handling without a cord. A corded drill provides constant power for tougher jobs. Choose a drill with adjustable speed settings for better control. Use high-quality drill bits made for metal to avoid damage.
Safety Gear
Protect yourself with safety gear. Safety glasses shield your eyes from metal shards. Gloves protect your hands from sharp edges and heat. Wear ear protection to reduce noise from drilling. Use a dust mask to avoid inhaling metal dust and debris.
Additional Supplies
Have these extra supplies ready for a smooth process. A center punch helps mark the spot to drill accurately. Lubricant reduces heat and friction while drilling. A flashlight improves visibility in tight spaces. Clean rags remove metal shavings and keep the area tidy.
Preparing The Vehicle
Preparing the vehicle is the first step to drill out a Chevy ignition lock cylinder. This step makes the process safe and easier. Taking time to prepare prevents damage and injury. Follow these steps carefully before drilling.
Disconnecting The Battery
Start by disconnecting the vehicle’s battery. This stops electrical power from flowing. It protects you and the vehicle’s electronics. Use a wrench to loosen the negative battery terminal. Remove the cable and keep it away from the battery. Check that no tools touch the battery during work.
Accessing The Ignition Cylinder
Next, find the ignition lock cylinder. It is located on the steering column. You may need to turn the steering wheel for better access. Check the vehicle manual for exact location. Make sure you have enough light to see clearly. Clear space around the steering column to work freely.
Removing Surrounding Panels
Remove the panels around the ignition cylinder. These panels protect the lock and wiring. Use a screwdriver to take out screws holding the panels. Gently pry the panels apart to avoid breaking clips. Keep screws and panels safe for reassembly. Removing panels gives clear access to the lock cylinder.
Locating The Lock Cylinder
Before drilling out a Chevy ignition lock cylinder, find its exact location. Knowing where the cylinder sits helps avoid damage to other parts. It also makes the task faster and safer.
The ignition lock cylinder is usually part of the steering column or dashboard. Finding it requires careful observation and sometimes removing panels. The next sections explain how to identify and check for security features around it.
Identifying Cylinder Position
The ignition lock cylinder is near the steering wheel. Look for a small, round slot where the key fits. This slot is often on the right side of the steering column.
Remove any covers or panels around the steering column. This reveals the lock cylinder and its mounting points. Use a flashlight for better visibility in tight spaces.
Checking For Security Features
Chevy often adds security parts around the ignition lock cylinder. These parts stop easy removal or tampering. Look for metal plates, clips, or plastic guards around the cylinder.
Some models have a lock pin inside the cylinder housing. This pin blocks the cylinder from coming out without the key. Knowing these features helps plan the drilling process safely.
Drilling Process
The drilling process is a key step in removing a Chevy ignition lock cylinder. It needs careful attention to avoid extra damage. Using the right tools and method makes the job easier and safer. This guide breaks down the drilling process into clear steps.
Choosing The Right Drill Bit
Pick a drill bit that matches the lock cylinder size. A 3/8-inch or 7/16-inch bit usually works well. Use a high-speed steel (HSS) bit for strength. Avoid using worn or dull bits to prevent slipping. A sharp bit drills smoothly and fast.
Drilling Technique
Start drilling at the center of the keyhole. Hold the drill steady and keep it straight. Drill slowly to keep control and avoid overheating. Stop occasionally to clear metal shavings from the hole. Apply light pressure to avoid breaking the drill bit.
Avoiding Damage To Surrounding Parts
Cover nearby areas with tape or cloth for protection. Keep the drill bit away from the dashboard and wiring. Drill only as deep as needed to remove the cylinder. Use steady hands to prevent slipping and scratching. Checking your progress helps stop mistakes early.
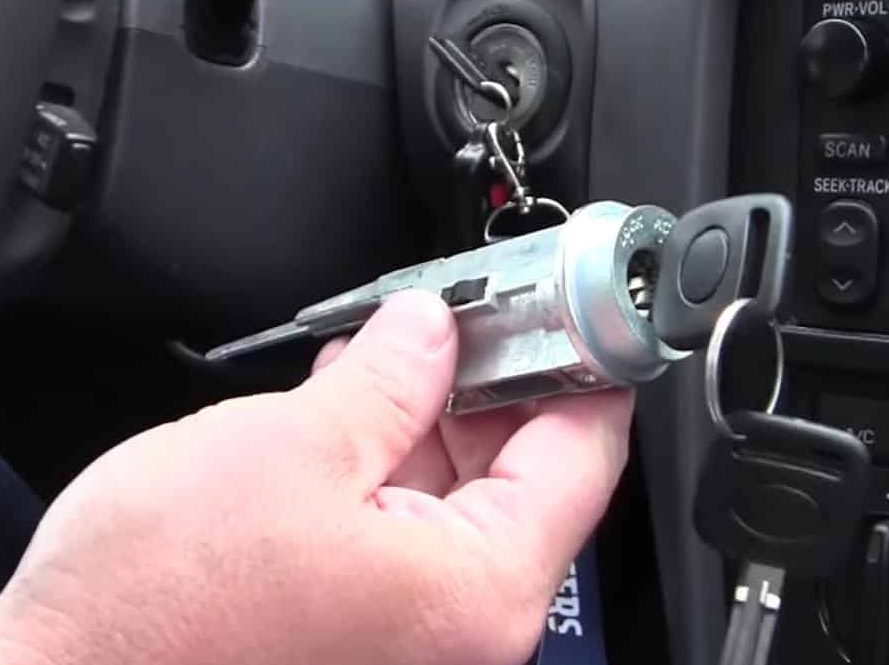
Removing The Damaged Cylinder
Removing the damaged ignition lock cylinder is a key step in fixing your Chevy’s ignition. This part often breaks inside the lock after wear or a failed attempt to turn the key. Clearing out the old cylinder prepares your vehicle for a new one. It also helps avoid future ignition problems.
Work carefully to avoid harming the steering column or wiring. Use the right tools and take your time. This section explains how to remove the broken pieces and clean the area for a smooth installation.
Extracting Cylinder Pieces
First, remove all visible parts of the broken cylinder. Use needle-nose pliers to pull out loose pieces. A small screwdriver helps push out stuck fragments. Be gentle to avoid pushing debris further inside. Clear as much as possible before drilling or cutting.
If pieces are deep inside, a magnet tool can assist. Slowly pull out metal fragments without forcing them. Check the cylinder hole often to see your progress. Remove every small part to prevent jamming the new cylinder.
Cleaning The Area
After removing all cylinder pieces, clean the ignition area thoroughly. Use a vacuum to suck out dust and metal shavings. Wipe the space with a dry cloth to remove dirt and grease.
Inspect the ignition housing for damage or rust. Clean any rough edges with fine sandpaper. This makes the area smooth and ready for the new cylinder. A clean space ensures the new lock fits correctly and works well.
Credit: jandlpacificlockandkey.com
Installing A New Ignition Cylinder
Installing a new ignition cylinder in your Chevy is the next step after drilling out the old one. This process requires careful attention to ensure the new cylinder fits perfectly and works smoothly. Proper installation helps your vehicle start reliably and keeps it secure.
Aligning The New Cylinder
First, insert the new ignition cylinder into the steering column. Make sure the cylinder lines up with the key slot and the locking mechanism. Gently push it in until it seats fully. Avoid forcing the cylinder, as this can damage internal parts. The cylinder should slide in smoothly and lock into place.
Securing And Testing
Next, secure the ignition cylinder with the retaining clip or screw. Check that the cylinder does not move or wiggle. Insert the key and turn it to test the ignition. The key should turn easily and start the engine. Test all positions: off, accessory, and start. Confirm the steering wheel locks and unlocks properly.
Safety Tips
Drilling out a Chevy ignition lock cylinder requires care and attention. Safety is the top priority during this task. Follow these tips to protect yourself and your vehicle.
Handling Tools Safely
Wear safety glasses to protect your eyes from metal shards. Use gloves to avoid cuts and scrapes. Keep your hands away from the drill bit while operating. Secure the drill firmly to prevent slipping. Take breaks to avoid hand fatigue and loss of control.
Preventing Vehicle Damage
Cover nearby areas with tape to avoid scratches. Use the correct drill bit size to prevent extra damage. Drill slowly and steadily to control the process. Keep metal debris away from the ignition area. Check your progress often to avoid drilling too deep.
Credit: myfuse.education
Frequently Asked Questions
How Do I Safely Drill Out A Chevy Ignition Lock Cylinder?
To safely drill out the cylinder, use a small drill bit first. Drill slowly to avoid damaging the steering column. Wear safety goggles and disconnect the battery before starting. Follow step-by-step guides to prevent errors and ensure safety.
What Tools Are Needed To Drill Out The Ignition Cylinder?
You need a power drill, various drill bits, a screwdriver, and safety goggles. A punch tool helps remove cylinder remnants. Keep tools organized and ready to avoid interruptions during the process.
Can Drilling Out The Ignition Damage My Chevy’s Steering Column?
Yes, improper drilling can damage the steering column or electrical wiring. Drill slowly and carefully to minimize risks. Follow instructions closely and use the correct drill bit size for the cylinder.
How Long Does It Take To Drill Out A Chevy Ignition Cylinder?
Drilling out the cylinder typically takes 15 to 30 minutes. The time depends on your experience and tool quality. Preparation and careful execution speed up the process.
Conclusion
Drilling out a Chevy ignition lock cylinder takes care and the right steps. Stay calm and follow each step carefully. Use the proper tools to avoid damage. Take your time and work slowly for best results. After drilling, replace the cylinder to keep your vehicle safe.
This guide helps you handle the task with confidence. Practice safety and patience to complete the job well.