

Have you ever faced the frustration of a broken bolt stuck deep in your project? When an easy out tool gets stuck or breaks inside, it can feel like you’re at a dead end.
But don’t worry—you can fix this. Knowing how to drill out an easy out can save your time, money, and a lot of stress. You’ll learn simple, step-by-step methods to get that stubborn piece out safely and move forward with confidence.
Keep reading, and you’ll discover how to turn a tricky problem into a quick solution.

Credit: drill-hog.myshopify.com
Tools Needed
Drilling out an Easy Out requires the right tools to do the job safely and efficiently. Having proper equipment helps you avoid damage and makes the task easier. Gather all necessary tools before starting to save time and frustration.
Drill Types
A corded drill offers consistent power for tough jobs. A cordless drill gives more freedom of movement. Choose a drill with adjustable speed settings. Lower speeds help control the drilling process.
Drill Bits
Use high-speed steel (HSS) bits for metal drilling. Start with a small bit to create a pilot hole. Gradually increase bit size for a cleaner removal. Left-handed bits can help loosen stuck Easy Outs.
Additional Supplies
Protective eyewear guards your eyes from metal shavings. Cutting oil reduces heat and friction during drilling. A center punch helps mark the drill spot precisely. Clamps hold the workpiece steady and safe.
Safety Measures
Drilling out an easy out can be tricky and risky. Safety measures protect you from injury and damage. Always follow these steps before you start drilling. Care and caution are key for a safe job.
Protective Gear
Wear safety glasses to shield your eyes from metal shards. Use gloves to protect your hands from sharp edges. Hearing protection helps reduce noise from the drill. Wear a dust mask if metal dust is heavy in the air. Dress in close-fitting clothes to avoid snagging on tools.
Workspace Preparation
Clear your workspace of clutter and loose items. Ensure good lighting to see the drill and easy out clearly. Secure the workpiece firmly with clamps or a vise. Keep a fire extinguisher nearby in case sparks ignite. Check that your drill and bits are in good condition before starting.
Preparing The Workpiece
Preparing the workpiece is a key step before drilling out an easy out. Proper preparation makes the process safer and more precise. It helps avoid damage to the workpiece and tools. Start by cleaning the area around the easy out. This ensures a clear view and better control. Then, mark the exact spot where you will drill. This guides your drill bit and prevents slipping.
Cleaning The Area
Remove dirt, grease, and rust around the easy out. Use a wire brush or cloth for cleaning. A clean surface gives better visibility. It helps the drill bit grip the metal firmly. Avoid any loose debris that can cause slipping or damage.
Marking The Drill Spot
Find the center of the easy out carefully. Use a center punch to make a small dent. This dent keeps the drill bit from wandering. Marking the spot precisely ensures accurate drilling. A steady drill bit reduces the chance of breaking the easy out.
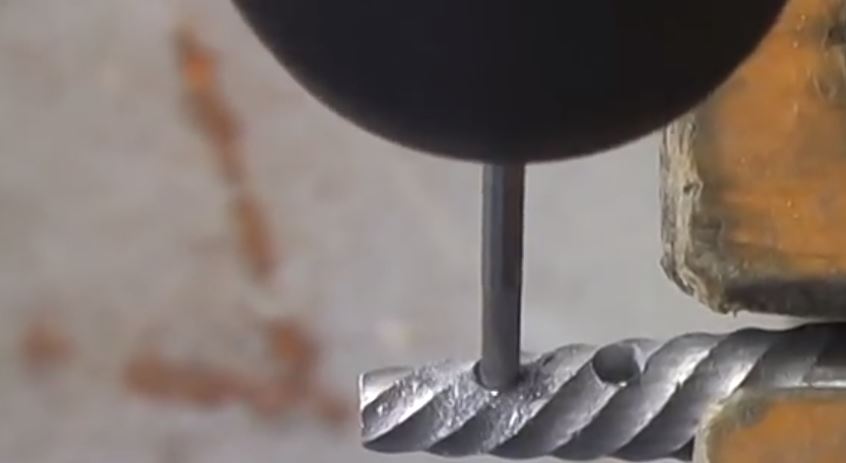
Credit: blog.denlorstools.com
Choosing The Right Drill Bit
Choosing the right drill bit is key to drilling out an easy out without damage. The right bit helps you work safely and efficiently. It prevents further breaking or slipping inside the hole. Picking the correct drill bit size and type ensures smooth drilling and better results.
Size Selection
Pick a drill bit slightly smaller than the easy out. This keeps the bit from hitting the edges. It also helps remove the center part of the easy out first. Use a bit that matches the diameter of the easy out’s core. This size allows for careful drilling without cracking the surrounding material.
Material Compatibility
Choose a bit made for the material you drill into. High-speed steel bits work well on soft metals. For harder metals, use cobalt or carbide bits. These bits last longer and cut cleaner. Using the right material reduces wear and prevents the bit from dulling fast.
Drilling Techniques
Drilling out an Easy Out requires careful technique to avoid damage. The right drilling method helps remove the broken tool safely. Focus on controlling speed, applying steady pressure, and preventing bit breakage.
Drill Speed Control
Keep the drill speed slow and steady. Fast drilling creates heat, which can damage the Easy Out. Use a variable speed drill for better control. Slow speeds help the bit cut smoothly and avoid slipping.
Applying Steady Pressure
Push the drill evenly and gently. Too much force may break the drill bit or the Easy Out. Steady pressure helps the bit stay centered. This reduces the risk of damaging the surrounding material.
Avoiding Bit Breakage
Use the correct drill bit size and type. Hardened bits work best for breaking Easy Outs. Keep the bit cool by pausing often or using cutting oil. Avoid twisting or bending the bit to prevent snapping.

Credit: www.ebay.com
Removing The Easy Out
Removing an Easy Out can be tricky. These tools dig into broken bolts or screws to pull them out. Sometimes, the Easy Out itself gets stuck. This section explains two simple ways to remove it safely.
Using Pliers Or Extractors
Start by trying pliers if the Easy Out is partially exposed. Grip it firmly but gently. Twist the tool slowly to loosen it. Avoid too much force to prevent breaking it inside.
Special extractors can also help. These tools grip the Easy Out’s edges better than regular pliers. Insert the extractor carefully and turn counterclockwise. This often frees the stuck tool.
Tapping Methods
Tapping can loosen a stuck Easy Out. Use a small hammer or mallet for gentle taps. Tap on the tool’s end to break the grip inside the hole.
Do not hit too hard. Light taps help avoid damage. After tapping, try turning the Easy Out again with pliers or extractors.
Troubleshooting Common Issues
Troubleshooting common issues while drilling out an easy out is key. Problems can slow you down and cause damage. Knowing how to fix these issues saves time and effort. The following tips help handle the most frequent problems safely.
Bit Slippage
Bit slippage happens when the drill bit slips off the easy out. This can damage the part and waste time. Use a sharp bit with the right size. Hold the drill steady and apply firm, even pressure. Start drilling slowly to keep control. If slippage occurs, stop and reposition the bit carefully.
Stuck Easy Out
A stuck easy out is tough to remove. It may be seized or rusted inside the hole. Try applying penetrating oil around the easy out. Let it sit for a few minutes. Use a wrench with good grip to turn gently. Avoid forcing it hard to prevent breaking the tool inside.
Damaged Threads
Damaged threads happen if the easy out or drill bit slips. Threads allow screws to fit tightly. If damaged, the hole may not hold a new screw. Use a thread chaser or tap to clean the threads. Work slowly and carefully to restore the thread shape. If damage is too bad, consider using a larger screw or insert.
Preventing Future Breakages
Breaking an easy out can cause delays and extra work. Preventing future breakages saves time and effort. Small changes in how you use tools make a big difference. Focus on using the right methods and care.
Proper Installation Tips
Use the correct size easy out for the bolt. Tighten it slowly and steadily. Avoid using too much force at once. Keep the tool aligned with the bolt’s center. These steps reduce stress on the easy out. They help prevent it from snapping inside the hole.
Regular Maintenance
Inspect tools before each use. Check for any signs of wear or damage. Clean the easy outs after every job. Store them in a dry place to stop rust. Well-kept tools last longer and work better. Regular care lowers the chance of breakage during use.
Frequently Asked Questions
What Tools Do I Need To Drill Out An Easy Out?
You need a drill, drill bits, penetrating oil, pliers, and safety glasses. Using the right tools ensures a safe and efficient removal process.
How Do I Safely Drill Out A Broken Easy Out?
Apply penetrating oil first. Use a center punch to mark the drill spot. Drill slowly with the correct bit size to avoid damage.
Can I Reuse An Easy Out After Drilling It Out?
No, easy outs are usually single-use tools. Drilling damages their threads and strength, so it’s best to replace them with new ones.
What Drill Bit Size Is Best For Removing An Easy Out?
Start with a small pilot bit, then gradually increase size. Use a bit slightly smaller than the broken easy out’s diameter for best results.
Conclusion
Drilling out an easy out can seem tough at first. Take your time and work carefully. Use the right tools for better results. Stay safe by wearing protective gear always. Small steps lead to big success. Practice makes the process easier each time.
Now you can remove stuck bolts with confidence. Keep trying, and don’t give up. Your skills will improve with every project. Simple tips like these help you fix things fast.