

Have you ever started tapping a hole, only to have the tap break off inside? It’s frustrating and can bring your project to a sudden halt.
But don’t worry—removing a broken tap doesn’t have to be a nightmare. You’ll learn simple, step-by-step methods to drill out that stuck piece safely and get your work back on track. Keep reading, and you’ll discover the tools and tricks that make this tricky task much easier than you might think.
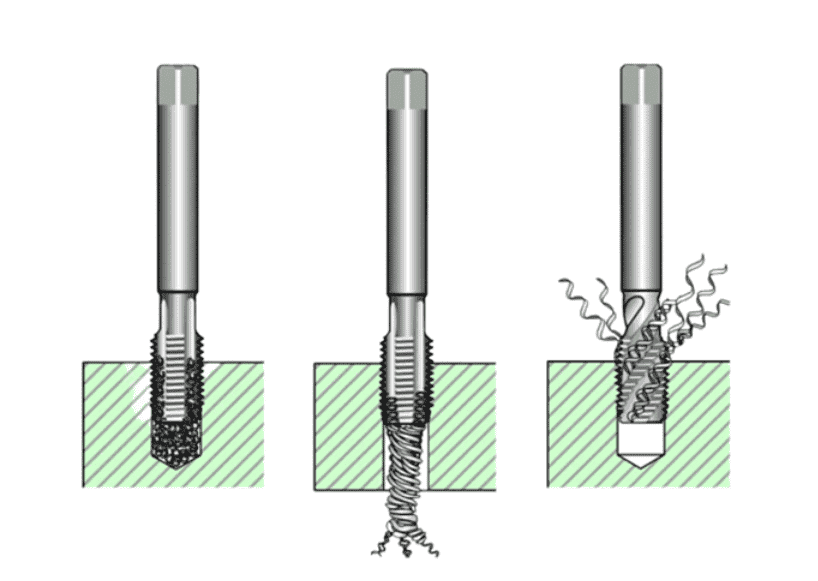
Causes Of Broken Taps
Broken taps happen often during threading jobs. Knowing why taps break helps you prevent it. Several factors cause taps to snap inside holes. Understanding these reasons saves time and tools.
Common Mistakes Leading To Breakage
Applying too much force can break a tap quickly. Turning the tap too fast causes stress and wear. Not using cutting oil makes the tap heat up and seize. Not backing out the tap to clear chips causes clogging and breakage. Using the wrong tap size for the hole weakens the tool.
Material And Tool Quality Factors
Low-quality taps are more likely to break under pressure. Soft or brittle tap material can snap easily. Hard or dirty workpieces increase the risk of tap damage. Using old or worn taps reduces cutting efficiency. Poorly made taps may have weak spots or cracks.
Credit: yijinsolution.com
Preparing For Tap Removal
Preparing to remove a broken tap is an important step. It helps avoid more damage and makes the process easier. Before drilling, gather all tools and follow safety rules. This careful preparation saves time and effort.
Essential Tools Needed
Use a drill with a small bit for precise work. A center punch helps mark the drill spot. Safety glasses protect your eyes from metal chips. A tap extractor or pliers may help remove the broken piece. Keep a lubricant handy to ease drilling and reduce heat.
Safety Precautions To Follow
Wear safety glasses to protect your eyes from flying debris. Use gloves to avoid sharp edges and hot surfaces. Work in a well-lit area to see clearly. Secure the workpiece firmly to stop slipping. Keep your hands clear of the drill bit at all times. Take breaks to prevent tool overheating and hand fatigue.
Step-by-step Drill Out Process
Removing a broken tap can be tricky. The step-by-step drill out process helps you do it safely and cleanly. Each step focuses on precision and care. Follow the guide to avoid damaging the workpiece.
Locating The Broken Tap
First, find the exact spot of the broken tap. Use a bright light and magnifier if needed. Mark the center carefully. This helps guide the drill bit straight down the tap.
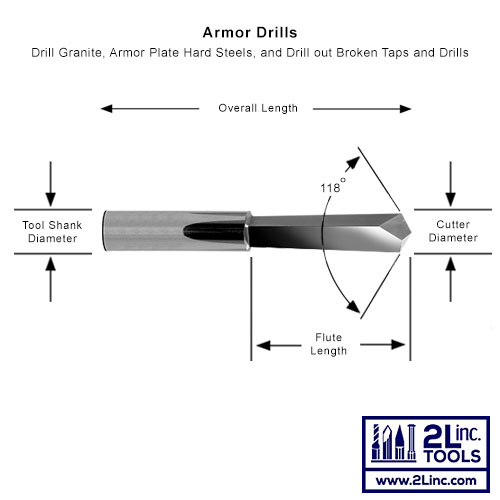
Choosing The Right Drill Bit
Select a drill bit smaller than the tap’s diameter. This prevents cutting the hole’s threads. Use a high-speed steel (HSS) bit for metal taps. Check the drill bit is sharp and clean.
Drilling Techniques For Success
Start drilling slowly and keep the drill steady. Use light pressure to avoid moving off-center. Pause to clear metal shavings often. Use cutting oil to reduce heat and friction.
Credit: www.2linc.com
Alternative Removal Methods
Broken taps can be tough to remove with just drilling. Alternative removal methods help save time and prevent damage. These techniques often work better for stubborn taps stuck deep inside metal. They offer different ways to loosen or pull out the broken piece safely.
Using Extractors And Easy Outs
Extractors and easy outs are special tools designed for removing broken taps. They have sharp edges that grip inside the broken tap. Turn the extractor slowly with a wrench. It bites into the metal and twists the tap out. This method works well if the tap is not too deep or damaged.
Choose the right size extractor for the broken tap. Too large or small can cause slipping. Use steady pressure to avoid breaking the tap further. Extractors often save time compared to drilling alone.
Applying Heat Or Lubricants
Heat can loosen tight metal around the broken tap. Use a heat gun or small torch carefully. Warm the area evenly, not too hot to damage the part. Heat expands the metal, making the tap easier to remove.
Lubricants like penetrating oil work by reducing friction. Spray the oil around the broken tap and let it sit for some minutes. The oil seeps into the threads and helps loosen rust or corrosion. Combine heat and lubricant for better results.
Preventing Future Tap Breakage
Broken taps can cause delays and extra work. Preventing tap breakage saves time and money. Simple habits help keep taps strong and last longer.
Proper Tapping Techniques
Use the right tap size for the hole. Start tapping slowly and keep the tool straight. Turn the tap a little, then back it out to clear chips. Avoid forcing the tap if it feels stuck. Use cutting oil to reduce heat and friction. These steps reduce stress on the tap and prevent breakage.
Maintenance Of Tools
Check taps before use for any damage or wear. Clean taps after each job to remove metal chips. Store taps in a dry place to avoid rust. Sharpen dull taps or replace them promptly. Well-maintained taps cut more smoothly and last longer.

Credit: www.youtube.com
When To Seek Professional Help
Knowing when to seek professional help is important for drilling out a broken tap. Some situations need expert skills and tools. Trying to fix these on your own can cause more damage or waste time. Recognizing the right moment to call a pro saves effort and money.
Signs The Job Is Too Complex
The broken tap is deep inside the metal. It breaks into many small pieces. The metal around the tap is cracked or very thin. You do not have the right tools or experience. The tap is stuck very tightly and won’t budge. These signs show the job is beyond basic DIY skills.
Finding A Reliable Service
Search for local professionals with good reviews. Choose those who specialize in metalwork or tool repair. Ask about their experience with broken taps. Check if they use modern tools and safe methods. Compare prices and turnaround times. A reliable service will fix the problem quickly and safely.
Frequently Asked Questions
How Do I Safely Remove A Broken Tap?
First, secure the workpiece firmly. Use a center punch to mark the tap center. Drill a small hole inside the broken tap carefully. Then use a tap extractor or pliers to turn and remove the broken tap slowly. Always wear safety glasses during the process.
What Tools Are Needed To Drill Out A Broken Tap?
You need a drill, drill bits, a center punch, a tap extractor, and safety glasses. A vise or clamp is useful to secure the workpiece. Optional tools include cutting fluid to ease drilling and prevent damage to the material.
Can I Drill Out A Broken Tap Without Damaging Threads?
Yes, by drilling precisely in the tap’s center and using correct drill sizes. Use cutting fluid and drill slowly to avoid heat and damage. After removal, re-tap the hole carefully to restore the threads properly.
How Long Does It Take To Drill Out A Broken Tap?
It usually takes 10 to 30 minutes depending on tap size and material hardness. Preparation and careful drilling are key to a quick, successful removal. Rushing can cause more damage and extend repair time.
Conclusion
Drilling out a broken tap can seem tough but is doable with care. Take your time and choose the right drill bit size. Keep your drill steady and go slow to avoid damage. Use cutting oil to help with smooth drilling.
Patience pays off and keeps your work safe. Follow these steps to fix taps and save tools. Practice makes perfect, so don’t rush. Soon, you will handle broken taps with more confidence.