

Are you tired of drilling holes that end up crooked or uneven? Getting perfectly perpendicular holes can seem tricky, but with the right tips, you can master it quickly.
Imagine how much smoother your projects will go when every hole is straight and precise. In this guide, you’ll discover simple techniques and tools that make drilling perfect right angles easy—no guesswork, no frustration. Keep reading to unlock the secrets that will take your DIY skills to the next level.
Credit: www.reddit.com
Importance Of Perpendicular Holes
Drilling perpendicular holes is a key skill in many projects. It ensures parts fit together correctly. Accurate holes improve the strength and look of your work. Without proper alignment, problems often arise. Understanding why perpendicular holes matter helps you drill better every time.
Applications Requiring Precision
Many tasks need exact holes. Furniture building uses perpendicular holes for joints. Cabinets and shelves rely on straight holes for stability. Metalwork and machinery parts demand precise drilling. Even simple DIY projects benefit from accurate holes. Precision keeps parts aligned and secure.
Consequences Of Misaligned Drilling
Wrong angle holes cause several issues. Parts may not fit or hold properly. Weak joints can break under pressure. Misaligned holes also spoil the appearance. Fixing errors wastes time and materials. Drilling straight holes avoids these costly mistakes.
Essential Tools For Accurate Drilling
Drilling holes straight and true is key for many projects. Using the right tools helps keep your holes perpendicular. Good tools reduce mistakes and save time. This section covers essential tools for accurate drilling.
Choosing The Right Drill And Bits
Select a drill with adjustable speed settings for better control. Cordless drills offer convenience and ease of use. Pick drill bits that fit your material—wood, metal, or plastic. Sharp bits make clean cuts and reduce wobble. Use brad point bits for wood as they stay steady.
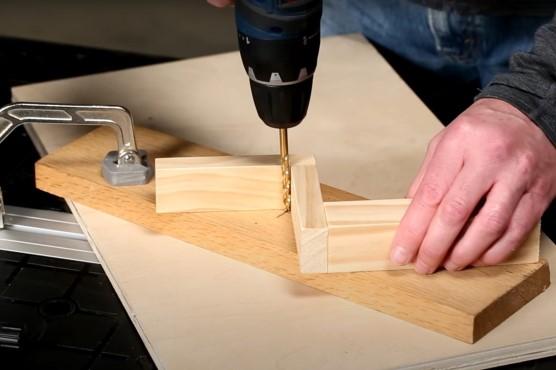
Using Drill Guides And Jigs
Drill guides help keep the drill straight during use. They attach to the drill or the workpiece for stability. Jigs hold the material and guide the drill bit precisely. They ensure repeatable, accurate hole placement. These tools are great for beginners and pros alike.
Leveraging Laser Levels And Squares
Laser levels project a straight line to align your drill. This visual aid helps maintain a perfect angle. Squares help check if your drill is at 90 degrees. Use a combination of laser levels and squares for best results. These tools improve accuracy and confidence during drilling.
Preparing The Workpiece
Preparing the workpiece is a key step before drilling perpendicular holes. It helps ensure accuracy and safety. Taking time here reduces mistakes and improves the final result.
Marking The Drill Spot
Use a pencil or marker to mark the exact spot to drill. A clear mark guides the drill bit and keeps it steady. For more precision, use a center punch to create a small dent. This dent prevents the drill bit from slipping.
Securing The Material
Clamp the workpiece firmly to your workbench or table. A loose piece can shift and cause uneven holes. Use strong clamps that hold the material tightly. Double-check the grip before starting to drill.
Setting Up For Stability
Place a scrap piece of wood under the workpiece. This supports the drill and prevents tear-out. Ensure the drill press or hand drill is steady and aligned. Keep the drill bit perpendicular to the surface for best results.
Techniques For Drilling Perpendicular Holes
Drilling perpendicular holes requires careful attention and the right technique. The goal is to keep the drill straight and steady. This ensures clean, accurate holes that fit parts perfectly. Small mistakes can cause angled holes that weaken your work. Follow these simple techniques for the best results.
Aligning The Drill Properly
Start by positioning the drill bit exactly where the hole needs to be. Hold the drill so it points straight down at the surface. Use a square or guide block to check alignment. Look from different angles to confirm the drill is not tilted. Proper alignment is key to drilling straight holes.
Maintaining Steady Pressure
Apply firm but gentle pressure on the drill. Too much force can bend the bit or cause slipping. Too little pressure will slow progress and cause uneven holes. Keep your hands steady and avoid pushing the drill sideways. Consistent pressure helps the bit cut straight through the material.
Using Pilot Holes For Accuracy
Drill a small pilot hole before the final size. This guides the larger bit and keeps it from wandering. Pilot holes make it easier to start drilling at the right spot. They also reduce stress on the drill bit. Use a bit half the size of your final hole for the pilot.
Common Mistakes And How To Avoid Them
Drilling perpendicular holes can be tricky. Many beginners make common mistakes that affect the quality of their work. Avoiding these errors helps you drill straight and clean holes every time. Understanding these mistakes improves your skill and saves time.
Drilling At An Angle
One common error is drilling at an angle. The drill bit slips or tilts, causing uneven holes. Use a guide or a square to keep the drill straight. Check your position often. A steady hand and proper setup reduce this problem.
Ignoring Tool Wear
Dull drill bits cause poor results. They make holes larger or rough. Check your tools before starting. Replace or sharpen bits regularly. Sharp bits cut better and keep holes accurate.
Rushing The Process
Drilling too fast leads to mistakes. The bit can overheat or wander off track. Take your time and apply steady pressure. Slow drilling improves control and hole quality. Patience is key to success.

Credit: www.youtube.com
Advanced Tips For Precision Drilling
Advanced tips improve drilling accuracy. These methods help you drill holes straight every time. Precision is key to a strong, clean result. Small tools and checks make a big difference.
Focus on control and measurement. Use proper equipment and techniques. These tips save time and reduce errors.
Using Depth Stops
Depth stops control how far the drill bit goes. Attach a stop collar on the bit to set hole depth. This prevents drilling too deep or too shallow. It keeps holes consistent in size. Depth stops improve safety and reduce damage.
Employing Drill Presses
Drill presses hold the drill steady and straight. They make drilling perpendicular holes easier and faster. Use clamps to secure your workpiece. Adjust the press table to the correct height. Drill presses provide more control than hand drills.
Checking Alignment Midway
Stop drilling halfway to check alignment. Use a square or level to verify the hole angle. Correct any tilt before continuing. This prevents mistakes and uneven holes. Regular checks ensure the final hole is straight.
Troubleshooting Drilling Issues
Drilling holes straight and true can be tough. You might face problems like holes that are not straight, rough edges, or the drill bit slipping. These issues affect your work’s quality and can waste materials. Fixing these problems is simple with the right steps.
Correcting Off-angle Holes
Off-angle holes happen when the drill is not held straight. Use a drill guide or a square to keep the drill steady. Mark the spot clearly and start slowly. If the hole is slightly off, try drilling a new hole next to it at the right angle. Filling the wrong hole with wood filler or putty helps hide mistakes.
Dealing With Material Tear-out
Tear-out means the wood or material splinters around the hole. Place a piece of scrap wood under the workpiece. This supports the material and reduces splintering. Use a sharp drill bit to cut cleanly. Drill slowly near the end of the hole to avoid tearing out the back side.
Fixing Drill Bit Wander
Drill bit wander happens when the bit slips on the surface. To stop this, make a small dimple with a nail or center punch before drilling. This marks the spot and guides the bit. Start drilling at low speed to keep control. Using a sharp bit also helps the drill stay in place.
Credit: learn.kregtool.com
Frequently Asked Questions
How Do I Ensure Holes Are Drilled Perfectly Perpendicular?
Use a drill guide or a square to align the drill bit at 90 degrees. Mark the spot clearly and steady your hands to maintain alignment while drilling.
What Tools Help Drill Straight Perpendicular Holes?
A drill press, drill guide, or right-angle attachment helps maintain accuracy. These tools stabilize the drill and ensure the bit stays perpendicular to the surface.
Can I Drill Perpendicular Holes Without Special Equipment?
Yes, use a carpenter’s square and steady your drill by hand. Mark the angle carefully and drill slowly to keep the bit aligned.
Why Is Drilling Perpendicular Holes Important?
Perpendicular holes ensure proper fit and alignment for fasteners or components. This precision prevents structural weakness and improves the overall quality of your project.
Conclusion
Drilling perpendicular holes takes focus and the right tools. Use a guide or square to keep your drill straight. Check your work often to avoid mistakes. Practice on scrap material before working on your project. Small steps lead to better results.
With patience and care, you can drill clean, straight holes every time. Keep these tips in mind for your next task. Simple methods make tough jobs easier. You will see improvement quickly.