

Have you ever found a beautiful shell and wondered how to turn it into a unique piece of jewelry? Drilling shells might sound tricky, but with the right steps, you can create stunning accessories that show off your personal style.
In this guide, you’ll learn exactly how to drill shells safely and easily, even if you’ve never done it before. Ready to transform your shells into wearable art? Let’s dive in and make your jewelry ideas come to life!
:max_bytes(150000):strip_icc()/drill-shell-187-d111999_vert-d51d04ac1b674d259255fb25811f3d3d.jpg)
Credit: www.marthastewart.com
Choosing The Right Shells
Choosing the right shells is a key step in making beautiful jewelry. Not all shells work well for drilling. Some shells break easily or do not look good once drilled. Picking the right shell helps create strong, attractive pieces. It saves time and effort during the crafting process. Understanding shell types and their qualities makes your project easier and more fun.
Best Shell Types For Drilling
Hard shells are the best choice for drilling. Examples include conch, clam, and scallop shells. These shells have a smooth surface and strong structure. They hold up well to the pressure of drilling. Avoid soft or fragile shells like paper shells or small snail shells. These tend to crack or crumble easily. Choose shells that are large enough to hold a hole without breaking.
Checking Shell Thickness And Strength
Look at the shell’s thickness before drilling. Thin shells may break or crack quickly. Thick shells offer more support and last longer. Hold the shell and gently press to test strength. If it feels brittle or fragile, find another one. Some shells have layers; thicker layers mean better durability. Strong shells make drilling safer and reduce the chance of damage.
Gathering Tools And Materials
Before drilling shells for jewelry, gather the right tools and materials. This step ensures smooth and safe work. Using proper tools makes drilling easier and avoids damage to shells. Prepare a clean, stable workspace to keep everything organized.
Essential Drilling Tools
Start with a small drill or rotary tool. A handheld rotary tool works well for delicate shells. Use fine drill bits made for fragile materials. Diamond or carbide bits are best. Have a few drill bit sizes ready for different hole sizes. Keep a small container for shells to avoid losing them.
Safety Gear And Work Surface
Wear safety glasses to protect your eyes from dust and chips. A dust mask helps prevent inhaling shell particles. Use gloves for better grip and hand protection. Work on a flat, stable surface covered with a soft cloth. The cloth keeps shells from slipping and cushions them during drilling.
Preparing Shells For Drilling
Preparing shells for drilling is an important step in making jewelry. Proper preparation helps avoid cracks and makes drilling easier. It also ensures the holes are clean and smooth for stringing or attaching findings.
This section covers the key steps for preparing your shells. You will learn how to clean and dry them properly. Also, how to mark drill points with accuracy for perfect results.
Cleaning And Drying Shells
Start by washing the shells with warm water and mild soap. Use a soft brush to remove dirt and debris. Avoid harsh chemicals that can damage the shell’s surface.
Rinse the shells well to remove all soap. Pat them dry with a soft cloth. Let the shells air dry completely. Moisture inside can cause cracking during drilling.
Marking Drill Points Accurately
Use a pencil or a fine-tip marker to mark the drill spot. Choose a flat or slightly curved area for easier drilling. Avoid thin or fragile edges to prevent breakage.
Double-check the position of the mark. Ensure it aligns with your jewelry design. Marking carefully helps create neat, centered holes.
Credit: www.youtube.com
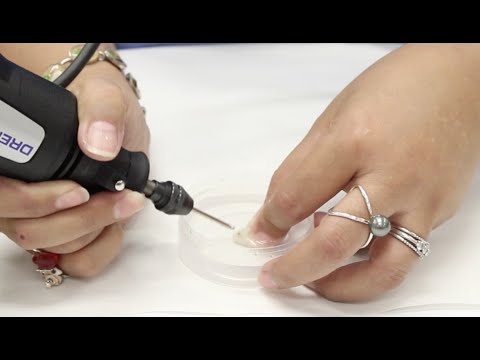
Drilling Techniques
Drilling shells for jewelry requires careful techniques to protect the delicate material. Shells can crack or break easily if drilled incorrectly. Using the right methods makes the process smoother and safer. This section covers important drilling tips to help you work confidently.
Drill Speed And Pressure Tips
Use a slow drill speed to avoid overheating the shell. High speed can cause cracks. Apply gentle, steady pressure. Pressing too hard may break the shell. Let the drill bit do the work. Pause often to check your progress.
Using Water For Cooling
Water keeps the shell cool while drilling. It stops heat build-up that weakens the shell. Use a small spray bottle or dip the shell in water. Keep the drill bit wet during the process. This reduces dust and prevents damage.
Avoiding Shell Cracks And Breakage
Start with a small drill bit to make a pilot hole. This guides the larger bit safely. Hold the shell firmly but gently. Support it with a soft cloth or foam. Drill slowly and do not rush. Inspect the shell often for any signs of cracking.
Finishing Touches
After drilling shells for your jewelry, the work is not quite finished. The finishing touches make your piece safe to wear and look polished. These steps improve the shell’s durability and beauty. Taking time to smooth edges and clean the shell ensures a professional result.
Smoothing Rough Edges
Drilling can leave sharp or rough edges around the hole. These edges might scratch skin or catch on clothing. Use fine sandpaper or a small nail file to gently smooth the area. Move the sandpaper in a circular motion to avoid cracks. Check often to keep the hole round and even. Smoothing edges also prevents the shell from breaking easily.
Cleaning After Drilling
Drilling creates dust and small shell particles that stick to the surface. Use a soft brush to remove loose debris carefully. Wash the shell with mild soap and warm water to clear any remaining dust. Rinse well and dry completely with a soft cloth. Cleaning brightens the shell and prepares it for stringing or setting. Clean shells last longer and look more attractive in jewelry.

Credit: www.youtube.com
Troubleshooting Common Issues
Drilling shells for jewelry can be tricky. Small mistakes cause cracks or damage. Knowing how to fix common problems saves time and materials. This section helps you solve typical issues during drilling. It improves your crafting experience and final results.
Fixing Cracks And Chips
Cracks often happen from too much pressure or a fast drill speed. Stop drilling immediately if you see cracks. Use a fine sandpaper to smooth rough edges gently. Apply a small amount of clear jewelry glue to seal cracks. Let the glue dry fully before continuing work. This prevents cracks from growing and keeps shells strong.
Dealing With Drill Bit Slippage
Drill bits slip on smooth shell surfaces easily. To avoid slippage, mark the spot with a pencil dot. Use masking tape on the drill area to add grip. Start drilling slowly to keep the bit steady. Hold the shell firmly but without too much force. A steady hand reduces slippage and gives a clean hole.
Frequently Asked Questions
How Do I Choose The Right Drill Bit For Shells?
Choose a small, sharp drill bit designed for delicate materials. Carbide or diamond-tipped bits work best. Ensure the size matches your shell hole requirements to prevent cracking or breaking during drilling.
What Safety Precautions Should I Take When Drilling Shells?
Wear safety glasses and a dust mask to protect eyes and lungs. Secure the shell firmly to avoid slipping. Drill at a slow speed to prevent overheating and shell damage.
How Can I Prevent Shells From Cracking While Drilling?
Use a slow drill speed and steady pressure. Place the shell on a soft surface like foam. Starting with a small pilot hole reduces stress and helps avoid cracks.
What Is The Best Way To Clean Shells After Drilling?
Rinse shells gently with warm water to remove debris. Use a soft brush to clean the drilled hole. Let shells dry completely before using them in jewelry making.
Conclusion
Drilling shells for jewelry can be simple and fun. Use the right tools and take your time. Always protect the shell to avoid cracks. Small, steady movements work best. Practice on a few shells before starting your project. This helps you gain confidence and skill.
Enjoy making unique jewelry with your drilled shells. Keep safety in mind and have patience. Your creativity will shine through each piece you create.