

Is your cordless drill switch acting up and slowing down your project? You’re not alone, and the good news is you don’t need to rush out and buy a new drill.
Fixing your cordless drill switch can be easier than you think. In this guide, you’ll discover simple steps to get your drill working smoothly again. Imagine saving time, money, and frustration by handling this repair yourself. Keep reading, and you’ll be back to drilling with confidence in no time.

Credit: www.reddit.com
Common Switch Issues
Common switch issues can stop a cordless drill from working properly. The switch controls power flow to the drill’s motor. If it fails, the drill will not turn on or work smoothly. Understanding common switch problems helps fix the drill faster and saves money on repairs.
Signs Of A Faulty Switch
The drill does not start when pressing the trigger. The switch feels loose or stuck. The drill runs only at certain trigger positions. It turns off suddenly during use. Sparks or smoke come from the switch area. These signs show the switch may be broken or worn out.
Causes Of Switch Failure
Dirt and dust can block the switch contacts. Moisture can cause rust or corrosion inside the switch. Frequent use wears out the internal parts over time. Dropping the drill can damage the switch mechanism. Electrical problems like a short circuit can also harm the switch.
Tools And Materials Needed
Fixing a cordless drill switch requires the right tools and parts. Having everything ready makes the repair easier and faster. This section lists what you need to get started. Prepare your workspace and gather these items before opening the drill.
Essential Repair Tools
A small screwdriver set is necessary for opening the drill casing. Precision screwdrivers work best for tiny screws. A multimeter helps check electrical connections and test the switch. Needle-nose pliers make handling small wires easier. A soldering iron may be needed to fix or replace wires. Keep a clean cloth nearby to wipe dust and dirt.
Replacement Parts
A new drill switch is the main replacement part. Make sure it matches your drill model. Also, have spare wires or connectors ready if damaged. Small screws may need replacement if lost or stripped. Use proper parts to ensure the drill works safely after repair.
Safety Precautions
Fixing a cordless drill switch requires care and attention. Safety should be your top priority. A small mistake can cause injury or damage. Follow basic safety steps before starting any repair work. Protect yourself and your tools.
Power Disconnection
Always remove the battery before working on your drill. This stops any power from running through the tool. Without power, the drill cannot accidentally turn on. Check twice to be sure the battery is out. Never skip this step, even if the drill seems off.
Protective Gear
Wear safety glasses to guard your eyes from dust and debris. Gloves protect your hands from sharp parts and rough edges. Choose gloves that let you move your fingers easily. Avoid loose clothing or jewelry that could get caught in the drill. Stay safe by using the right gear.
Step-by-step Switch Repair
Fixing a cordless drill switch can seem tough. Step-by-step guidance makes it easier. Follow clear instructions to repair the switch safely and quickly. This process saves money and extends the drill’s life.
Opening The Drill Housing
Unplug the drill or remove its battery first. Use a screwdriver to remove all screws on the housing. Carefully separate the two halves of the drill case. Avoid forcing the parts to prevent damage.
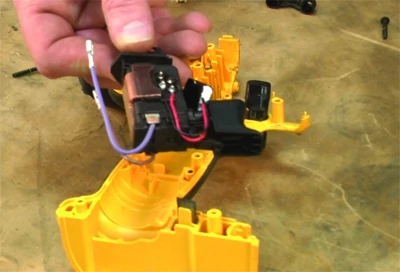
Locating The Switch
Look inside for the switch connected to wires. It is usually near the trigger button. Note how the wires connect to the switch for later. Take a photo if needed to remember the setup.
Testing The Switch
Use a multimeter to check the switch function. Set the multimeter to continuity mode. Press the switch and observe the reading. No change means the switch is faulty and needs replacement.
Removing The Faulty Switch
Disconnect the wires from the switch carefully. Use a soldering iron if wires are soldered. Heat the joints and gently pull the wires free. Remove any screws or clips holding the switch in place.
Installing The New Switch
Place the new switch in the correct position. Reattach the wires by soldering or clipping them. Double-check the wire connections for safety. Ensure the switch fits securely in the housing.
Reassembling The Drill
Align the drill housing halves carefully. Replace all screws and tighten them firmly. Insert the battery or plug the drill back. Test the drill switch to confirm it works well.
Testing After Repair
Testing after repair is a key step to ensure your cordless drill switch works properly. This stage confirms the fix and checks for any new problems. It also helps avoid future issues that could cause frustration or damage.
Careful testing saves time and ensures safety during use. Follow simple steps to verify the switch’s function and diagnose any leftover faults. This process keeps your drill reliable and ready for work.
Functionality Check
Start by inserting the battery and turning on the drill. Notice if the drill powers up smoothly without hesitation. Test the trigger switch by pressing it several times. The drill should start and stop instantly with each press. Listen for unusual sounds or delays. Check if the drill speed changes when you press the trigger harder. Confirm the forward and reverse switch works by switching directions. Make sure the drill bit spins correctly both ways. If all these tests pass, the switch repair is successful.
Troubleshooting Remaining Issues
If the drill fails any test, identify the problem area. Loose wires or poor connections cause many issues. Reopen the drill and inspect the switch and wiring carefully. Clean any dirt or corrosion around the switch contacts. Replace damaged parts that look worn out or burnt. Test the battery charge level to rule out power issues. Try another battery if possible. If the drill still does not work, the problem might be with the motor or control board. In such cases, consider professional help to avoid further damage.
Credit: extremehowto.com
Maintenance Tips
Proper maintenance keeps your cordless drill switch working well. Small actions now save bigger repairs later. Follow easy steps to extend your drill’s life and avoid switch problems.
Preventing Future Switch Problems
Keep your drill dry and clean. Avoid dropping it or exposing it to dust. Use the drill gently to prevent switch damage. Store it in a safe place. Check the switch regularly for any signs of wear.
Regular Cleaning And Inspection
Turn off and unplug the drill before cleaning. Use a soft brush to remove dust from the switch area. Wipe the drill with a dry cloth to keep it clean. Look closely at the switch for cracks or loose parts. Clean the contacts if you notice dirt or debris. Regular checks help spot problems early.

Credit: www.youtube.com
Frequently Asked Questions
How Do I Know If My Cordless Drill Switch Is Faulty?
A faulty switch often causes the drill not to start or stop unexpectedly. Check for inconsistent power or no response when pressing the trigger.
Can I Replace A Cordless Drill Switch Myself?
Yes, with basic tools and safety precautions, you can replace the switch. Ensure you buy the correct switch model and follow a step-by-step guide.
What Tools Are Needed To Fix A Cordless Drill Switch?
You typically need a screwdriver, soldering iron, replacement switch, and safety gloves. These tools help you safely open the drill and replace the faulty switch.
How Much Does It Cost To Fix A Cordless Drill Switch?
Replacement switches usually cost between $10 to $30. Repair costs may vary if done professionally, typically ranging from $20 to $60.
Conclusion
Fixing a cordless drill switch is easier than it seems. Start by checking the switch for dirt or damage. Clean or replace the switch if needed. Always unplug the drill before working on it. Test the drill after repair to ensure it works well.
Taking small steps helps avoid bigger problems later. With patience and care, your drill will run smoothly again. Keep tools in good shape for longer use. Simple fixes save time and money. Try these tips next time your drill switch acts up.