

Loading a brad nail gun is simple once you understand the process. This guide walks you through each step to load nails correctly, ensuring safe operation and optimal results. Whether you’re a beginner or experienced, mastering this skill is essential for effective woodworking projects.
How to Load a Brad Nail Gun
If you’re working on a woodworking project or finishing carpentry, a brad nail gun is a handy tool that speeds up your work. But before you start firing nails, you need to know how to load it properly. Incorrect loading can cause jams, misfires, or even injuries. This guide will walk you through the entire process step-by-step, ensuring you load your brad nail gun safely and correctly. Let’s get started!
Key Takeaways
- Always disconnect the power or air supply: Before loading, ensure the nail gun is unplugged or disconnected to prevent accidental firing.
- Use the correct nails: Verify the size and type of nails compatible with your brad nail gun to avoid jams or damage.
- Open the magazine properly: Follow the manufacturer’s instructions to access the nail chamber safely.
- Load nails carefully: Insert nails aligned with the magazine’s guide and ensure they sit flat and securely.
- Close the magazine securely: Make sure the chamber is fully closed before testing or using the nail gun.
- Perform safety checks: Always test fire on scrap material after loading to confirm proper operation.
Understanding Your Brad Nail Gun
Before diving into the loading process, it’s important to understand your tool. Brad nail guns come in different models and brands, but most share similar features:
- Magazine: The chamber where nails are loaded.
- Trigger: Fires nails when pressed.
- Power source: Usually pneumatic (air-powered) or electric.
- Loading chamber: The area that holds the nails in place.
Always consult your user manual for specific instructions related to your model. Each model might have slight differences in how the magazine opens or how nails are inserted.
Tools and Materials Needed
- Brad nail gun
- Compatible brad nails (check your manual for size and type)
- Safety gear: Safety glasses and gloves
- Clean workspace
- Optional: Lubricant (if recommended by manufacturer)
Step-by-Step Guide to Loading a Brad Nail Gun
Step 1: Safety First
Before handling your nail gun, make sure it is disconnected from its power source:

Visual guide about How to Load a Brad Nail Gun
Image source: support.ryobi.com.au
Visual guide about How to Load a Brad Nail Gun
Image source: i.ytimg.com
- Unplug the electric nail gun or disconnect the air hose for pneumatic models.
- Remove the battery if it’s a cordless model.
- Double-check that the tool is not connected to any power source to prevent accidental firing.
Tip: Always wear safety glasses and gloves when working with power tools to protect yourself from accidental injury.
Step 2: Prepare Your Workspace
Set up a clean, well-lit area to work on your brad nail gun. Keep your nails and tools organized for quick access. Make sure the workspace is free of clutter and distractions.
Step 3: Open the Magazine
The way to access the nail chamber varies by model, but generally:
- Locate the magazine release latch: Usually a button, lever, or latch on the side or bottom of the tool.
- Release the latch: Push, slide, or lift as instructed by your manual.
- Open the magazine: Swing or slide it open to expose the nail chamber.
Tip: Handle the magazine gently to avoid damaging the latch or the chamber.
Step 4: Prepare the Nails
Ensure you have the correct nails for your brad nail gun:
- Check the size (commonly 18-gauge), length, and type (brads are thin nails).
- Inspect the nails for rust, damage, or bent nails, and discard any defective ones.
Tip: Use high-quality nails to prevent jams and ensure smooth operation.
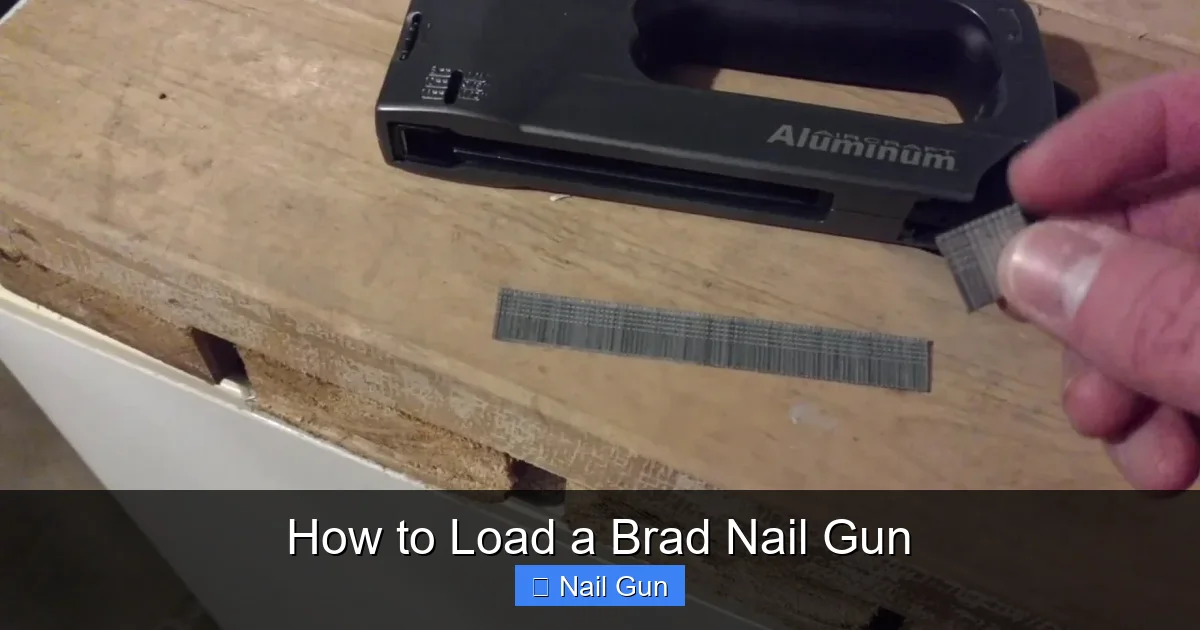
Step 5: Load the Nails into the Magazine
Follow these sub-steps for proper loading:
Align the Nails
- Hold the nails by the head, with the pointed ends facing forward.
- Ensure the nails are standing upright, aligned with the guide rails inside the magazine.
Insert the Nails
- Gently slide the nails into the magazine, following the direction indicated in your manual.
- Make sure each nail sits flat and flush against the guide, with the head properly seated.
- Do not force nails if they don’t slide easily; check if they are compatible or if the magazine is misaligned.
Check for Proper Seating
- Confirm that the nails are snugly in place and that the magazine is not overloaded.
- Ensure that the nails are not bent or jammed.
Tip: Some models have a spring or follower that pushes the nails toward the firing end. Ensure this is in place and functioning properly.
Step 6: Close the Magazine
Once nails are loaded:
- Carefully close the magazine door or slide it back into position.
- Ensure it locks securely in place.
- If your model has a latch or lock, re-engage it.
Tip: Double-check that the magazine is fully closed before proceeding.
Step 7: Reconnect Power and Test
After loading:
- Reconnect the air hose, plug in the electric model, or reattach the battery.
- Keep the tool pointed away from yourself and others.
- Perform a test fire on a scrap piece of wood to ensure nails are firing properly.
If the nails do not fire correctly, recheck the loading steps or consult the troubleshooting section below.
Practical Tips for Loading a Brad Nail Gun
- Always use compatible nails specified by the manufacturer.
- Regularly inspect nails and the magazine to prevent jams.
- Keep the magazine clean and free of debris.
- Never force nails into the magazine; they should slide in smoothly.
- Store nails in a dry place to prevent rust and corrosion.
- Follow your specific model’s manual for any unique loading procedures.
Troubleshooting Common Loading Issues
Jammed Nails
If your nail gun jams:
- Disconnect the power source immediately.
- Open the magazine and carefully remove the jammed nails.
- Check for bent or damaged nails and replace them.
- Clean the magazine chamber and guide rails.
- Re-load nails carefully and test again.
Misfiring or No Firing
If the gun doesn’t fire after loading:
- Ensure the magazine is fully closed and latched.
- Check that the nails are compatible and properly seated.
- Verify there is sufficient air pressure or power supply.
- Inspect the firing mechanism for damage or debris.
Conclusion
Loading a brad nail gun is a straightforward process when done carefully and correctly. Always prioritize safety by disconnecting power sources before loading and handling nails gently to prevent jams or damage. With practice, you’ll become more efficient at loading your nail gun, making your projects smoother and safer. Remember to consult your specific model’s manual for any unique instructions. Happy woodworking!
🎥 Related Video: How to Load a Nail Gun: Quick Tutorial
📺 Mellowpine Woodworking
Here’s a step-by-step guide on loading a nail gun. We’ll walk you through how to safely load the nails, prepare your gun for use, …