

In this guide, you’ll learn how to load a Milwaukee M18 nail gun safely and correctly. From understanding the parts to troubleshooting common issues, you’ll gain all the tips needed to keep your nail gun ready for use.
Key Takeaways
- Understand your nail gun: Familiarize yourself with the parts of the Milwaukee M18 nail gun before loading.
- Use the correct nails: Always choose nails that match the gun’s specifications for optimal performance.
- Safety first: Disconnect the battery or ensure the tool is off before loading to prevent accidents.
- Follow the loading steps carefully: Properly position nails to prevent jams and damage.
- Check for jams: Regularly inspect for nail jams and clear them properly to keep the gun functioning smoothly.
- Maintain your tool: Keep your Milwaukee M18 nail gun clean and well-maintained for best results.
Introduction
If you’re a DIY enthusiast or a professional contractor, knowing how to load a Milwaukee M18 nail gun is essential. Proper loading ensures your tool works safely and efficiently, preventing jams and damage. This guide walks you through each step, from understanding the parts to troubleshooting common issues. Whether it’s your first time or you’re looking to improve your technique, you’ll find clear instructions and helpful tips to keep your project on track.
Understanding the Milwaukee M18 Nail Gun
Before loading, it’s important to understand the main parts of your Milwaukee M18 nail gun. Familiarity helps prevent mistakes and makes the process smoother.
Visual guide about How to Load a Milwaukee M18 Nail Gun
Image source: i.ytimg.com
- Magazine: Holds the nails and feeds them into the firing chamber.
- Loading chamber: The area where nails are placed before being fed into the gun.
- Latch or release mechanism: Opens the magazine for nail loading.
- Battery compartment: Powers the tool and should be disconnected during loading for safety.
Review your specific model’s manual for detailed diagrams and safety instructions.
Step 1: Prepare Your Workspace and Safety Equipment
Ensure Safety First
Before starting, wear safety glasses and gloves if needed. Make sure your workspace is clean and well-lit.
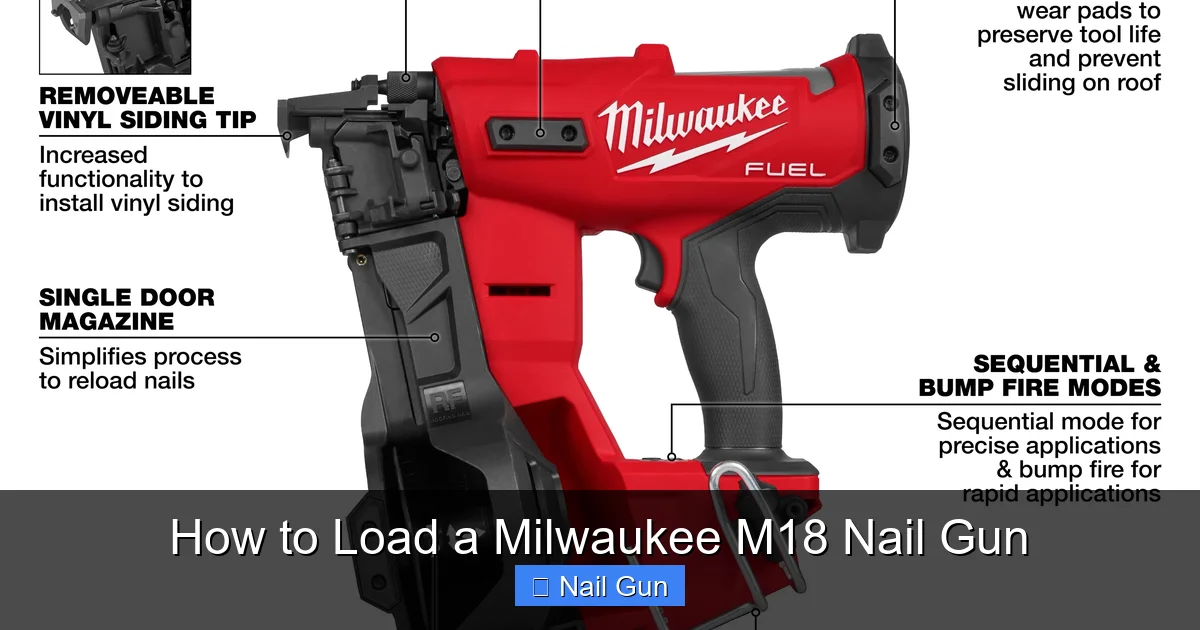
Visual guide about How to Load a Milwaukee M18 Nail Gun
Image source: milwaukeetool.com
Disconnect the Battery
Always remove the battery from your Milwaukee M18 nail gun before loading. This prevents accidental firing and ensures safety.
To remove the battery, press the release button and slide it out, following your tool’s specific instructions.
Step 2: Open the Magazine
Locate the Latch or Release Mechanism
Find the magazine latch or release button on your nail gun. This is usually on the side or top of the magazine assembly.
Release the Magazine
Press or slide the latch to open the magazine. Some models have a side latch, while others may require pressing a button. Refer to your manual if unsure.
Once open, you should see the chamber ready for nails.
Step 3: Prepare the Nails
Select the Correct Nails
Check your nail gun’s manual for the right nail size and type. Using incompatible nails can cause jams or damage.
Inspect the Nails
Ensure the nails are straight and free of defects. Sturdy, undamaged nails feed more smoothly and reduce jams.
Step 4: Load the Nails into the Magazine
Align the Nails Correctly
Hold the nails with the pointed end facing downward and the head side up.
Insert the Nails
Carefully place the nails into the magazine, making sure they are aligned properly. The nails should slide easily into the chamber without forcing them.
Tip: Use your fingers or a small tool to help guide the nails if necessary, but avoid forcing them.
Ensure Proper Seating
Push the nails gently toward the rear of the magazine until they are fully seated and aligned with the feeding mechanism.
Step 5: Close the Magazine
Secure the Cover
Once the nails are loaded, close the magazine cover or latch securely. Make sure it clicks into place and is locked properly.
This step is crucial to prevent nails from falling out and to ensure smooth feeding during operation.
Step 6: Reinstall the Battery and Test
Reconnect the Battery
Slide the battery back into place until it clicks securely. Confirm it is properly installed.
Test the Nail Gun
Before starting your project, do a quick test on a scrap piece of wood. Hold the gun securely and press the trigger to verify proper loading and operation.
Tip: Always test in a safe area away from other people or objects.
Additional Tips for Smooth Loading
- Regularly clean the magazine to prevent debris from causing jams.
- Avoid overloading the magazine; follow the maximum nail capacity indicated in your manual.
- Store nails in a dry place to prevent rust and corrosion.
- Periodically check for signs of wear or damage in your nail gun’s feeding mechanism.
Troubleshooting Common Loading Issues
Nail Jamming
If nails jam during loading or firing, disconnect the battery immediately. Open the magazine and carefully remove the jammed nails. Check for bent or damaged nails and clear any debris.
Misaligned Nails
If nails aren’t feeding properly, ensure they are loaded correctly and aligned properly. Re-load if necessary, making sure the nails slide smoothly into the chamber.
Unable to Close Magazine
If the magazine won’t close, check for obstructions or improperly loaded nails. Remove any debris or bent nails and try again.
Conclusion
Loading a Milwaukee M18 nail gun is straightforward once you understand the parts and follow the correct steps. Always prioritize safety by disconnecting the battery and wearing protective gear. Proper loading not only keeps your tool functioning smoothly but also extends its lifespan. With practice, loading and maintaining your nail gun will become a quick and simple task, helping you complete your projects efficiently and safely.