

Are you tired of losing power while working on your projects? Imagine having a reliable power source wherever you go, without worrying about cords or outlets.
Learning how to make a cordless drill generator can give you that freedom. It’s easier than you think, and you don’t need to be an expert to build one yourself. You’ll discover simple steps to create a powerful, portable generator using your cordless drill.
Keep reading, and you’ll unlock a smart, cost-effective solution that will change the way you work forever.
Materials Needed
Gathering the right materials is the first step to build a cordless drill generator. Each item plays a key role in making the project work well. Prepare all parts before starting to avoid delays and mistakes.
Cordless Drill Selection
Choose a cordless drill with a strong motor and good battery life. A drill with a brushless motor lasts longer and runs smoother. Pick one that fits your power needs and budget. Make sure the drill is easy to disassemble.
Generator Components
You will need magnets, copper wire, and a coil form to create the generator part. Use strong neodymium magnets for better power output. Copper wire should be thin but durable for winding the coils. A sturdy coil form helps hold everything in place.
Additional Tools
Get tools like screwdrivers, pliers, and a multimeter. A soldering iron helps join wires securely. Sandpaper or a file smooths rough edges. Safety gear such as gloves and goggles protects you during the build.
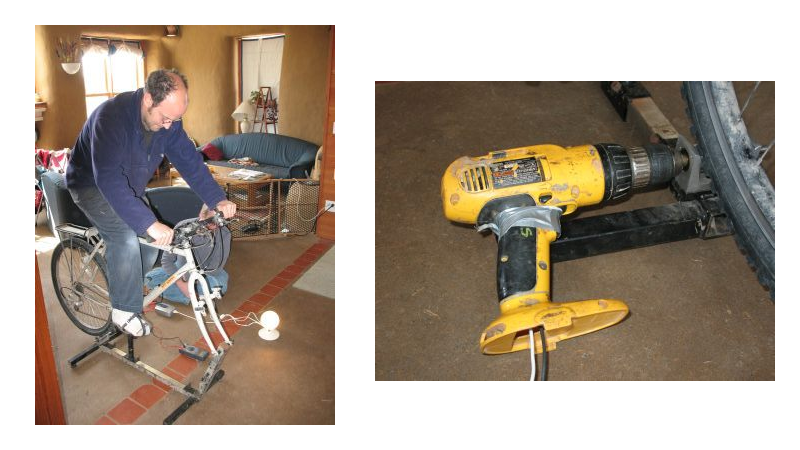
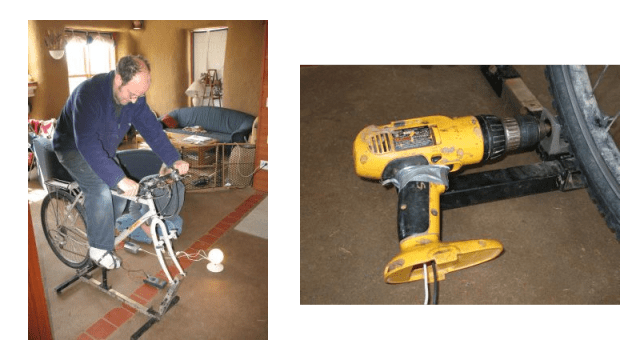
Credit: hackaday.com
Preparing The Drill
Preparing the drill is the first step in making your cordless drill generator. This step helps you access the parts needed for the generator setup. A clean and ready drill ensures smooth work later. Start by taking off the chuck. This part holds the drill bit and blocks access to the motor shaft. Removing it carefully will expose the motor shaft for connection.
Removing The Chuck
First, make sure the drill is off and unplugged. Hold the drill firmly. Turn the chuck counterclockwise to loosen it. Some chucks twist off by hand, others need a special key. Use the key if your chuck has one. Once loose, pull the chuck away from the drill. Set it aside safely. This clears the way to the motor shaft below.
Accessing The Motor Shaft
With the chuck removed, find the motor shaft at the drill’s center. It is a metal rod that spins when the drill runs. Check the shaft for dirt or damage. Clean it gently with a cloth if needed. The shaft must be smooth and free to turn. This makes it easier to attach wires or parts for the generator. Handle the shaft carefully to avoid bending it.
Building The Generator
Building the generator for a cordless drill requires careful steps. This process turns simple parts into a working power source. Each part plays a key role in making the generator work well. Follow these steps to build your own generator with ease.
Attaching The Coil
Start by winding the copper wire into a tight coil. The coil must fit firmly around the drill’s core. Make sure the wire loops are even and close. This coil will create electric current when magnets spin nearby.
Connecting Magnets
Next, place strong magnets around the coil. Arrange the magnets evenly to maintain balance. Use neodymium magnets for better power output. The magnets should face the coil without touching it.
Securing The Assembly
Finally, fix the coil and magnets in place. Use screws or strong glue to hold parts steady. Make sure nothing moves during rotation. A secure assembly helps the generator run smoothly and last longer.

Credit: www.youtube.com
Wiring And Electrical Setup
Wiring and electrical setup are key steps in building a cordless drill generator. Proper wiring ensures the generator works safely and efficiently. This section guides you through soldering connections, installing a voltage regulator, and testing output voltage.
Soldering Connections
Soldering creates strong electrical joints between wires and components. Use a good soldering iron and rosin-core solder. Heat the wire and pad before applying solder. Avoid cold joints by ensuring the solder flows smoothly. Trim excess wire for a clean finish. Proper soldering prevents power loss and loose connections.
Installing Voltage Regulator
The voltage regulator keeps the output voltage steady. Connect the input wire to the regulator’s input terminal. Attach the output wire to your device or battery. Secure the regulator with screws or mounting tape. Check the regulator’s rating matches your generator’s voltage. This step protects your cordless drill from voltage spikes.
Testing Output Voltage
Testing verifies your generator produces the correct voltage. Use a digital multimeter set to DC voltage mode. Connect the probes to the output terminals. Turn the generator on and read the display. The voltage should match your cordless drill’s needs. If not, recheck your wiring and regulator installation.
Mounting And Enclosure
Mounting and enclosure are key parts of building a cordless drill generator. They keep parts steady and safe during use. A good setup stops damage and helps the generator work well for a long time.
Choosing the right base and enclosure protects the components from dust, dirt, and shock. It also makes the generator easier to move and store. Safety comes first.
Designing A Stable Base
Start by picking a flat, strong surface for the base. Wood or metal plates work well. Make sure it can hold the drill and generator parts without tipping.
Use screws or bolts to fix parts firmly. Avoid loose fittings that cause vibration or noise. Add rubber feet to reduce slipping and absorb shock.
The base should allow good airflow around the drill. This stops overheating during use. Space out parts so wires and cables do not get tangled.
Protecting Components
Choose an enclosure that covers all moving and electrical parts. Plastic or metal boxes are common choices. The enclosure must have holes for ventilation.
Seal any gaps to keep out dust and moisture. Use foam or rubber strips around openings. This protects the generator in different weather.
Check the enclosure design for easy access. You will need to clean or repair parts over time. Doors or removable panels help with maintenance.
Testing And Troubleshooting
Testing and troubleshooting are key steps after making your cordless drill generator. They ensure the device works safely and efficiently. Careful checks help find any problems early. Fixes can save time and prevent damage.
Initial Power Test
Start by connecting the drill battery to your generator setup. Turn on the drill and watch for any signs of power output. Use a multimeter to measure voltage at the output terminals. Expect a steady voltage around the drill’s rated output.
Check the drill’s rotation speed. It should run smoothly without jerks. Listen for unusual sounds like grinding or buzzing. These can signal mechanical or electrical issues.
Perform a load test by attaching a small device or bulb. The bulb should light up steadily if power flows correctly. If the bulb flickers or dims, the generator needs adjustment.
Common Issues And Fixes
The generator may not produce power. Check battery charge and drill connection first. Loose wires cause no output or weak power. Tighten all connections firmly.
Drill motor might overheat quickly. This means excessive load or poor ventilation. Reduce load or improve airflow around the drill.
Voltage readings can drop under load. This often means weak battery or bad contacts. Replace the battery or clean contact points with fine sandpaper.
Unusual noises often come from worn gears or bearings. Lubricate parts or replace damaged components. Regular maintenance keeps the generator running well.
Safety Tips
Safety is the most important part of making a cordless drill generator. Working with electricity and tools can be risky without proper care. Follow these safety tips to avoid accidents and keep yourself safe.
Handling Electrical Parts
Always turn off and unplug the drill before starting. Use insulated tools to avoid electric shocks. Check wires for damage or wear before use. Never touch wires with wet hands. Keep electrical parts dry and away from water. Wear rubber gloves for added protection. Secure connections tightly to prevent sparks.
Operating Precautions
Work in a clean, dry area with good light. Keep children and pets away from your workspace. Do not rush; work carefully and steadily. Wear safety goggles to protect your eyes. Avoid loose clothing that can get caught in tools. Follow the drill’s instructions step by step. Stop immediately if you smell burning or see smoke.
Credit: hackaday.com
Practical Applications
Making a cordless drill generator is not just a fun project. It has many practical uses. This tool can help during power cuts or outdoor activities. It provides a simple way to generate electricity. Using a cordless drill as a generator can be a handy skill in different situations.
Emergency Power Solutions
A cordless drill generator offers a quick power source during emergencies. It can charge small devices like phones or flashlights. This is useful when the main power is out. You can keep essential gadgets running. It helps maintain communication and light in dark times. This setup works well for short power interruptions.
Outdoor Usage Ideas
This generator is perfect for outdoor use. Camping trips become easier with a power source on hand. It can charge GPS devices or cameras. You can also power small fans or lights at your campsite. It adds comfort and safety without heavy equipment. The cordless drill generator is lightweight and easy to carry.
Frequently Asked Questions
What Materials Are Needed For A Cordless Drill Generator?
You need a cordless drill, wire coil, magnets, rectifier, and batteries. These parts work together to convert mechanical energy into electrical power efficiently.
How Does A Cordless Drill Generate Electricity?
The drill’s motor spins magnets inside a coil. This movement induces electrical current through electromagnetic induction, producing usable electricity.
Can A Cordless Drill Generator Power Household Devices?
Yes, but only low-power devices. The generator produces limited voltage and current, suitable for small electronics or emergency charging.
Is It Safe To Build A Cordless Drill Generator?
Yes, if you follow safety guidelines. Use insulated tools, avoid water, and handle electrical components carefully to prevent accidents or damage.
Conclusion
Building a cordless drill generator is a simple, useful project. You save money by reusing old parts. It also helps you learn basic electrical skills. Always follow safety steps to avoid accidents. This small generator can power drills during outdoor work.
Try it yourself and see how it works. Keep tools and parts organized for easy assembly. Enjoy the satisfaction of creating something practical and handy.