

Are your cordless drills scattered around, making it hard to find the right one when you need it? Imagine having a neat, easy-to-access storage solution that keeps your drills safe and ready to use.
In this post, you’ll discover simple, effective ways to create your own cordless drill storage. Whether you have just one drill or a whole collection, these tips will help you save time, protect your tools, and keep your workspace clutter-free.
Keep reading to learn how to make a storage setup that works perfectly for you.

Credit: www.dgmindia.in
Choosing The Right Storage Spot
Choosing the right storage spot for your cordless drill is key to keeping your workspace tidy and safe. A good spot saves time and protects your drill from damage. It also helps you find the drill quickly when you need it.
Assessing Your Workspace
Start by looking at the space you have. Check walls, shelves, and drawers for storage options. Think about the size of your drill and its case. Measure the area to make sure the drill fits well. Avoid cluttered or crowded places. Choose a clean, dry spot to prevent rust and dirt buildup.
Considering Accessibility And Safety
Keep the drill where you can reach it easily. Store it at a height that avoids bending or stretching. Make sure the spot is away from children and pets. Use locks or covers if needed. Avoid places near water or heat sources. Safety helps stop accidents and keeps your drill working longer.

Credit: www.youtube.com
Materials Needed For Diy Organizer
Creating a cordless drill storage organizer needs some basic materials. Choosing the right supplies makes the project easier and the result better. This section explains what you need to start building your DIY organizer.
Basic Tools And Supplies
Start with a sturdy wooden board or plywood for the base. You need screws or nails to hold pieces together. A drill or screwdriver helps to fix parts firmly. Sandpaper smooths rough edges for safety. Measuring tape or ruler ensures accurate cuts and spacing. A pencil marks where to cut or drill. Clamps can hold pieces while you work. These basic items make the foundation of your organizer strong and reliable.
Optional Decorative Elements
Paint or wood stain improves the look and protects the wood. Brushes or rollers apply paint evenly. Stick-on labels help to identify drill types or bits. Decorative knobs or hooks add style and extra storage. Foam padding or rubber mats prevent tools from slipping. These extras make your organizer unique and user-friendly.
Designing Your Drill Storage
Designing your cordless drill storage means creating a place that fits your space and tools well. It helps keep your drills safe, easy to find, and ready to use. Good design saves time and protects your drills from damage.
Choose a style that suits your room and how often you use the drill. Think about space, convenience, and how many drills you have. The right storage keeps your workspace neat and your tools in good shape.
Wall-mounted Options
Wall-mounted storage keeps drills off the floor and within reach. You can use hooks, shelves, or custom racks to hold drills and accessories. This option saves floor space and makes your tools visible.
Mount near your workbench for quick access. Use strong materials to hold the weight safely. Label each spot for easy drill placement and faster work.
Portable Storage Boxes
Portable boxes let you carry drills to different places easily. Choose boxes with compartments to keep drills and bits separate. Look for sturdy handles and secure latches for safety.
Boxes protect your drills during transport and keep small parts organized. Clear lids help you see contents without opening the box.
Drawer Organizers
Drawer organizers fit inside tool chests or cabinets. They divide space into sections for drills, batteries, and bits. This keeps everything tidy and stops items from moving around.
Use foam inserts or plastic trays for extra protection. Drawers hide tools from dust and give your workspace a clean look.
Step-by-step Building Guide
Building your own cordless drill storage is a smart way to keep tools organized. This guide breaks the process into easy steps. Follow along to create a simple, effective storage solution. You will save time and protect your drill and accessories.
Preparing Materials
Start by gathering all materials before building. You need wood boards, screws, and drill bits. Also, get sandpaper, wood glue, and paint or stain. Measure your cordless drill and batteries to size the storage correctly. Use a pencil and ruler to mark cuts on wood.
Assembly Tips
Cut wood pieces carefully along marked lines. Sand edges smooth to avoid splinters. Attach base and sides using screws and wood glue. Keep pieces square by checking corners with a carpenter’s square. Make holes for drill and batteries using a drill bit. Work slowly to ensure all parts fit well.
Finishing Touches
Sand the entire storage unit for a smooth finish. Apply paint or stain to protect wood and improve look. Let paint dry completely before use. Add hooks or small shelves for extra tool storage. Place your cordless drill and accessories neatly inside. Your custom storage is now ready and strong.
Customizing For Batteries And Accessories
Customizing your cordless drill storage for batteries and accessories makes your workspace neater. It keeps everything in one spot and easy to find. Proper storage protects batteries and helps them last longer. Accessories like drill bits and chargers also need special places. Organize these parts to save time and reduce clutter.
Charging Station Ideas
Create a dedicated charging station for your drill batteries. Use small shelves or boxes to hold batteries while charging. Label each spot to know which battery is charging. Place the station near power outlets for easy access. Use cable clips or ties to keep cords neat and untangled.
Organizing Bits And Chargers
Store drill bits in small containers or magnetic strips. Sort bits by size or type for quick selection. Use clear containers to see bits without opening them. Keep chargers in a separate box or drawer to avoid damage. Label each charger to match the correct battery and drill model.
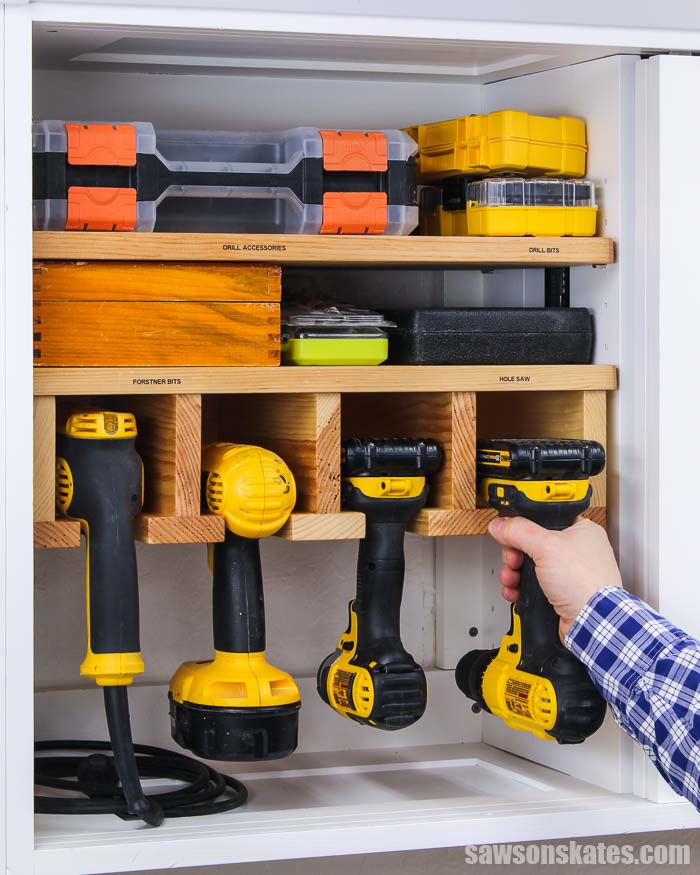
Credit: sawsonskates.com
Maintaining Your Drill Storage
Maintaining your cordless drill storage keeps your tools safe and ready to use. Proper care extends the life of both the storage and the drill. Small efforts can prevent damage and clutter. Regular checks and cleaning help keep your workspace neat.
Cleaning And Upkeep
Dust and dirt can build up inside the storage unit. Use a soft cloth to wipe surfaces weekly. Avoid water or harsh chemicals that can damage the material. Check for any signs of rust or wear. Remove debris from compartments to keep them clear.
Make sure the drill batteries are stored separately in a cool, dry place. This prevents moisture damage. Regularly clean battery contacts with a dry cloth to ensure good connection.
Adjusting For New Tools
Your drill storage should fit new tools as your collection grows. Measure new drills or accessories before adding them. Adjust shelves or dividers to create space. Customizing compartments avoids damage during storage.
Use foam inserts or small boxes to organize smaller parts. This keeps everything in place and easy to find. Check for loose screws or hinges and tighten them to keep the storage sturdy.
Frequently Asked Questions
What Materials Are Best For Cordless Drill Storage?
Wood, plastic, and metal are ideal for cordless drill storage. Wood offers durability and customization. Plastic is lightweight and affordable. Metal provides strength and protection. Choose materials based on your workspace, budget, and desired storage style for optimal organization and tool safety.
How Do I Organize Cordless Drills Efficiently?
Use wall-mounted racks, pegboards, or custom shelves to organize drills. Label each spot for easy identification. Keep batteries and chargers nearby. This system saves space, prevents damage, and ensures quick access, enhancing your workflow and tool maintenance.
Can I Make Portable Storage For Cordless Drills?
Yes, portable storage options include compact cases or rolling toolboxes. Use foam inserts to secure drills and accessories. Portable storage protects tools during transport and allows convenient usage at different job sites or locations.
How To Protect Cordless Drills From Dust And Damage?
Store drills in closed containers or cases to shield from dust. Use padding or foam inserts to prevent impacts. Regularly clean and inspect your storage area to maintain tool condition and prolong cordless drill lifespan.
Conclusion
Storing your cordless drill properly saves space and protects it. Simple storage ideas keep your tools neat and easy to find. Use shelves, hooks, or small boxes for a tidy setup. Organizing your drill helps you work faster and avoid damage.
Try different storage methods to see what fits best. Keeping your tools in order makes every project smoother and more fun. Take a few minutes to create a good storage spot today. Your drill will thank you with longer life and quick access.