

Are you ready to create a beautiful outdoor table without any complicated tools? Imagine building your own sturdy table using just one cordless drill—no extra machines, no hassle.
This guide will show you exactly how to turn simple materials into a perfect spot for your backyard gatherings. Whether you’re a beginner or just want a quick, easy project, you’ll find step-by-step tips that make the process smooth and fun.
Keep reading, and you’ll have your very own outdoor table ready before you know it.
Materials And Tools Needed
Building an outdoor table is easier than you think. The right materials and tools make the job smooth and fun. You only need a cordless drill and a few supplies. These will help you create a sturdy and beautiful table for your outdoor space.
This section covers the wood, hardware, and cordless drill you need. Each part plays a key role in your table’s success. Let’s explore what to gather before starting your project.
Selecting The Right Wood
Choose wood that resists water and sun damage. Cedar, redwood, and treated pine work well outdoors. These woods last long without rotting or warping. Pick boards that are straight and free of cracks. Smooth wood makes your table look neat and safe to touch.
Essential Hardware Components
Gather screws that fit your wood type. Use outdoor-rated screws to avoid rust. Hinges or brackets help hold parts firmly in place. Sandpaper smooths rough edges for a clean finish. A measuring tape and pencil help with precise cuts and assembly.
Choosing The Best Cordless Drill
Pick a cordless drill with good battery life and power. A drill with adjustable speed works best for different tasks. Choose one with a comfortable grip to avoid hand strain. Make sure it fits standard drill bits and screwdriver heads. This tool will save time and effort during assembly.
Credit: www.milwaukeetool.com
Preparing Your Workspace
Preparing your workspace is the first step to building an outdoor table with a cordless drill. A clean, organized area helps you work faster and safer. It keeps all tools and materials close at hand. This reduces stress and avoids mistakes. Take time to set up a good workspace before starting your project.
Setting Up A Safe Area
Choose a flat, open space outside. Avoid places near children or pets. Clear the area of any clutter or obstacles. Make sure the ground is stable and dry. This will prevent slips and falls. Keep a first aid kit nearby. Safety glasses and gloves protect your eyes and hands. Good lighting is essential to see clearly. Safety first for a smooth build.
Organizing Materials For Efficiency
Gather all wood pieces, screws, and drill bits before you start. Arrange them in the order you will use them. Keep small items in containers to avoid losing them. Place your cordless drill within easy reach. Group similar tools together for quick access. This saves time and keeps your focus. A tidy workspace helps you build with ease and speed.
Cutting And Measuring Wood
Cutting and measuring wood are key steps in making an outdoor table. Accurate cuts ensure the table fits together well. Measuring right keeps the wood pieces the right size. This process needs care and simple tools. A cordless drill helps with drilling and screwing, but cutting and measuring take careful attention.
Marking Accurate Measurements
Use a tape measure to get exact lengths. Mark the wood clearly with a pencil. Draw lines where you will cut. Double-check each measurement before marking. Measure twice, cut once. Use a square tool to make straight lines. This helps keep edges even and corners right.
Tips For Straight Cuts Without Power Saws
Use a handsaw with a steady hand for cutting. Clamp the wood to a table or bench. This stops the wood from moving. Follow the pencil line carefully while sawing. Saw slowly to keep the cut straight. Use a sanding block to smooth rough edges after cutting. Patience is key for neat cuts without power tools.
Drilling And Assembling The Table Frame
Drilling and assembling the table frame is a key step in building a sturdy outdoor table. This stage shapes the table’s strength and stability. Using only a cordless drill makes the process simple and efficient.
Focus on precision and care while drilling and joining the pieces. Proper technique ensures the frame holds together well and lasts long.
Drilling Pilot Holes Correctly
Start by marking where to drill pilot holes. These small holes guide screws and stop the wood from splitting. Use a drill bit slightly smaller than the screw width. Hold the drill steady and drill straight into the wood.
Drill slowly to keep control. Check the hole depth to avoid going through the other side. Pilot holes make screwing easier and create a tight fit.
Joining Pieces Securely
Align the wood pieces carefully before joining. Clamp them if needed to keep steady. Insert screws into the pilot holes using your cordless drill. Drive screws in slowly to avoid stripping.
Place screws evenly for balanced support. Tighten screws until snug but avoid over-tightening. Secure joints keep the table frame stable and strong for outdoor use.
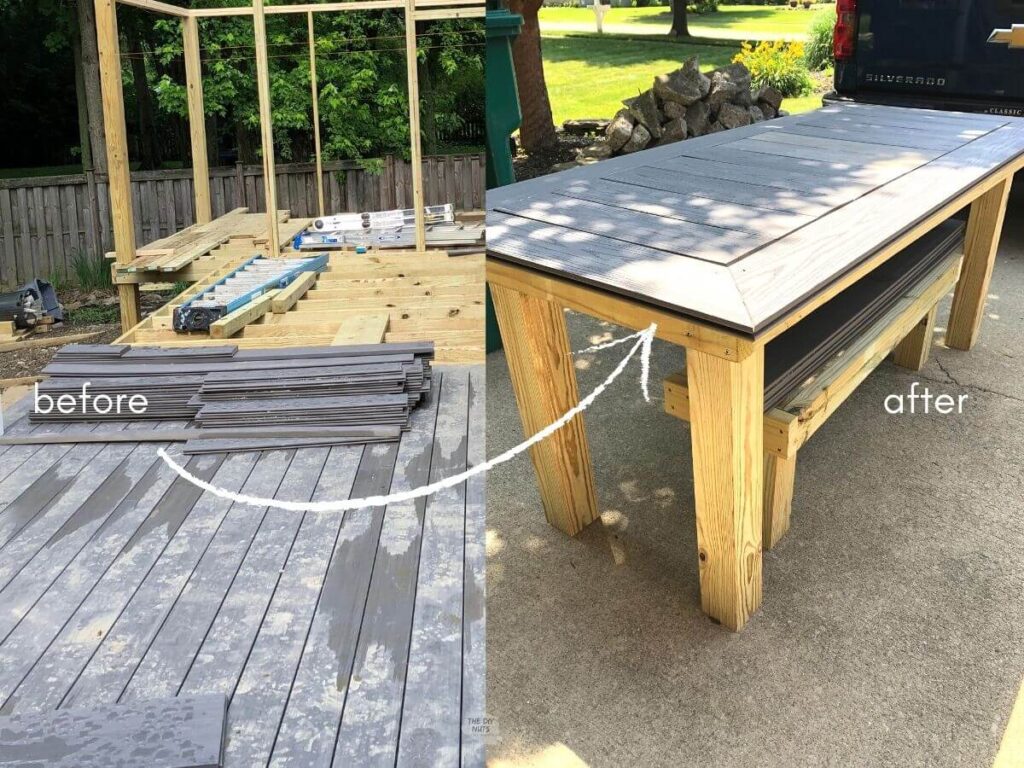
Constructing The Tabletop
Constructing the tabletop is a key step in making your outdoor table. This part holds the entire structure together. Start by choosing strong wooden planks. The quality of these planks affects the table’s durability.
Preparing the tabletop carefully ensures a flat and sturdy surface. A smooth, even top makes the table more comfortable to use. Follow simple steps to align and secure the planks using your cordless drill.
Aligning Wooden Planks
Begin by laying the wooden planks side by side. Check that the edges fit tightly without big gaps. Use a flat surface to keep them even. Adjust the planks until they form a straight line. This helps create a neat tabletop. Measure the length to make sure all planks match.
Securing The Surface With Screws
Use your cordless drill to drive screws through the planks. Space the screws evenly for strong support. Screws prevent the wood from moving or warping over time. Drill slowly to avoid splitting the wood. Tighten the screws just enough to hold the planks firmly. Secure both ends and the middle of the tabletop.

Credit: www.youtube.com
Finishing Touches
Finishing touches give your outdoor table a polished, professional look. They protect the wood and make the table last longer. Proper finishing also improves the table’s feel and appearance. Take time to do these steps carefully for the best results.
Sanding For Smoothness
Start by sanding the entire table surface. Use medium-grit sandpaper to remove rough spots. Then switch to fine-grit sandpaper for a smooth finish. Sand along the wood grain to avoid scratches. Wipe away dust with a clean cloth before moving on.
Applying Weatherproof Sealant
Choose a sealant designed for outdoor wood. Apply it evenly using a brush or cloth. Cover all surfaces, including edges and legs. Let the sealant dry completely according to instructions. Add a second coat for extra protection if needed. This step keeps your table safe from rain and sun damage.
Maintenance Tips For Longevity
Building an outdoor table with a cordless drill is just the start. Keeping it in good shape ensures it lasts for years. Simple care steps help protect your table from damage and wear. Regular attention keeps the wood strong and looking fresh. Here are easy maintenance tips to follow.
Regular Cleaning Routines
Dust and dirt can wear down your table’s surface. Clean it often with a soft cloth or brush. Use mild soap and water for sticky spots. Avoid harsh chemicals that can damage the wood. Dry the table well after cleaning to stop moisture buildup. This simple habit prevents stains and wood rot.
Protecting Against Outdoor Elements
Sun, rain, and wind can harm your table over time. Cover the table with a waterproof cover when not in use. Move it to a shaded spot to reduce sun damage. Apply a wood sealant or outdoor paint yearly. These protect the wood from moisture and fading. Checking for cracks or loose screws keeps the table safe and steady.
Credit: thediynuts.com
Frequently Asked Questions
What Materials Do I Need For An Outdoor Table Build?
You need wood planks, screws, wood glue, sandpaper, and a cordless drill. Choose weather-resistant wood for durability. Gather all tools before starting.
How Do I Use A Cordless Drill For Table Assembly?
Use the drill to pre-drill holes and drive screws. It ensures tight joints and faster assembly. Adjust drill speed for precision.
Can I Make A Sturdy Table With Only A Cordless Drill?
Yes, a cordless drill can create strong joints if used properly. Pre-drill holes to prevent wood splitting. Use quality screws and wood glue for extra strength.
What Safety Tips Should I Follow When Drilling Wood Outdoors?
Wear safety goggles and gloves to protect yourself. Keep the work area clean and stable. Always check drill battery level before starting.
Conclusion
Building an outdoor table with only a cordless drill is simple and fun. The drill helps you save time and work easily. You do not need many tools or skills. Just follow the steps and take your time. In the end, you get a strong and useful table for your space.
Try this project to enjoy fresh air and your own handiwork. It feels good to make something with your hands. Keep practicing, and your skills will grow.