

If you want to get the most out of your drill press, knowing how to raise and lower it smoothly is key. Whether you’re working on a DIY project or tackling professional tasks, mastering this simple skill saves you time and effort.
In this guide, you’ll discover easy steps to adjust your drill press with confidence. By the end, you’ll feel more in control and ready to handle any drilling job with precision. Keep reading—you’re just moments away from improving your workshop skills.
Credit: myfuse.education
Drill Press Basics
A drill press is a powerful tool used for drilling holes with precision. It holds the drill bit steady and moves it straight down into the workpiece. Understanding the basics helps you use it safely and effectively. This section covers the main parts and types of drill presses.
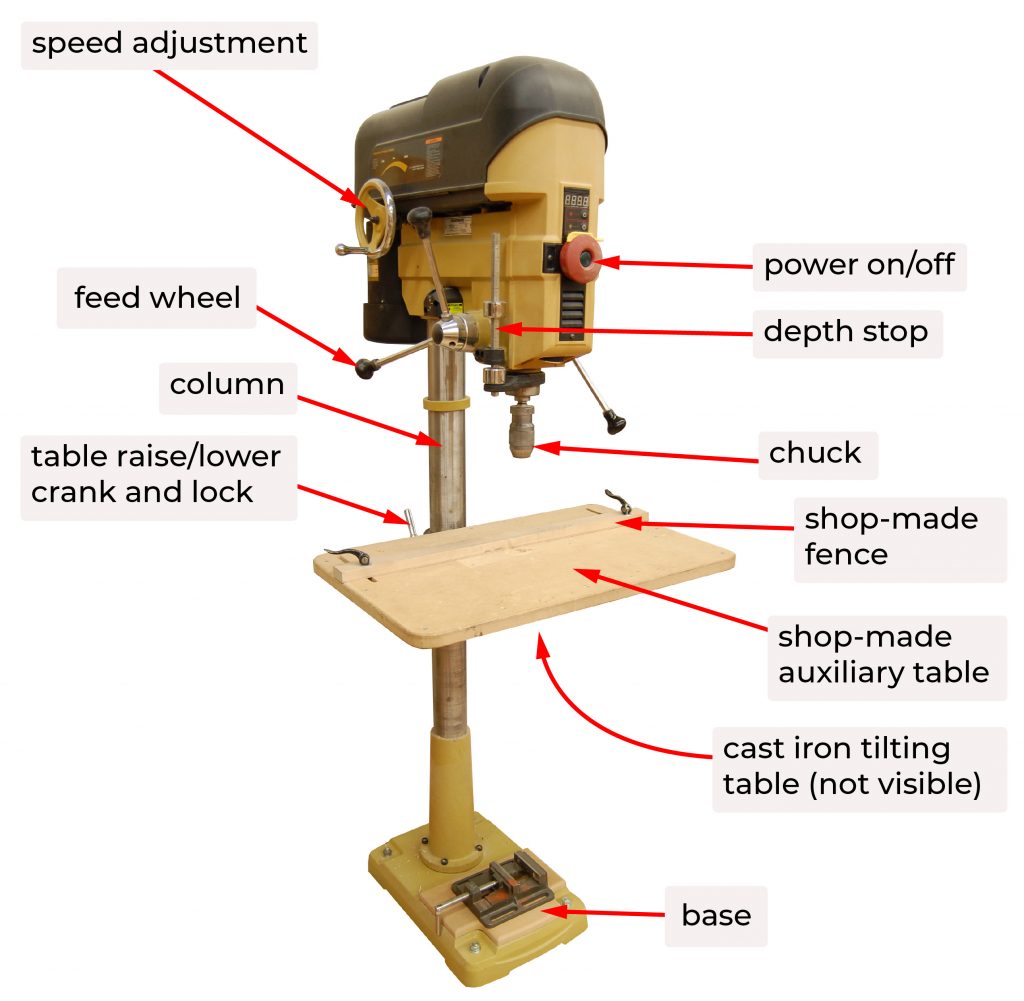
Key Components
The drill press has several important parts. The base supports the machine and keeps it stable. The column is a vertical pole that holds the head and table. The table supports the workpiece and can move up or down. The head contains the motor and spindle, which spins the drill bit. The feed handles let you raise and lower the drill bit smoothly.
Types Of Drill Presses
There are different types of drill presses for various tasks. The bench-top drill press is small and sits on a workbench. It is good for light jobs and small spaces. The floor drill press is larger and stands on the floor. It handles bigger projects and heavier materials. Radial arm drill presses allow the arm to move, giving more flexibility. Choose the type that fits your needs and workspace.
Safety Precautions
Working with a drill press needs care and attention. Safety precautions help avoid accidents and injuries. Follow these tips to keep yourself safe while raising and lowering the drill press.
Protective Gear
Always wear safety glasses to protect your eyes from flying debris. Use ear protection to reduce loud noise. Wear gloves only if they do not get caught in moving parts. Avoid loose clothing and tie back long hair. Proper footwear helps keep your feet safe from falling objects.
Workspace Setup
Keep the area clean and free of clutter around the drill press. Make sure the floor is dry to prevent slipping. Use good lighting to see clearly what you are doing. Keep tools and materials organized and within reach. Check that the drill press is stable before starting work.
Preparing The Drill Press
Before raising or lowering the drill press, get ready carefully. Preparation helps avoid accidents and ensures smooth operation. Start by making sure the drill press is in good working order.
Check the power supply and inspect the tool parts. These steps protect you and your equipment.
Power Check
First, confirm the drill press is unplugged before any adjustments. This step stops the machine from starting by mistake. Look at the power cord for cuts or damage. A broken cord can cause shocks or fire.
Plug in the drill press only after you finish all checks. Make sure the power switch works smoothly. Test the switch by turning it on and off quickly. If it feels sticky or hard, fix or replace it before use.
Tool Inspection
Next, examine the drill press parts closely. Check the chuck for tightness to hold the drill bit firmly. Loose parts may cause the bit to wobble or come out.
Look at the drill bit for wear or damage. A dull or bent bit can ruin your work or break. Clean the table and column to remove dust and debris. Dirt can block smooth movement of the press.
Check the handles and feed mechanism for smooth motion. Lubricate if needed to avoid stiffness. Proper inspection keeps your drill press working well and safely.
Credit: mosaicosalvarez.com.ar
Raising The Drill Press
Raising the drill press table helps you work on different sizes of materials. It lets you adjust the height for better drilling control. This simple step improves your accuracy and safety during drilling.
Unlocking The Column
Start by finding the column lock. Usually, it is a lever or knob near the column. Turn or loosen it carefully. This allows the table to move up and down freely. Do not force it. The table should slide smoothly after unlocking.
Adjusting The Table Height
Hold the table firmly. Move it up to the needed height. Check the distance between the drill bit and the table. Make sure it fits your workpiece perfectly. Adjust slowly for precise positioning. Avoid sudden moves that could damage the machine.
Securing The Position
Once the table is at the right height, lock the column again. Tighten the lever or knob securely. This keeps the table stable during drilling. Test the table by pressing down lightly. It should not move or wobble. A secure table ensures safe and accurate drilling.
Lowering The Drill Press
Lowering the drill press table is an important step in adjusting the machine for your work. It lets you set the right height for the material you are drilling. Doing this safely and correctly keeps your work steady and precise.
Releasing The Lock
Start by finding the table lock. This lock holds the table in place. Turn or loosen the lock to free the table. Make sure the lock is fully released before moving the table. This prevents damage and keeps you safe.
Lowering The Table
Hold the table firmly with both hands. Slowly move the table down to the desired height. Use the handle or crank, depending on your drill press model. Move smoothly to avoid sudden drops. Check the height often to get it just right.
Locking The Table Again
Once the table is at the right height, tighten the lock. This secures the table firmly in place. Double-check that the lock is tight and the table does not move. A locked table ensures safe and accurate drilling.
Common Issues And Fixes
Raising and lowering a drill press table may seem simple. Problems can arise that stop smooth movement. Knowing common issues helps fix them fast. This saves time and keeps your work safe.
Table Stuck
A stuck table usually means dirt or rust blocks the path. Clean the column and table support with a cloth. Use light oil to remove rust and add smoothness.
Check the locking lever. It might be too tight or jammed. Loosen it carefully and try to move the table again. Tighten the lever only after you find the right position.
Uneven Movement
Uneven movement happens when the table tilts or moves jerkily. Look for bent or damaged parts in the raising mechanism. Replace any broken parts immediately.
Grease the screw and gears inside the column. Lack of lubrication often causes rough motion. Move the table slowly to spread the grease evenly.
Maintenance Tips
Maintaining your drill press ensures smooth operation and long life. Simple care keeps the raising and lowering functions working well. Regular maintenance prevents costly repairs and downtime.
Lubrication
Keep moving parts lubricated to reduce friction. Use light machine oil on the spindle and quill. Avoid over-oiling to prevent dust buildup. Lubricate the rack and pinion or pulley system. Smooth movement depends on proper lubrication.
Regular Inspections
Check the drill press for wear and tear often. Look for loose bolts and screws. Inspect the belts for cracks or fraying. Test the raising and lowering mechanism for smooth action. Early detection of issues saves time and money.
Credit: www.woodsmith.com
Frequently Asked Questions
How Do You Raise A Drill Press Safely?
To raise a drill press, unlock the rack-and-pinion mechanism carefully. Turn the crank or handle slowly while supporting the drill head. Always ensure the machine is turned off before adjusting height to avoid accidents and maintain control.
What Is The Best Way To Lower A Drill Press?
Lower the drill press by releasing the locking lever or knob. Turn the crank handle slowly to bring the drill head down. Maintain a firm grip to prevent sudden drops and ensure precise positioning for your work.
Can I Adjust Drill Press Height Without Tools?
Yes, most drill presses have a built-in crank or handle for height adjustment. You do not need additional tools. Just unlock the height lock, turn the crank to raise or lower, then re-lock securely before use.
Why Is Proper Drill Press Height Adjustment Important?
Proper height adjustment ensures accurate drilling depth and alignment. It prevents bit damage and workpiece errors. Correct positioning improves safety and efficiency during drilling tasks, leading to better project outcomes.
Conclusion
Raising and lowering a drill press is simple with the right steps. Always check the height before starting your work. Adjust the table smoothly to avoid mistakes. Keep your hands clear of moving parts for safety. Practice these steps to feel confident and work efficiently.
Regular care helps your drill press last longer. A well-set drill press makes your projects easier and better. Take your time, and you will improve quickly.