

If your Dewalt cordless drill isn’t working like it used to, the problem might be with its gears. Knowing how to reassemble Dewalt cordless drill gears can save you time and money.
You don’t have to be an expert to fix it yourself. This guide will walk you through each step clearly and simply. By the end, your drill will feel almost brand new. Ready to get your tool back in top shape?
Let’s dive in.
Credit: scala-santa.com
Tools And Materials Needed
Reassembling the gears of a Dewalt cordless drill needs the right tools and materials. Having these ready makes the process smooth and safe. Without them, the task may become hard or even cause damage.
Gathering the right tools helps you work faster. It also protects the small parts from loss or breakage. Below are the main tools and materials needed for this job.
Basic Hand Tools
You will need screwdrivers, both flathead and Phillips. A small wrench or socket set helps with bolts. Tweezers or needle-nose pliers assist in handling tiny parts.
Cleaning Supplies
Use a soft cloth to wipe parts clean. A brush with soft bristles helps remove dirt from gears. Isopropyl alcohol or a mild cleaner ensures no grease or dust remains.
Lubricants
Grease designed for power tools reduces wear. Use a small amount to keep gears moving smoothly. Avoid over-lubricating, which can attract dust and grime.
Replacement Parts
Sometimes, old gears or springs wear out. Keep spare parts ready, especially gears and washers. Check the drill’s manual for the exact parts needed.
Safety Equipment
Wear safety glasses to protect your eyes. Gloves keep your hands safe from sharp edges. A clean workspace avoids losing small parts during assembly.
Safety Precautions
Safety is the top priority when reassembling Dewalt cordless drill gears. Proper precautions protect you and your tool. Follow simple safety steps to avoid accidents and damage.
Working with small parts and tools needs care. Even a small mistake can cause injury or break the drill. Prepare your workspace and equipment before starting.
Wear Protective Gear
Always wear safety glasses to protect your eyes from debris. Use gloves to avoid cuts from sharp edges. Closed-toe shoes help protect your feet.
Disconnect The Battery
Remove the battery before starting any work on the drill. This prevents accidental starts and electrical shocks. Check twice to ensure power is off.
Work In A Clean Area
Choose a well-lit and tidy workspace. Keep tools and parts organized to avoid losing pieces. A clean area reduces chances of accidents.
Handle Gears Carefully
Gears are small and fragile. Handle them gently to avoid damage. Use tools designed for small parts to keep control.
Follow Manufacturer Instructions
Use the Dewalt manual for specific guidance. Follow steps exactly to avoid mistakes. Manufacturer advice ensures safe and proper reassembly.
Disassembling The Drill Gears
Disassembling the drill gears is the first step in fixing or cleaning your Dewalt cordless drill. It needs care and attention to avoid damage. Follow the steps carefully to take apart the gears safely. Keep your workspace clean and organized. This helps you find small parts easily and prevents loss.
Take your time. Rushing can cause mistakes or broken pieces. Use the right tools and work in a bright area. These tips make the process smoother and safer.
Removing The Battery
Start by taking out the battery from the drill. Press the release buttons on both sides of the battery pack. Pull the battery straight out. Never try to open the drill with the battery still inside. This step keeps you safe from electric shocks or accidental starts.
Opening The Drill Casing
Next, remove the screws holding the drill casing. Use a screwdriver that fits well to avoid stripping screws. Keep the screws in a small container. Carefully separate the two halves of the casing. Watch for any wires connected inside. Do not pull the casing apart quickly. Gently open it to avoid breaking wires or clips.
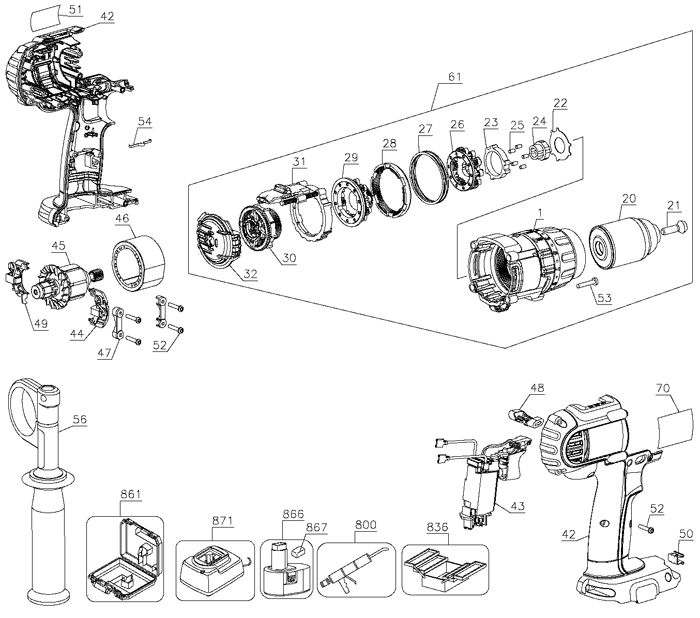
Extracting The Gear Assembly
Look inside the drill to find the gear assembly. It usually sits near the motor. Check for any clips or screws holding the gears. Remove these carefully with the right tool. Slowly lift the gear assembly out of the casing. Place it on a clean surface. Make sure not to lose any small springs or washers attached.

Credit: www.youtube.com
Inspecting Gears And Components
Inspecting the gears and components is a key step in reassembling a Dewalt cordless drill. This step ensures the drill works smoothly and lasts longer. Careful examination helps find issues like wear, cracks, or dirt that affect performance.
Taking time to inspect each part prevents future problems. It also saves money by fixing small issues early. A clean and well-maintained gear system runs quietly and efficiently.
Checking For Wear And Damage
Start by looking closely at each gear tooth. Check for chips, cracks, or uneven wear. Worn teeth can slip or break under pressure. Also, inspect shafts and bearings for smooth movement. Any roughness or play means parts need replacement.
Look for signs of rust or corrosion. These reduce gear strength and cause noise. Use a bright light and magnifying glass for a better view. Small damage can cause big problems later.
Cleaning Gear Parts
Remove dirt, grease, and old lubricant from all gear parts. Use a soft brush and a mild cleaner. Avoid harsh chemicals that can damage plastic or metal. Dry parts completely before reassembly.
Clean gears mesh smoothly and reduce wear. Dirt buildup causes friction and overheating. Regular cleaning extends the life of your drill.
Reassembling The Gear System
Reassembling the gear system of your Dewalt cordless drill is a careful process. Each gear must fit perfectly for smooth operation. This section guides you through proper gear positioning, applying lubrication, and securing the assembly. Follow these steps to ensure your drill works like new again.
Positioning The Gears Correctly
Start by placing the main gear on its shaft. Make sure the teeth align with the smaller gears. Check that all gears rotate freely without sticking. Proper alignment prevents damage and ensures power transfers smoothly. Take your time to avoid forcing any parts into place.
Lubricating Gear Components
Apply a light coat of grease to each gear’s teeth. Use grease made for power tools or machinery. Lubrication reduces friction and wear inside the drill. Avoid over-applying as excess grease can attract dirt. Spread the grease evenly for best results.
Securing The Gear Assembly
Once the gears are in place and lubricated, secure them with their retaining clips or screws. Tighten screws firmly but do not strip them. Double-check that gears still move smoothly after securing. This step keeps the gears stable during drill operation.
Closing The Drill Housing
Closing the drill housing is a key step in reassembling your Dewalt cordless drill gears. This process protects the internal parts and ensures the drill works smoothly. Careful handling during this step helps avoid damage and keeps the drill safe to use.
Take your time to fit the housing correctly. A tight and proper closure prevents dust and debris from entering the drill. It also keeps the gears aligned and ready for action.
Aligning The Casing
Start by matching the two halves of the drill housing. Look for the tabs and slots that fit together. Line them up carefully. Avoid forcing the parts; they should slide together easily. Check that no wires or parts are caught between the casings. Proper alignment ensures the drill closes evenly and fits snugly.
Fastening Screws Properly
Use the correct screwdriver to avoid stripping the screws. Tighten each screw slowly and evenly. Do not overtighten; this can crack the plastic housing. Start with screws near the center, then move outward. This balances the pressure and secures the housing firmly. Double-check all screws to confirm they are snug but not too tight.
Testing The Reassembled Drill
Testing the reassembled Dewalt cordless drill is important. It ensures the gears fit and work well together. Proper testing helps avoid damage and ensures safety. Follow these steps to check your drill after reassembly.
Reinstalling The Battery
Start by placing the battery back into the drill. Make sure it clicks in place securely. A loose battery can cause the drill to stop working. Check the battery charge to guarantee enough power for testing.
Performing Function Checks
Turn the drill on and off several times. Listen for unusual sounds like grinding or clicking. Test the drill at different speeds to check gear movement. Try running it without a drill bit first. Confirm the drill spins smoothly and stops quickly when released.

Credit: www.ebay.com
Troubleshooting Common Issues
Troubleshooting common issues helps you fix your Dewalt cordless drill gears fast. Problems like gear misalignment, strange noises, or power failure can stop your drill from working well. Understanding these issues saves time and prevents damage.
Gear Misalignment
Gear misalignment happens if gears do not fit correctly. This causes the drill to feel rough or jam. Check each gear’s position carefully during reassembly. Make sure all gears sit straight on their shafts. Use gentle pressure to avoid bending parts. Misaligned gears reduce drill performance and can break parts.
Unusual Noises
Unusual noises come from worn or loose gears. Grinding or clicking sounds mean gears may be damaged or not seated well. Inspect gears for cracks or missing teeth. Tighten any loose screws or parts around the gear box. Lubricate gears lightly to reduce friction and noise.
Power Problems
Power problems can be caused by gear issues or electrical faults. If the drill won’t start or runs weakly, check gear engagement first. Broken gears or poor contact block power flow. Test the battery and switch for faults. Clean contacts and ensure proper gear alignment to restore power.
Frequently Asked Questions
How Do I Disassemble Dewalt Cordless Drill Gears Safely?
Start by removing the battery and chuck. Use the right screwdriver to open the casing. Handle gears gently to avoid damage.
What Tools Are Needed To Reassemble Dewalt Drill Gears?
You need a Phillips screwdriver, tweezers, and lubricant. A clean workspace is essential for efficient reassembly and gear alignment.
How To Align Gears Properly In Dewalt Cordless Drills?
Match the gear teeth carefully during reassembly. Ensure the gears mesh smoothly without gaps or overlaps to maintain drill performance.
Can I Reuse Old Gears When Reassembling My Drill?
Yes, if gears show no wear or damage. Replace gears if they are cracked or excessively worn to avoid malfunction.
Conclusion
Reassembling Dewalt cordless drill gears takes time and care. Follow each step slowly and check your work often. Keep parts clean and in order to avoid mistakes. Use the right tools to make the process easier. Practice helps build confidence and skill.
Soon, your drill will work like new again. Stay patient and enjoy fixing your drill yourself.