

If you’ve ever struggled with a stuck chuck on your Ridgid cordless drill, you know how frustrating it can be. Whether you need to change bits quickly or fix a jam, knowing how to remove the chuck easily saves you time and hassle.
In this guide, you’ll discover simple, step-by-step methods to get your chuck off without damaging your drill. Keep reading to unlock quick tips that make your tool work smoother and keep your projects moving forward.
Ridgid Cordless Drill Basics
The Ridgid cordless drill is a popular tool for many home and professional projects.
It offers power and flexibility without the hassle of cords.
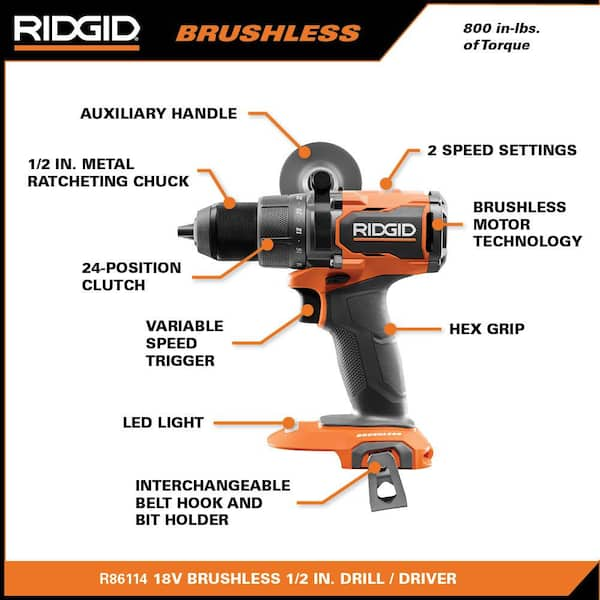
Understanding its basic parts helps you use and maintain it better.
The chuck is one key part. It holds the drill bit in place.
Key Features
Ridgid cordless drills have a strong motor for tough jobs.
The battery is rechargeable and lasts long during use.
They come with an ergonomic handle for comfort and control.
Speed settings allow you to adjust the drill for different tasks.
The drill is lightweight, making it easy to carry and use.
Types Of Chucks
Most Ridgid cordless drills use a keyless chuck.
This type lets you tighten or loosen the bit by hand.
Some models may have a keyed chuck, which uses a special tool to adjust.
Chucks come in different sizes, commonly 3/8 inch or 1/2 inch.
Choosing the right chuck size depends on your drill bit and project needs.
Credit: www.homedepot.com
When To Remove The Chuck
Knowing when to remove the chuck from your Ridgid cordless drill helps keep the tool working well. The chuck holds drill bits tightly. Over time, it can wear out or get damaged. Removing it at the right time saves you from bigger problems and keeps your drill safe to use.
Common Reasons
One common reason to remove the chuck is to replace a broken or worn-out part. The chuck can become loose and stop holding bits properly. Dirt and rust may build up, causing it to jam. Sometimes, you need to swap the chuck to fit a different type of drill bit. Removing it also helps when you want to clean the chuck deeply.
Signs Of Wear
Look for signs that the chuck is not working well. If the drill bits slip during use, the chuck may be worn. Strange noises or stiffness when turning the chuck also show problems. Rust or visible damage means the chuck needs attention. A worn chuck can affect drilling accuracy and safety. These signs mean it is time to remove and check the chuck.
Tools Needed
Removing the chuck from a Ridgid cordless drill is easier with the right tools. Having the correct items ready helps you finish the job quickly and safely. Some tools are essential, while others can make the process smoother. Below is a list of what you need.
Essential Tools
- Allen wrench or hex key – for loosening the chuck screw
- Adjustable wrench – to grip and turn the chuck
- Hammer – to tap the wrench gently if the chuck is stuck
- Work gloves – to protect your hands during the process
Optional Accessories
- Penetrating oil – to loosen rust or debris
- Soft cloth – for cleaning parts after removal
- Rubber mallet – an alternative to a hammer for gentle taps
- Bench vise – to hold the drill steady while working

Credit: www.youtube.com
Step-by-step Removal
Removing the chuck from a Ridgid cordless drill is simple with clear steps. Follow each part carefully to avoid damage. This guide helps you take off the chuck safely and quickly.
Prepare The Drill
First, remove the battery from the drill. This prevents the drill from turning on by accident. Clean the chuck area to see all parts clearly. Get a cloth and some tools ready. A hex wrench and a screwdriver might be needed.
Unlock The Chuck
Hold the drill firmly. Rotate the chuck counterclockwise to loosen it. Use your hand or a tool if it is too tight. Some models have a locking ring; move it aside carefully. Keep turning until the chuck opens fully and stops.
Detach The Chuck
Look inside the chuck for a small screw. It holds the chuck in place. Use a screwdriver to turn it counterclockwise and remove it. Once the screw is out, hold the chuck and pull it straight off. If it does not come out, tap it gently with a hammer handle.
Tips For Easy Removal
Removing the chuck from a Ridgid cordless drill can seem tricky. Simple steps make the process easier and safer. Follow these tips to avoid damage and handle tough chucks. Proper care saves time and tools.
Avoiding Damage
Always turn off the drill before starting. Remove the battery to stop power flow. Use the right tools, like a hex wrench or screwdriver. Work gently to prevent stripping screws or parts. Keep the drill clean to avoid dirt build-up. Avoid using excessive force on any part.
Handling Stubborn Chucks
Apply a small amount of penetrating oil to the chuck screw. Let it sit for a few minutes to loosen rust or dirt. Use a firm grip and steady pressure when turning the chuck. Tap lightly with a rubber mallet to help break it free. Try turning the chuck in both directions to find the loose side. Warm the chuck slightly with a heat source to expand metal parts.
Replacing Or Maintaining The Chuck
Replacing or maintaining the chuck on your Ridgid cordless drill keeps it working well. A worn or damaged chuck can cause the drill to slip or not hold bits tightly. Regular care helps the drill last longer and work better. This section explains how to install a new chuck and how to clean and lubricate the existing one.
Installing A New Chuck
First, remove the old chuck by loosening the screws inside. Use an Allen wrench to remove the set screw. Hold the drill firmly and turn the chuck counterclockwise. Pull the chuck off the spindle once it is loose. Align the new chuck with the spindle. Push it on firmly and tighten the set screw. Make sure the chuck fits snugly and spins smoothly before use.
Cleaning And Lubrication
Remove dust and debris from the chuck regularly. Use a dry brush or compressed air for cleaning. Avoid water or harsh chemicals that can cause rust. Apply a small amount of machine oil to the moving parts. Rotate the chuck to spread the oil evenly. Wipe off any extra oil to prevent dirt buildup. Clean and lubricate the chuck to keep it operating smoothly.

Credit: www.ifixit.com
Frequently Asked Questions
How Do I Remove The Chuck From A Ridgid Cordless Drill?
To remove the chuck, first remove the drill bit. Then, open the chuck jaws fully. Locate the chuck screw inside and unscrew it counterclockwise. Finally, use a wrench to turn the chuck counterclockwise and pull it off the spindle.
What Tools Are Needed To Remove The Chuck Safely?
You need an Allen wrench or hex key to remove the chuck screw. A pipe wrench or adjustable wrench helps to loosen and remove the chuck itself safely without damaging the drill.
Can I Remove The Chuck Without A Chuck Key?
Yes, if your Ridgid drill has a keyless chuck, you can open the jaws by hand. For a keyed chuck, use the chuck key to loosen the jaws before removing the chuck.
Why Is The Chuck Stuck On My Ridgid Drill?
The chuck may be stuck due to dirt, rust, or over-tightening. Applying lubricant and using proper tools to gently loosen it helps in safe removal without damage.
Conclusion
Removing the chuck from a Ridgid cordless drill is simple. Just follow the steps carefully. Use the right tools and take your time. This helps avoid damage and keeps your drill working well. Practice makes the process easier and faster.
Now, you can change bits safely and confidently. Keep your drill in good shape for many projects ahead.