

If you’ve ever tried changing a drill bit on your Makita cordless drill and felt stuck, you’re not alone. Knowing how to remove the chuck quickly and safely can save you time and frustration.
Whether you’re fixing a jam or upgrading your drill bits, mastering this simple step keeps your tool working smoothly. In this guide, you’ll discover clear, easy instructions that anyone can follow—no special skills needed. Keep reading, and you’ll be ready to handle your Makita drill like a pro.

Credit: www.powertools.parts
Identify The Chuck Type
Identifying the chuck type on your Makita cordless drill is the first step to remove it safely. Knowing the chuck type helps you choose the right tools and method. It makes the removal process faster and avoids damage.
Makita drills usually have two main chuck types. Each requires a different approach. Spotting the chuck type is easy if you know what to look for.
Keyed Chuck
A keyed chuck uses a small gear key to tighten or loosen. It has holes around the chuck body. You insert the key into these holes to turn and adjust the chuck.
This type often feels sturdy and secure. It is common in many older or heavy-duty Makita drills.
Keyless Chuck
A keyless chuck does not need a key to operate. You twist the chuck sleeve by hand to open or close it. It allows quick bit changes without tools.
Most modern Makita cordless drills use keyless chucks. They look smooth and have no holes for a key.
Visual Clues To Identify
Look closely at the chuck body. If it has holes or gears, it is keyed. If it is smooth and twists easily, it is keyless.
The size and shape also give clues. Keyed chucks are often bulkier, while keyless ones are sleek.
Prepare Your Workspace
Preparing your workspace is the first step to safely remove the chuck from a Makita cordless drill. A clean and organized area helps you work with ease. It also reduces the chance of losing small parts or tools.
Set up a flat surface with good lighting. This makes it easy to see what you are doing. Keep everything you need close by to avoid interruptions.
Clear The Area
Remove any clutter from your work surface. Clear space helps you focus on the drill. It also prevents accidents or damage to other items.
Collect all tools you might need before starting. Common tools include an Allen wrench, pliers, and a cloth. Having these ready saves time and frustration.
Wear Safety Gear
Put on safety glasses and gloves. Protect your eyes from dust or metal shards. Gloves help you grip the drill and avoid cuts.
Secure The Drill
Place the drill on a non-slip mat or clamp it gently. This stops the drill from moving while you work. Stability is key for safe chuck removal.
Gather Necessary Tools
Gathering the right tools makes removing the chuck from a Makita cordless drill easier. Having all tools ready saves time and avoids frustration. This step is important before starting any work on the drill.
Safety Gear
Wear safety glasses to protect your eyes from dust and debris. Use gloves to keep your hands safe and clean. Safety gear prevents accidents during the process.
Hex Wrench Or Allen Key
A hex wrench or Allen key fits the chuck screw inside the drill. This tool loosens the screw that holds the chuck in place. Choose the size that matches your drill model.
Adjustable Wrench Or Pliers
An adjustable wrench or pliers helps grip the chuck firmly. These tools provide the force needed to turn and remove the chuck. Use a tool that fits well to avoid slipping.
Soft Cloth Or Rag
A soft cloth protects the drill and tools from scratches. Wrap the cloth around the chuck before using the wrench. This prevents damage while applying force.
Power Off And Remove Battery
Powering off your Makita cordless drill and removing the battery is a vital first step. This ensures safety before you start removing the chuck. It stops the drill from accidentally starting during the process.
Always handle the drill with care. Removing the battery cuts all power to the tool. This simple action prevents any risk of injury.
Turn Off The Drill
Locate the power switch on your Makita cordless drill. Slide it to the off position. This stops the motor and prevents any movement.
Locate The Battery Pack
Find the battery pack at the base of the drill handle. It is usually clipped or slid into place. Knowing its position helps in quick removal.
Remove The Battery Pack
Press the release buttons on the sides of the battery pack. Pull the battery pack away from the drill. Store it safely while you work on the chuck.
Loosen The Chuck
Loosening the chuck on a Makita cordless drill is the first step to remove or change a drill bit. The chuck holds the bit tightly in place. To remove it, you must loosen this grip carefully. The process depends on the type of chuck your drill has. Some use a chuck key, while others are hand-tightened. Both methods are simple and do not need special tools.
Use The Chuck Key
Some Makita drills come with a chuck key. This small tool fits into the holes on the chuck. Insert the key and turn it counterclockwise. You will feel the chuck start to open. Keep turning until the drill bit loosens. Pull the bit out gently once the chuck is open enough. Store the chuck key safely for future use.
Hand-tightened Chucks
Many Makita cordless drills have hand-tightened chucks. These chucks open by twisting them with your hand. Grip the chuck firmly and turn it left. You might need to use some force. Once it loosens, the drill bit will come free. Always twist the chuck back to tighten it after changing the bit.
Credit: event.rmutt.ac.th
Remove The Chuck Screw
Removing the chuck screw is the first step to take off the chuck from your Makita cordless drill. This small screw holds the chuck tightly in place. Without removing it, you cannot detach the chuck safely.
The process is simple but requires the right tools and care. Follow the steps carefully to avoid damage to your drill or injury.
Locate The Screw
Look inside the chuck. You will find a small screw at the center. It usually has a left-hand thread. That means you turn it clockwise to loosen it, not counterclockwise like regular screws.
Check the screw carefully. It may have a slot for a flathead or a hex shape for an Allen wrench. Knowing the type helps you pick the right tool.
Unscrew With Proper Tool
Choose the correct screwdriver or Allen wrench. Insert it firmly into the screw head. Turn the screw clockwise to loosen it. This may take some force since it is tightly fixed.
Be patient and keep steady pressure. If the screw does not move, try applying a little penetrating oil. Let it sit for a few minutes before trying again.
Once loose, remove the screw completely. Keep it safe for reassembly later. Now you are ready to remove the chuck.
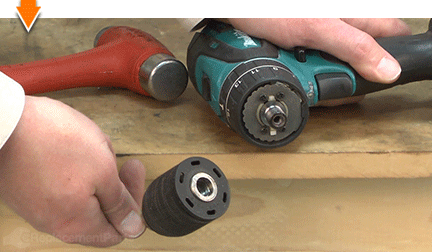
Detach The Chuck
Detaching the chuck from your Makita cordless drill is a simple process. It helps when you need to replace or clean the chuck. This guide shows easy ways to remove the chuck safely and quickly. Follow these steps to get the chuck off without damage.
Twist Off By Hand
First, try to remove the chuck by hand. Hold the drill firmly. Turn the chuck counterclockwise. Use steady force to loosen it. Most chucks come off easily this way. If it feels stuck, do not force too hard. Move to the next method.
Use A Wrench For Stubborn Chucks
For tight chucks, use a wrench to help. Find the flat sides on the chuck. Place the wrench on these flats. Turn the wrench counterclockwise slowly. This extra grip helps loosen the stuck chuck. Be careful not to damage the drill or chuck.
Clean And Inspect The Drill
Cleaning and inspecting your Makita cordless drill is important before removing the chuck. Dirt and dust can cause problems and damage the drill. Checking the drill carefully helps you spot any broken parts or wear. This makes sure the drill works well and lasts longer.
Take your time to clean the drill gently. Use the right tools and avoid harsh chemicals. Look closely at all parts to find any issues. A clean and well-checked drill is safer and easier to handle.
Remove Dust And Debris
Use a soft brush or cloth to remove dust from the drill. Pay attention to the chuck area and vents. Clean away all dirt to prevent it from entering the drill.
Compressed air can help blow out small debris. Hold the drill firmly and spray air carefully. Avoid using too much force that can damage parts.
Check For Damage Or Wear
Look closely at the chuck and surrounding parts. Check for cracks, rust, or worn teeth. These can cause the chuck to slip or not hold bits well.
Also, inspect the drill body for cracks or loose parts. Tighten any screws if needed. Replace damaged parts before removing the chuck.
Lubricate Moving Parts
Apply a small amount of light oil to the chuck’s moving parts. This helps the chuck open and close smoothly. Avoid over-oiling to prevent attracting dust.
Use a clean cloth to wipe away extra oil. Smooth moving parts make removing the chuck easier and safer.
Install A New Chuck
Installing a new chuck on your Makita cordless drill is a straightforward process. The right chuck keeps drill bits steady and secure during use. Replacing the old chuck ensures better performance and safety.
Follow the steps carefully to attach the new chuck properly. This will help your drill work smoothly and last longer.
Align And Attach
Start by aligning the new chuck with the drill’s spindle. The spindle is the part where the chuck fits. Push the chuck onto the spindle firmly. Make sure it sits straight and flush against the drill body. A well-aligned chuck prevents wobbling during drilling.
Secure With Chuck Screw
Use the chuck screw to lock the chuck in place. The screw goes inside the chuck, tightening it onto the spindle. Turn the screw clockwise using a screwdriver. Tighten it firmly but avoid over-tightening. This keeps the chuck steady and ready for use.

Credit: www.youtube.com
Test The New Chuck
Testing the new chuck on your Makita cordless drill is a key step after installation. It ensures the chuck holds drill bits firmly and works smoothly. This step helps avoid problems during your work and keeps the drill safe to use.
Check The Tightening Mechanism
Turn the chuck sleeve to tighten it. Insert a drill bit and twist the sleeve to lock it. The bit should feel secure without any wobble. If it slips, tighten the chuck more firmly.
Test The Chuck With The Battery On
Attach the battery and power on the drill. Run the drill at low speed first. Watch if the bit stays steady and does not shake. Increase speed gradually to see if the chuck holds well.
Listen For Unusual Noises
Operate the drill and listen closely. The chuck should turn quietly without grinding sounds. Any noise might mean the chuck is not seated correctly. Stop and check the installation again.
Perform A Drill Bit Change
Try changing the drill bit several times. The chuck should open and close smoothly. If it jams or feels stiff, remove and reinstall the chuck. Smooth action shows good alignment.
Safety Tips And Maintenance
Safety and maintenance are key when handling a Makita cordless drill. Proper care keeps you safe and your drill working well. Simple steps protect both you and your tool.
Always follow safety rules before starting any work. Clean and check your drill often. These habits extend the life of your drill and prevent accidents.
Wear Protective Gear
Always wear safety glasses to protect your eyes. Gloves help prevent cuts and improve grip. Avoid loose clothing that can catch on the drill.
Turn off the drill before removing the chuck. Take out the battery to stop the drill from running. This prevents accidental starts and injuries.
Use The Correct Tools
Use the right wrench or key to loosen the chuck. Avoid forcing parts to prevent damage. Proper tools make the job easier and safer.
Clean The Chuck Regularly
Remove dust and debris from the chuck after use. Wipe it with a dry cloth. Clean chucks hold drill bits better and last longer.
Lubricate Moving Parts
Apply light oil to the chuck’s moving parts occasionally. This keeps the mechanism smooth and prevents rust. Avoid using too much oil.
Store The Drill Properly
Keep the drill in a dry place away from moisture. Use the original case if available. Proper storage protects the drill and chuck from damage.
Frequently Asked Questions
How Do I Remove The Chuck On A Makita Cordless Drill?
To remove the chuck, first loosen it by hand or with a chuck key. Then, use an Allen wrench to unscrew the retaining screw inside the chuck. Finally, pull the chuck off the spindle by hand or gently tap it if needed.
What Tools Are Needed To Remove A Makita Drill Chuck?
You will need an Allen wrench to remove the chuck screw. A chuck key or your hands can loosen the chuck. Optionally, a hammer or mallet can help gently tap the chuck off the spindle if it’s stuck.
Can I Remove The Chuck Without Professional Help?
Yes, removing the chuck on a Makita drill is simple and safe. Follow the correct steps and use the proper tools. Always unplug or remove the battery before starting to avoid accidental activation.
Why Is The Chuck Stuck On My Makita Cordless Drill?
A stuck chuck is often caused by dirt, rust, or overtightening. Applying a small amount of lubricant and gently tapping can help loosen it. Avoid using excessive force to prevent damaging the drill or chuck.
Conclusion
Removing the chuck on a Makita cordless drill is simple with the right steps. Always make sure the drill is off and the battery is removed first. Use the proper tools and follow the instructions carefully. Taking your time helps avoid damage.
Practice makes this task easier each time. Now you can change drill bits quickly and safely. Keep your drill working well by doing this correctly.