

Are you struggling to remove the chuck from your drill press? You’re not alone.
Whether you need to replace it or just clean it, taking the chuck off can feel tricky and frustrating. But don’t worry—removing the chuck is easier than you think when you know the right steps. In this guide, you’ll learn simple, clear instructions to get the job done quickly and safely.
Keep reading, and you’ll have your drill press ready for any task in no time.
Tools Needed
Removing the chuck from a drill press requires the right tools. Having these tools ready helps you work safely and quickly. Each tool plays a specific role in the process. Using the correct tools also protects your drill press from damage.
Chuck Key
The chuck key unlocks the chuck jaws. It fits into the holes on the chuck. Turning the key loosens the grip on the drill bit. This tool is essential for removing the chuck safely.
Adjustable Wrench
An adjustable wrench helps loosen the chuck from the spindle. It fits different sizes of nuts or bolts. Use it carefully to avoid slipping and damaging parts.
Hammer Or Mallet
A hammer or mallet helps tap the spindle or chuck if it is stuck. Use light taps to avoid breaking parts. A rubber mallet is safer to prevent dents.
Penetrating Oil
Penetrating oil loosens rust or dirt on the chuck and spindle. Apply it before trying to remove the chuck. Let it sit for a few minutes to work well.
Safety Gloves
Wear safety gloves to protect your hands. They prevent cuts and bruises from sharp edges. Gloves also improve your grip on tools and parts.
Credit: forum.nwwoodworkers.org
Safety Precautions
Always unplug the drill press before removing the chuck to avoid accidents. Wear safety glasses to protect your eyes from metal shavings or debris. Keep hands clear of moving parts during the process.
Wear Safety Goggles
Protect your eyes from flying debris or metal shavings. Safety goggles prevent injuries while working on the drill press. Always wear them before starting any task.
Disconnect The Power
Unplug the drill press to avoid accidental starts. This step is crucial to keep your hands and fingers safe. Always double-check the power is off before removing the chuck.
Use Proper Tools
Use the correct wrench or chuck key to loosen the chuck. Using wrong tools can damage the drill or cause injury. Make sure tools fit well and are in good condition.
Secure The Drill Press
Lock the drill press or clamp it to a stable surface. This prevents movement during chuck removal. Stability helps avoid slips and accidents.
Keep Hands Clear
Keep your hands away from moving parts and sharp edges. Place them on safe areas while working. This reduces the risk of cuts or pinching.
Work In A Clean Area
Clear the workspace from clutter and spills. A tidy area helps you focus and move safely. It also prevents tripping hazards near the drill press.
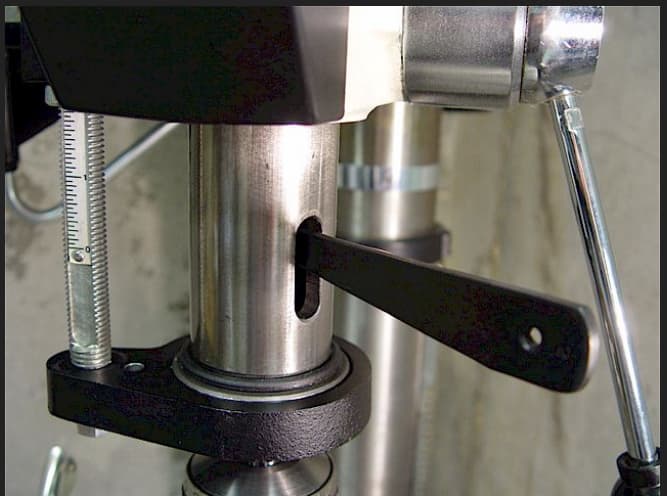
Locate The Chuck
Locating the chuck on a drill press is the first step to remove it safely. The chuck holds the drill bit tightly in place. Knowing exactly where it is helps you work faster and avoid damage.
The chuck is usually at the front end of the drill press spindle. It looks like a small, round clamp. It has three jaws that open and close to grip the drill bit.
Identify The Drill Press Spindle
The spindle is the rotating part of the drill press. It moves up and down during drilling. The chuck is attached to the end of the spindle. Find this part before trying to remove the chuck.
Check For Chuck Key Holes
Most chucks have small holes on the side. These holes hold the chuck key. The key tightens or loosens the jaws. Spotting these holes confirms the chuck location.
Observe The Chuck Size And Shape
Chucks come in different sizes but have a similar shape. They are round and slightly larger than the drill bit. This helps you spot the chuck quickly on the drill press.
Loosen The Chuck
Loosening the chuck is the first step to remove it from a drill press. The chuck holds the drill bit tightly. Loosening it makes it easier to take off. There are two common ways to loosen the chuck. One way uses a chuck key. The other way does not need a chuck key. Both methods are simple and safe.
Using The Chuck Key
Find the chuck key that fits your drill press chuck. Insert the key into the chuck’s hole. Turn the key counterclockwise to loosen the jaws. Keep turning until the jaws open wide. The chuck will feel loose and easy to remove. Never force the chuck off. Use the key gently to avoid damage.
Without A Chuck Key
Some drill presses use a keyless chuck. Hold the chuck firmly with one hand. Turn the chuck counterclockwise with your other hand. Use a cloth for a better grip if needed. Turn until the chuck loosens and opens. This method works well for light tightening. Avoid using tools that might scratch the chuck.
Remove The Chuck
Removing the chuck from a drill press is a simple task. It helps in changing drill bits or cleaning the chuck itself. Knowing how to remove the chuck safely saves time and prevents damage to your tool.
Follow clear steps to remove the chuck easily. Use the right tools and apply the correct method. This guide covers both standard removal and handling a stuck chuck.
Standard Removal Method
First, unplug the drill press for safety. Open the chuck jaws fully by turning the chuck key. Look inside the chuck for a screw. This screw holds the chuck to the spindle.
Use a screwdriver to turn the screw counterclockwise. Remove the screw completely. Hold the chuck firmly and turn it counterclockwise by hand. The chuck will loosen from the spindle thread.
If the chuck is loose, you can unscrew it by hand. If not, use a wrench for extra grip. Keep turning until the chuck comes off.
Dealing With A Stuck Chuck
A stuck chuck is common after long use. Dirt and rust can make it hard to move. Spray a small amount of lubricant around the chuck base. Let it sit for 10 minutes.
Use a wrench or pliers to grip the chuck. Turn the chuck counterclockwise with steady force. Avoid sudden or sharp movements to prevent damage.
If it still won’t move, tap lightly around the chuck with a rubber mallet. This can help loosen rust or dirt. Repeat the lubricant and turning process if needed.

Credit: www.ereplacementparts.com
Clean And Inspect
Cleaning and inspecting the chuck is an important step after removing it from a drill press. Dirt, dust, and metal shavings can build up inside the chuck. This buildup affects how well the chuck holds drill bits. Regular cleaning keeps the chuck working smoothly and extends its life.
Inspection helps find any damage or wear early. Catching problems now can prevent bigger issues later. It also ensures the chuck is safe to use before putting it back on the drill press.
Cleaning The Chuck Thoroughly
Start by removing loose dirt and dust with a dry cloth. Use a small brush to clean inside the jaws and other tight spaces. You can use compressed air to blow out stubborn debris. Avoid using water because it can cause rust. Use a light machine oil to wipe the chuck’s moving parts. This oil keeps the chuck working smoothly.
Inspecting For Wear And Damage
Look carefully at the jaws for cracks or chips. Check if the jaws move freely without sticking. Inspect the threads where the chuck attaches to the drill press. Damaged threads can cause poor fitting or slipping. If you see rust, clean it off and apply oil to protect the metal. Replace the chuck if you find serious damage.
Replace Or Reinstall The Chuck
Replacing or reinstalling the chuck on a drill press is an important step after removing it. A properly installed chuck ensures smooth and safe drilling. This process is simple but requires some care to avoid damage.
Clean The Spindle And Chuck
Start by cleaning the spindle and the inside of the chuck. Use a cloth to remove dirt and metal shavings. Clean parts help the chuck fit tightly and work correctly.
Align The Chuck On The Spindle
Place the chuck carefully onto the spindle. Make sure it fits straight and seats fully. Avoid forcing it to prevent damage to the threads or spindle.
Tighten The Chuck Securely
Use a chuck key or a wrench to tighten the chuck. Turn it clockwise until it is firmly fixed. A loose chuck can cause wobbling and unsafe operation.
Test The Chuck Rotation
Manually rotate the chuck to check for smooth movement. It should spin without wobbling or resistance. If it feels loose or uneven, adjust the fit again.

Credit: www.youtube.com
Frequently Asked Questions
How Do I Safely Remove A Chuck From A Drill Press?
First, unplug the drill press for safety. Use a chuck key to loosen the chuck jaws. Then, unscrew the chuck by turning it counterclockwise. If tight, tap gently with a rubber mallet to loosen it. Always follow the manufacturer’s instructions for your model.
What Tools Are Needed To Remove A Drill Press Chuck?
You will need a chuck key to loosen the jaws and a wrench or rubber mallet for stubborn chucks. Safety gloves are recommended to protect your hands. Having a clean workspace helps prevent losing small parts during removal.
Can A Stuck Chuck Damage The Drill Press?
Yes, forcing a stuck chuck can damage the spindle or threads. Always loosen the chuck gradually and use appropriate tools. Applying penetrating oil can help loosen rusted parts. Avoid using excessive force to prevent costly repairs.
How Do I Prevent The Drill Press Chuck From Sticking?
Regularly clean and lubricate the chuck and spindle. Avoid over-tightening the chuck jaws during use. Store the drill press in a dry environment to prevent rust. Routine maintenance increases the chuck’s lifespan and ensures smooth removal.
Conclusion
Removing the chuck from a drill press is simple with the right steps. Always unplug the machine before starting. Use the correct tools to avoid damage. Loosen the chuck carefully and pull it out steadily. This process helps you maintain your drill press well.
Regular care keeps your tools working longer. Practice these steps to become more confident. Keep safety your top priority during every task. With patience, you can handle this job easily.