

Is your cordless drill losing power too quickly? Before you rush to buy a new one, consider this: you might only need to replace the battery cells.
Knowing how to replace cordless drill battery cells can save you money and extend the life of your favorite tool. In this guide, you’ll learn simple, step-by-step instructions to bring your drill back to full strength. Keep reading, and you’ll discover how easy it is to fix your drill yourself—no special skills required!
Signs Your Battery Needs Replacement
Knowing when your cordless drill battery needs replacement is key to keeping your tools working well. Batteries do not last forever. Signs show up before a full failure. Spotting these signs early saves time and effort. Watch for changes in how your drill performs. These hints help you decide if it’s time to change the battery cells.
Reduced Run Time
The battery drains faster than before. Tasks that once took an hour now take less. Your drill stops often during use. This drop in power shows the battery is weak. It cannot hold a charge like new. Reduced run time means the battery cells wear out.
Overheating Issues
The battery or drill feels hot after short use. Heat is a warning sign. It can damage the battery and tool. Overheating happens when cells inside break down. The battery struggles to deliver power safely. This problem needs quick attention to avoid harm.
Physical Damage
Look for cracks, leaks, or swelling on the battery. Physical damage affects performance and safety. Damaged cells can short circuit or fail suddenly. A battery showing signs of harm must be replaced. Never ignore dents or bulges on your battery pack.
Tools And Materials Required
Replacing cordless drill battery cells requires specific tools and materials. Having the right items ensures the job is safe and effective. Preparation is key to avoid damage and achieve good results.
Safety Gear
Safety gear protects you from electrical shocks and injuries. Use insulated gloves to handle battery cells carefully. Wear safety glasses to protect your eyes from sparks or debris. A mask helps avoid inhaling dust or fumes.
Replacement Cells
Choose replacement cells that match your drill’s battery type. Check voltage and size before buying new cells. Use high-quality cells to keep your drill working well. Avoid cheap or unbranded batteries to prevent problems.
Basic Tools
Basic tools help you open the battery pack and replace cells easily. A small screwdriver set is necessary for screws. Use a soldering iron to connect new cells securely. Wire cutters and pliers make handling wires simpler. A multimeter checks the battery’s voltage and health.
Preparing The Drill For Battery Replacement
Preparing your cordless drill for battery replacement is the first important step. Safety and careful handling protect you and your tool. Follow these simple steps to get ready.
Proper preparation helps avoid damage to the drill or battery pack. It also makes the replacement process smoother and faster.
Power Off And Remove Battery
Always turn off the drill before working on it. Press the power button or switch until the drill is completely off.
Next, detach the battery pack from the drill. Most models have a release button or latch. Press or slide it to remove the battery safely.
Do not force the battery out. Check for any locks or clips holding it in place.
Disassembling The Battery Pack
Place the battery pack on a clean, flat surface. Use a screwdriver to remove the screws holding the pack cover.
Keep the screws in a safe place to avoid losing them. Gently pry the cover open with a plastic tool or your fingers.
Inside, you will see the battery cells connected by wires. Be careful not to damage any wires or components.
Take note of how the cells are arranged and connected. This will help during reassembly and wiring of new cells.
Identifying And Testing Battery Cells
Identifying and testing battery cells is the first step in replacing cordless drill battery cells. This process helps find weak or dead cells that reduce battery life. Each cell must be checked carefully to ensure the drill works well again.
Checking Cell Voltage
Use a multimeter to check the voltage of each cell. A healthy cell usually shows about 3.6 to 3.7 volts. Turn off the battery pack before testing. Touch the multimeter probes to the positive and negative ends of the cell. Write down the voltage reading for each cell. Low voltage cells need more attention or replacement.
Spotting Faulty Cells
Faulty cells often have much lower voltage than good ones. Look for cells with voltage below 3.0 volts. Swollen or damaged cells are also signs of failure. Test each cell’s voltage under load if possible. Weak cells cause the battery to lose power quickly. Replace all faulty cells to restore battery strength.
Removing Old Battery Cells
Removing old battery cells from a cordless drill is a key step in the replacement process. It helps ensure your drill works well with new cells. Careful removal keeps other parts safe and ready for reuse. Follow clear steps to avoid damage and stay safe.
Take your time and prepare the right tools. This makes the job easier and faster. Use safety gear like gloves and glasses. Batteries hold power and need careful handling.
Desoldering Connections
Start by identifying the soldered wires on the battery pack. Heat your soldering iron to a suitable temperature. Gently apply the iron to the solder joint. Melt the solder without touching the cells directly. Use a desoldering pump or wick to remove melted solder. This frees the wires without pulling or tearing.
Work slowly and keep the iron steady. Avoid overheating, which can damage wires or cells. Clear all connections before moving to cell removal.
Safely Extracting Cells
Once wires are free, carefully remove the battery cells. Use a plastic tool or tweezers to avoid short circuits. Do not use metal tools that could create sparks. Check for adhesive or tape holding cells in place. Gently peel or cut these to release the cells.
Handle each cell with care. Place old cells in a safe, non-metal container. This prevents accidents and prepares cells for proper disposal.
Credit: www.familyhandyman.com
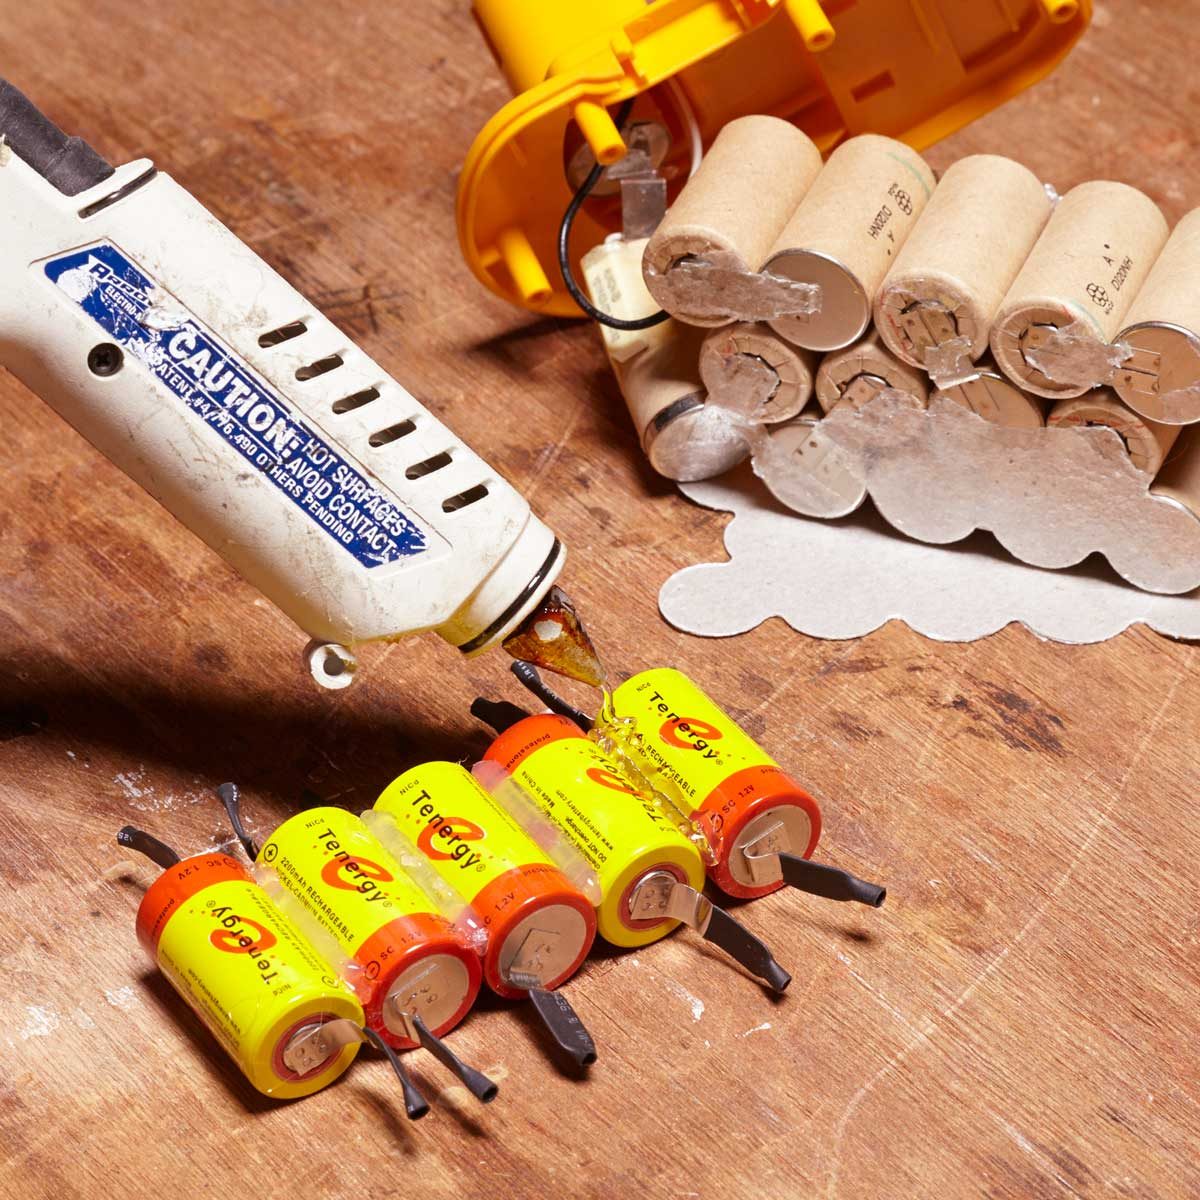
Installing New Battery Cells
Installing new battery cells is a key step in fixing your cordless drill. This part needs care and focus. Proper installation ensures your drill works well and lasts long. Follow each step carefully to avoid damage and get the best results.
Aligning Cells Properly
Place each battery cell in the holder carefully. Make sure the positive and negative ends match the drill’s layout. Incorrect alignment can cause short circuits or poor performance. Keep the cells tight and straight. This helps maintain a strong connection and safety.
Soldering Connections Securely
Use a good soldering iron to join the wires and cells. Heat the wire and the battery tab together. Apply solder smoothly and quickly. Avoid too much heat to protect the battery. Strong solder joints prevent loose connections and power loss. Check all joints before moving on.
Reassembling And Testing The Battery Pack
After replacing the battery cells, reassembling the battery pack is the next step. This part is important for safety and proper function. Take your time to ensure everything fits well and is secure. Testing the battery pack after assembly checks its performance and charge ability. These steps confirm the battery pack works like new.
Sealing The Battery Case
Place the battery cells carefully into the case. Align the connectors so they match perfectly. Close the case tightly to avoid gaps or loose parts. Use screws or clips to secure the case firmly. Check the edges to ensure no openings remain. A well-sealed case protects the cells from dust and moisture. This step helps keep the battery safe and durable.
Charging And Performance Check
Connect the battery pack to the charger and watch the indicator. A good battery should start charging immediately. Let it charge fully before testing the drill. After charging, insert the battery into the drill. Turn on the drill and test its power and runtime. If it runs smoothly, the battery cells are working well. If not, check connections or cell placement again. Testing avoids future problems and ensures reliability.

Credit: www.reddit.com
Tips For Extending Battery Life
Extending the life of your cordless drill battery saves money and time. Good care keeps the battery strong and reliable for longer. Small daily habits can make a big difference in battery health.
Proper Charging Habits
Charge the battery fully before first use. Avoid letting the battery drain completely each time. Partial charging helps keep the cells healthy. Use the charger that came with your drill. Fast chargers may damage the battery over time. Unplug the charger once the battery is full. Do not leave the battery on the charger for days.
Storage Recommendations
Store batteries in a cool, dry place away from direct sun. Heat speeds up battery wear and reduces capacity. If not using the battery for a long time, charge it halfway. Check and recharge the battery every few months. Keep batteries away from metal objects that can cause short circuits. Proper storage keeps batteries ready and safe to use.

Credit: www.youtube.com
Frequently Asked Questions
How Do I Know When To Replace Drill Battery Cells?
Check if your drill’s battery drains quickly or won’t hold charge. Reduced power and overheating also signal replacement time.
Can I Replace Cordless Drill Battery Cells Myself?
Yes, you can replace cells safely by following instructions carefully. Use matching cells and proper tools to avoid damage or injury.
What Type Of Cells Are Used In Cordless Drill Batteries?
Most cordless drills use lithium-ion or nickel-cadmium cells. Always match the original battery’s chemistry for optimal performance and safety.
How Long Does It Take To Replace Drill Battery Cells?
Replacing battery cells usually takes 30 to 60 minutes. Time varies based on your experience and battery type.
Conclusion
Replacing cordless drill battery cells is easier than it seems. Take your time and follow safety steps carefully. Use the right tools and choose good quality cells. Test the battery after replacement to ensure it works well. This simple repair can save money and extend your drill’s life.
Now, your cordless drill is ready for many more projects. Keep your tools in good shape for better results every time.